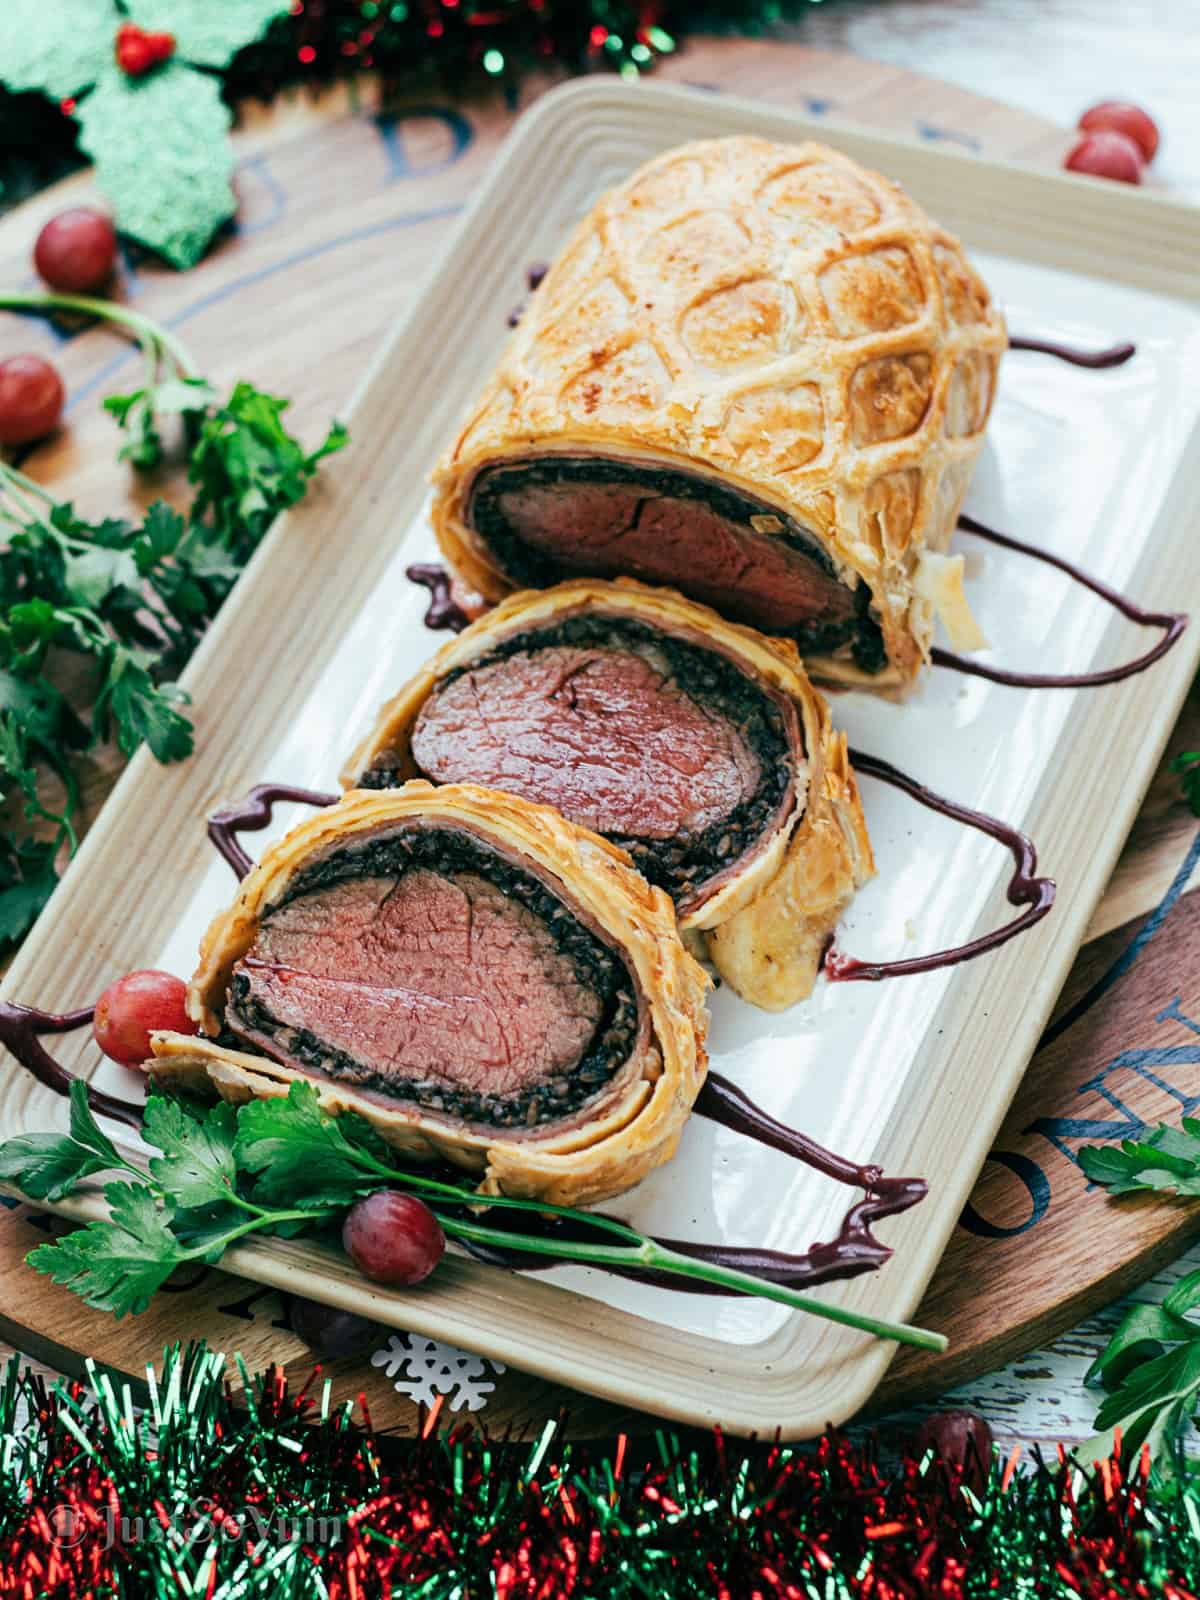
Amazingly Tender Weber Q Beef Wellington
Built to impress and a show stopper at Christmas gatherings. This Weber Q Beef wellington recipe is so juicy and tender you won’t want to stop at one slice.
So, you’ve decided to have a crack at what is believed to be one of the most intimidating recipes to tackle. Congratulations!
And I assure you there is no need for panic because making a Beef Wellington is easier than you think.
I know this because I mastered mine in one shot.
What I love most about this recipe is it can be made ahead. So prep your Welly the day before, ready for your special occasion.
Let’s be honest a Beef Wellington is not a cheap recipe to create, so it’s super important to get the job done the first time around, right!
Don’t worry, because I’ll have your back every step of the way.
So all that’s left to do is grab yourself a cup of tea or coffee and settle in.
Because this will be the most detailed Beef Wellington recipe on the internet.
What is the best cut of meat for a Weber Q Beef Wellington?
A Beef Wellington is a dish saved for the most important occasions. So the best cut of beef must be used.
Bring on the beef tenderloin (eye fillet), the juiciest and most tender part of the cow.
Cut straight from the back, the tenderloin has very little marbling and fat, making it the cut of choice for a Wellington.
We’ll be using only the centre cut portion of the tenderloin for this recipe.
Power Tip: When asking your local butcher for a beef tenderloin (eye fillet), make sure to get the whole backstrap and cut it yourself. It’s slightly more expensive, but you can repurpose the offcuts to make fillet mignon or casseroles later.
Ingredients you’ll need to make a beef Wellington
I have some optional stages during the recipe, such as making crepes and adding whiskey to the duxelles.
Feel free to skip these ingredients as they aren’t essential.
Wellington
- 650g beef tenderloin (eye fillet) centre cut 22cm in length
- 2 tbsp dijon mustard or English mustard
- 3 tbsp canola oil (high heat for searing the tenderloin).
- salt & pepper to taste
- 4 puff pastry sheets (Aussies will know puff pastry come super small here)
- 6-8 slices prosciutto
Duxelles
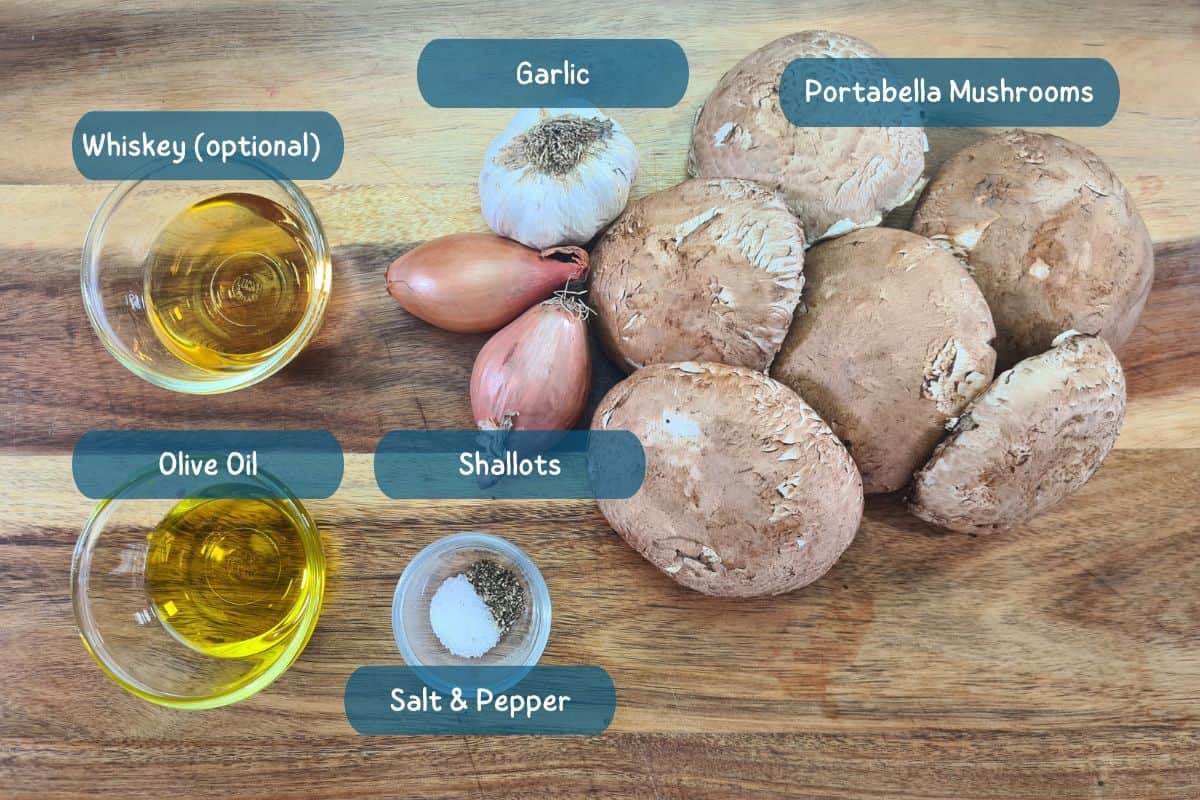
Duxelles is a French term to describe a savoury mushroom-like paste added to Beef Wellington or other luxurious dishes.
- 700g portabella mushrooms or a mixture of shitake and oyster mushrooms
- 2 shallots
- 3 garlic cloves
- 2 thyme sprigs (leaves only)
- 2 tbsp olive oil
- salt & pepper to taste
- 3 tbsp whiskey (optional)
Crepe (optional)
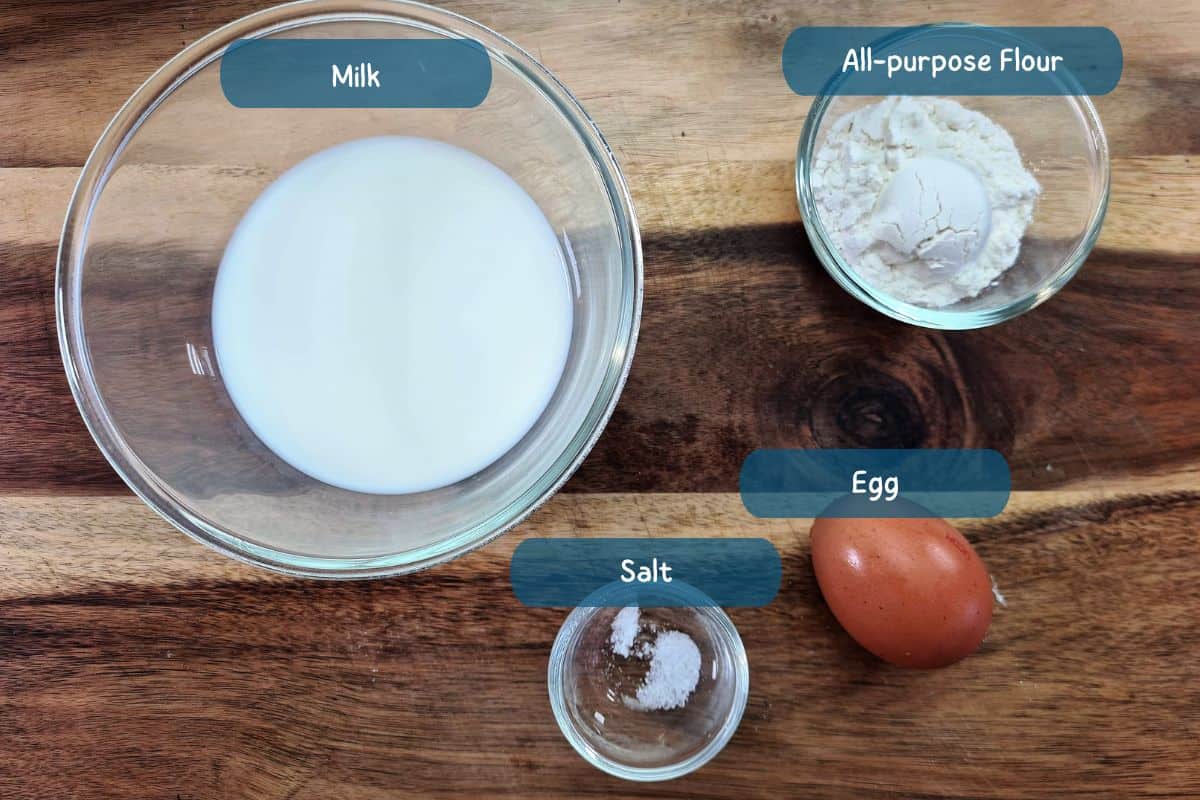
Making crepes is not crucial to a Weber Q Beef Wellington. But what it does is help retain a small amount of liquid and hold everything together.
- 3 1/2 tbsp plain/all-purpose flour
- 140ml milk
- 1 egg
- pinch of salt
Egg Wash
- 2 egg yolks
- 1 tbsp water
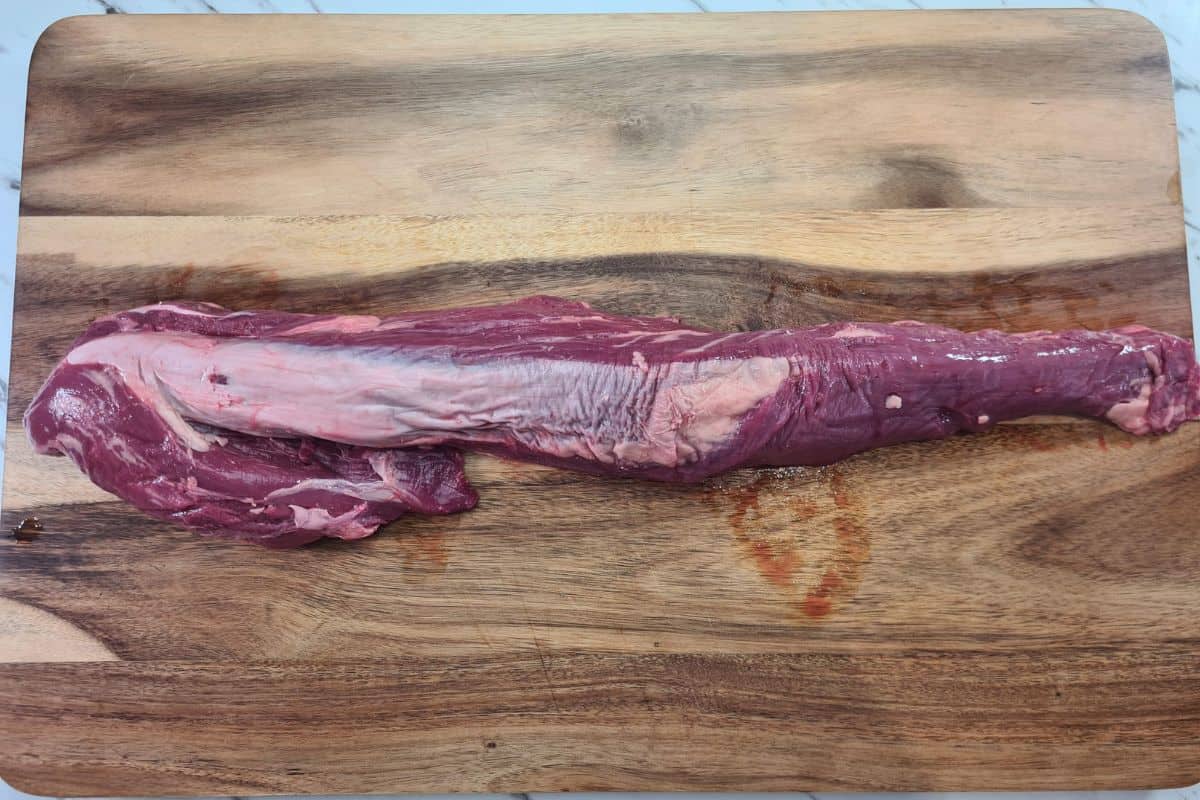
How to prepare beef tenderloin? – Step 1
I will assume you purchased the entire beef tenderloin for this recipe and need to do some preparation before searing off the beef.
Firstly, layout your tenderloin. What we are looking for is the centre part.
Look for the most tubular piece and slice both ends off using a sharp knife.
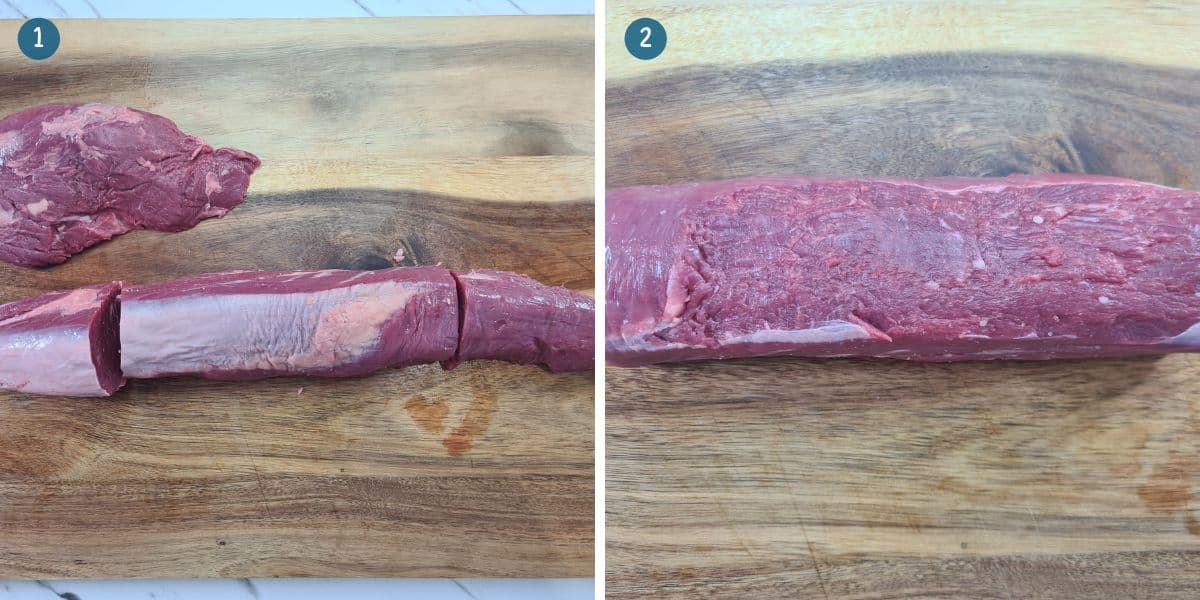
You should end up with a perfect tube around 22cm in length and even on both ends. That’s what we call a centre cut beef tenderloin.
The approximate weight should be 650g (1.4lb) and 6-7 cm thick.
Remove any silver skin (membrane) and cut off any thick pieces of fat from the exterior of the beef.
Try to keep the beef even when cutting, don’t cut too deeply.
Power Tip: It’s incredibly important that centre cut beef tenderloin is tubular in shape. This ensures that the Wellington cooks evenly from end to end.
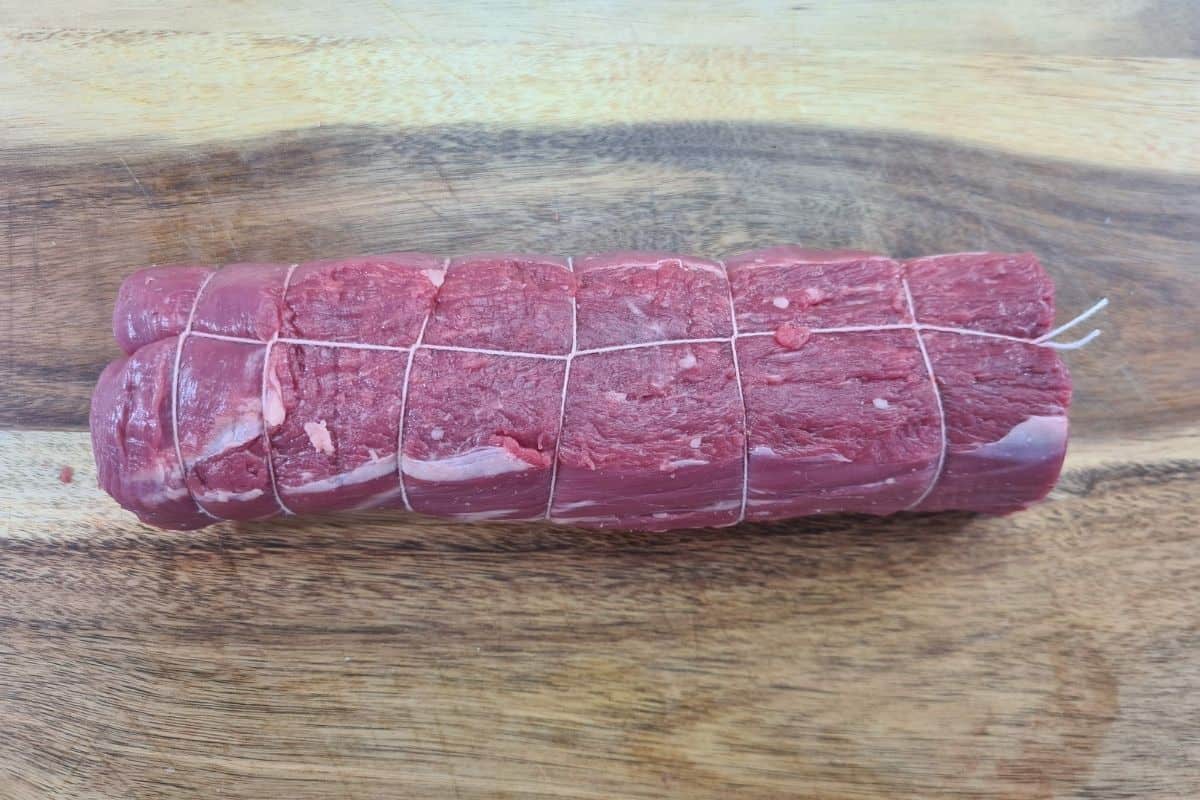
Suppose you’re not cooking Beef Wellington on the day you purchased the meat.
In that case, I highly advise you to tie butchers string around the tenderloin.
This way, the meat will hold its shape in the fridge until your ready for cooking.
Just remember to bring the beef up to room temperature before searing.
How to prepare beef tenderloin? Step 2 – Searing the beef
If you tied butcher’s string around the meat, then it’s time to cut it off.
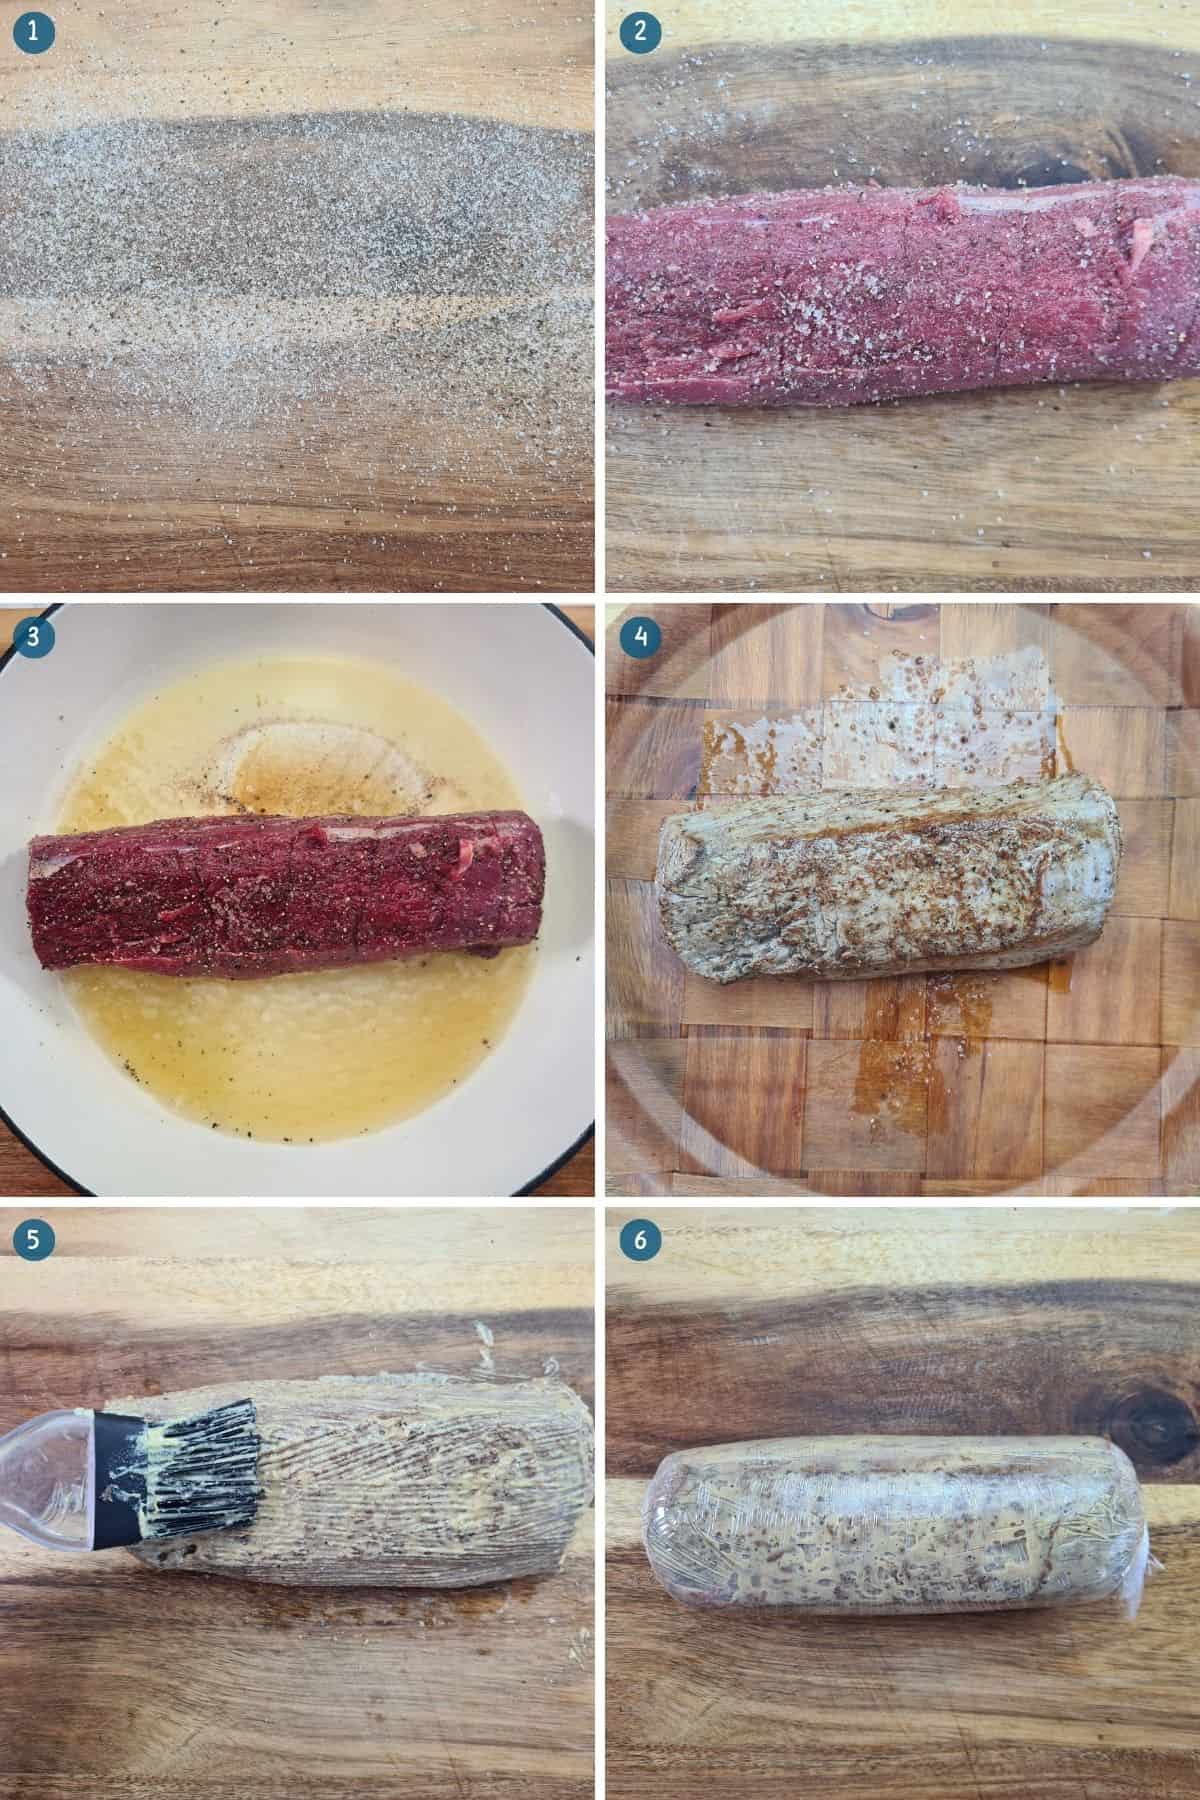
Spread lots of sea salt & freshly ground black pepper onto a cutting board and place the beef tenderloin on top.
Roll the beef around the salt and pepper, and don’t forget to season the ends as well. They need some love too!
Preferably in a cast iron pan, drizzle 3 tbsp of canola oil or any high smoking oil. Then turn the heat up to medium-high.
Wait until the pan generates a lot of smoke, then carefully drop the beef into the pan.
Sear on all sides for up to 1 to 1 1/2 minutes total. In other words, don’t leave the beef in the pan for any longer.
And make sure to give the ends a quick sear as well.
Power Tip: Searing the beef is one of the most crucial steps to creating the perfect Welly. If it’s been in the pan too long, you risk overcooking the meat. And the last thing you want is to serve an overcooked Beef Wellington.
After searing has been done, place the beef onto a sheet of paper towel to cool and brush dijon mustard over the surface.
Make sure to do this step while it’s still hot, so the meat absorbs the mustard.
Then wrap the meat in plastic wrap, pinching the plastic on both ends and roll the beef forwards until it’s tightly wrapped.
This will help the beef to continue holding its shape.
Then place into the fridge to cool for 30 minutes to 1 hour.
How to make duxelles for a Beef Wellington? – Step 1
Don’t let the name intimidate you. Making duxelles is super easy.
Mushrooms retain 90% of their water. So to stop the bottom from falling out of our Weber Q Beef Wellington, all of that water will need to be cooked out.
When chopping down our choice of mushrooms, we will be dicing them super small.
Now, you can do this one of two ways. Using a blender or going the slow but more effective route.
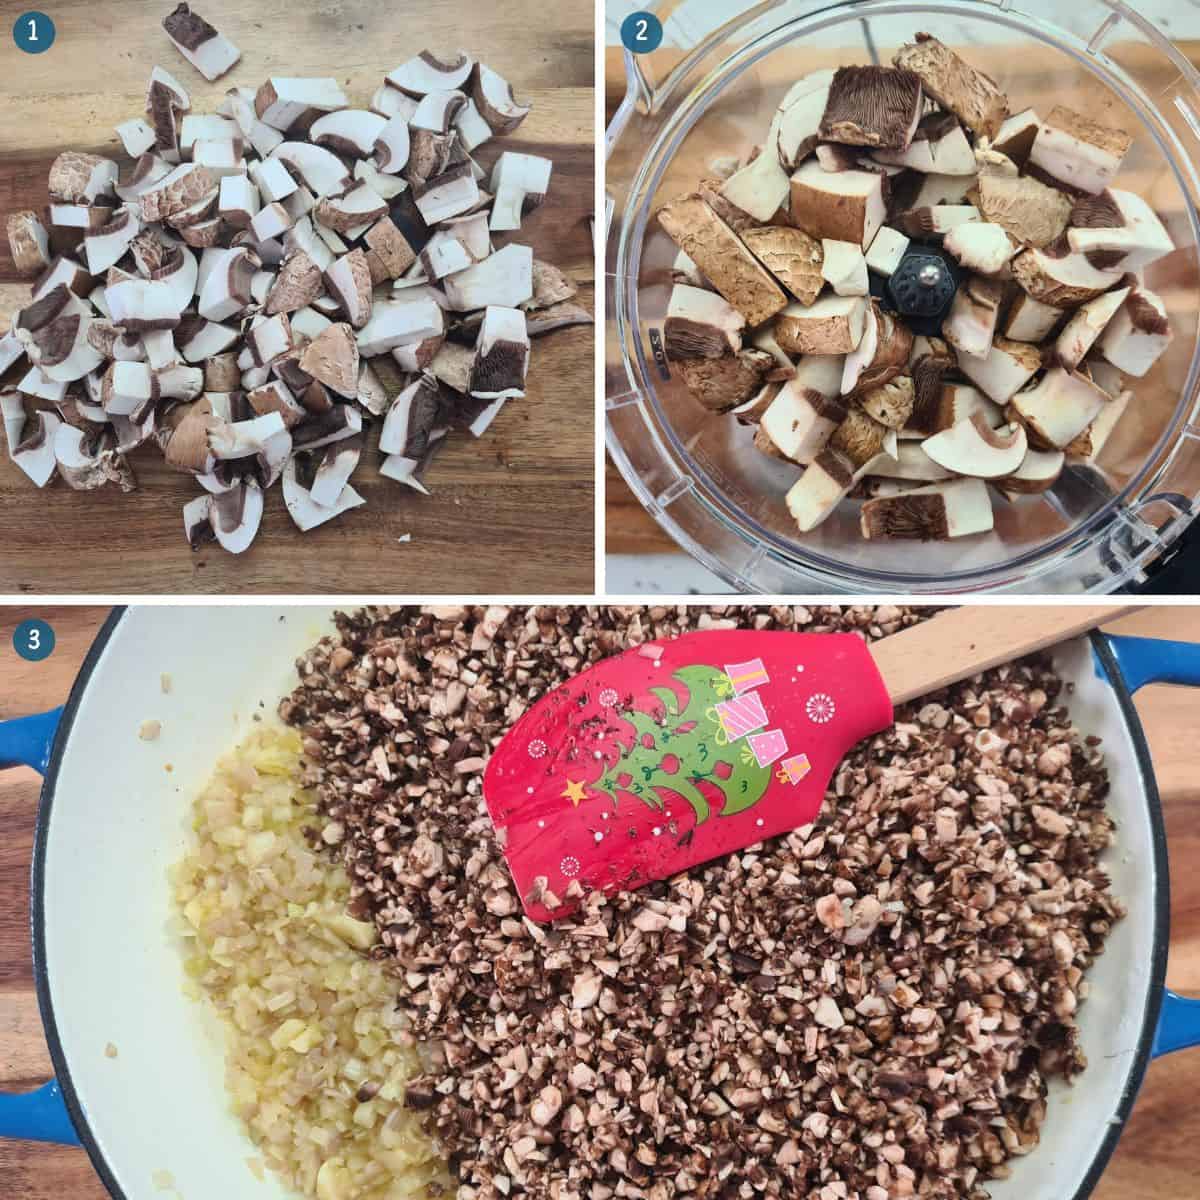
The blender method: Using a knife, chop the mushrooms down to a smaller size to fit your blender.
Don’t overstuff your blender with mushrooms, or they won’t chop evenly.
Pulse the mushrooms until they are super small. If the mushrooms have turned into a paste, then you have pulsed too much.
Sadly, this means you will need more mushrooms and will have to try again.
That’s why I use the Manuel method. It’s slower but much more reliable.
Dicing mushrooms by hand: If you’ve ever diced an onion, that’s the size we are going for.
Dice the mushrooms in batches. This way, you will have consistency for the duxelles.
Continue dicing the mushrooms until you have approximately 600g-700g.
Dice 2 shallots and add to a cold deep pan. Use a garlic crusher to add 3-4 fresh garlic cloves to the same pan.
How to make duxelles for a Beef Wellington? – Step 2
Add 2 tbsp of olive oil to the pan. Over medium heat, saute the onion and garlic until the onion is translucent, not brown.
Next, add the diced mushrooms and season with salt and pepper.
Add the leaves from two sprigs of thyme, then optionally add 3 tbsp of your favourite whiskey.
After the first 2-3 minutes, you will see the mushrooms losing their water.
Continue stirring the duxelles until all of the liquid is cooked out.
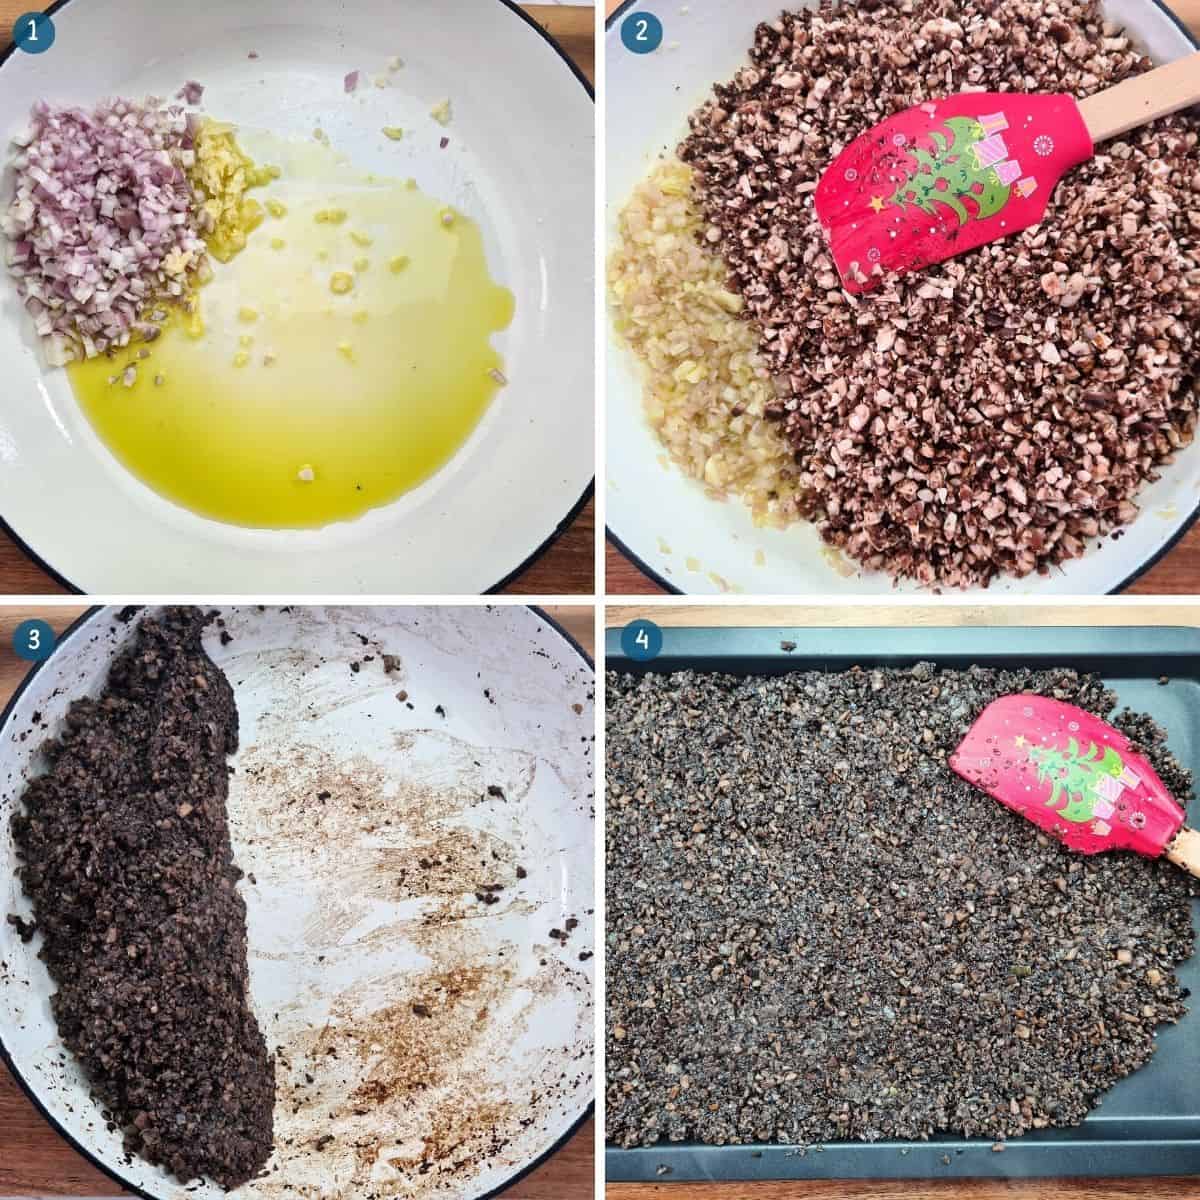
Power Tip: Push the duxelles over to one side of the pan and look at the bottom. If you still see bubbles, there is still liquid in the pan.
The duxelles should only take 10-12 minutes to remove any liquid from the pan.
Next, lay the duxelles flat onto a baking tray and press it down firmly. This will also help to reduce any stubborn liquid that’s left behind.
Your duxelles should look very similar to a paste.
Then place into the fridge to cool.
How to make crepes? – optional step
Making crepes is optional and is by no means an essential step to making a Weber Q Beef Wellington.
I found by using crepes, my Wellington held together, and the liquid stayed inside.
Although that is the purpose of the duxelles and prosciutto.
Whisk 3 1/2 tbsp of all-purpose flour, 140ml of milk, and one egg with a pinch of salt in a medium-sized bowl.
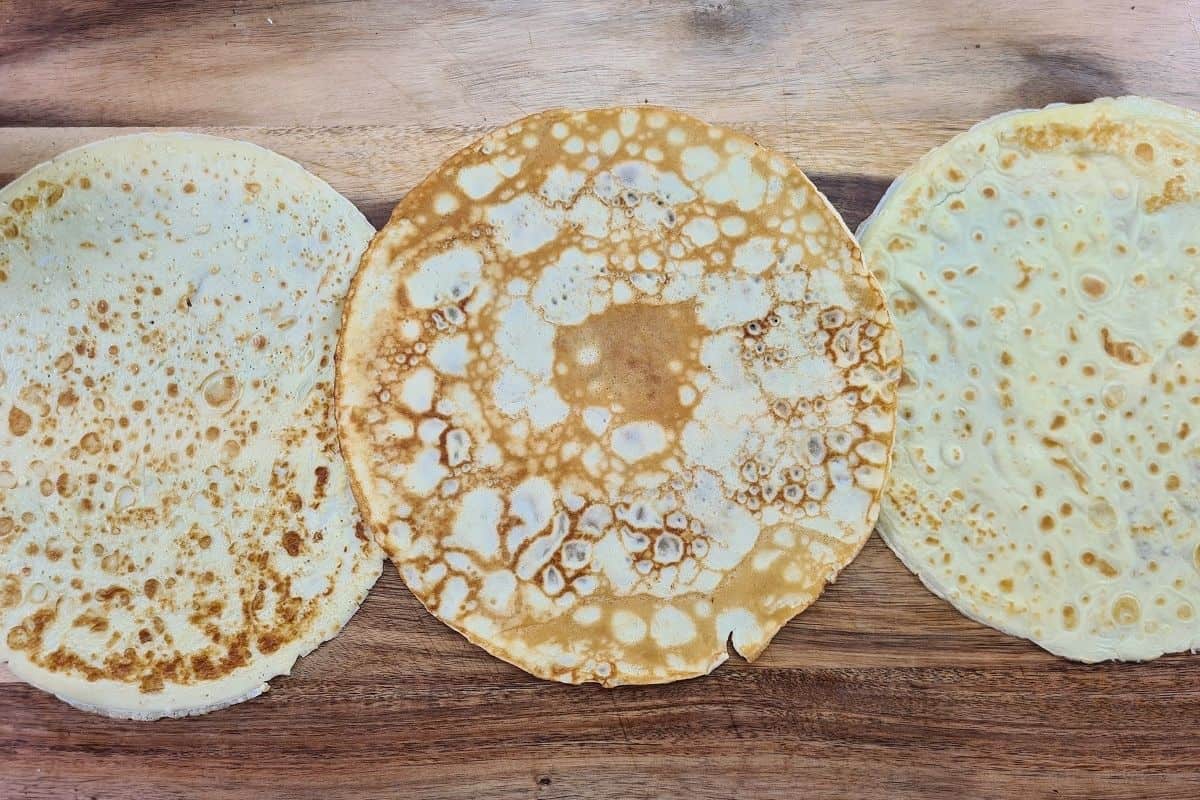
Then, pre-heat a 10inch pan with a tiny amount of butter over medium heat. Just enough to coat the bottom of the pan.
Pour batter into the centre of the pan and swirl the batter around until the batter reaches the edges.
Let that cook for 1-2 minutes until the batter has set, then flip the crepe and cook for a further 45 seconds to a minute.
Make 2-3 crepes and set them aside to cool.
Crepes done!
Assembling a Beef Wellington – Stage 1
Yay! We are finally beginning to assemble our Wellington.
Layout a large sheet of plastic wrap onto your kitchen counter.
And check to see if you have enough width by laying the beef onto the plastic.
You need enough plastic on both ends to pinch and roll the meat.
Overlap a second sheet of plastic wrap if needed.
Then lay 2 crepes vertically and overlap them.
Place the beef on the base of the crepe and carefully check if there is enough to completely encase it.
Don’t worry too much about the edges.
If you’re sure the Wellington will fit, then from the base of the crepe, begin laying prosciutto vertically overlapping each piece from end to end.
6-7 pieces of prosciutto should be more than enough.
Check one last time using the beef to ensure that the prosciutto will be fully encased.
Add more prosciutto if required.
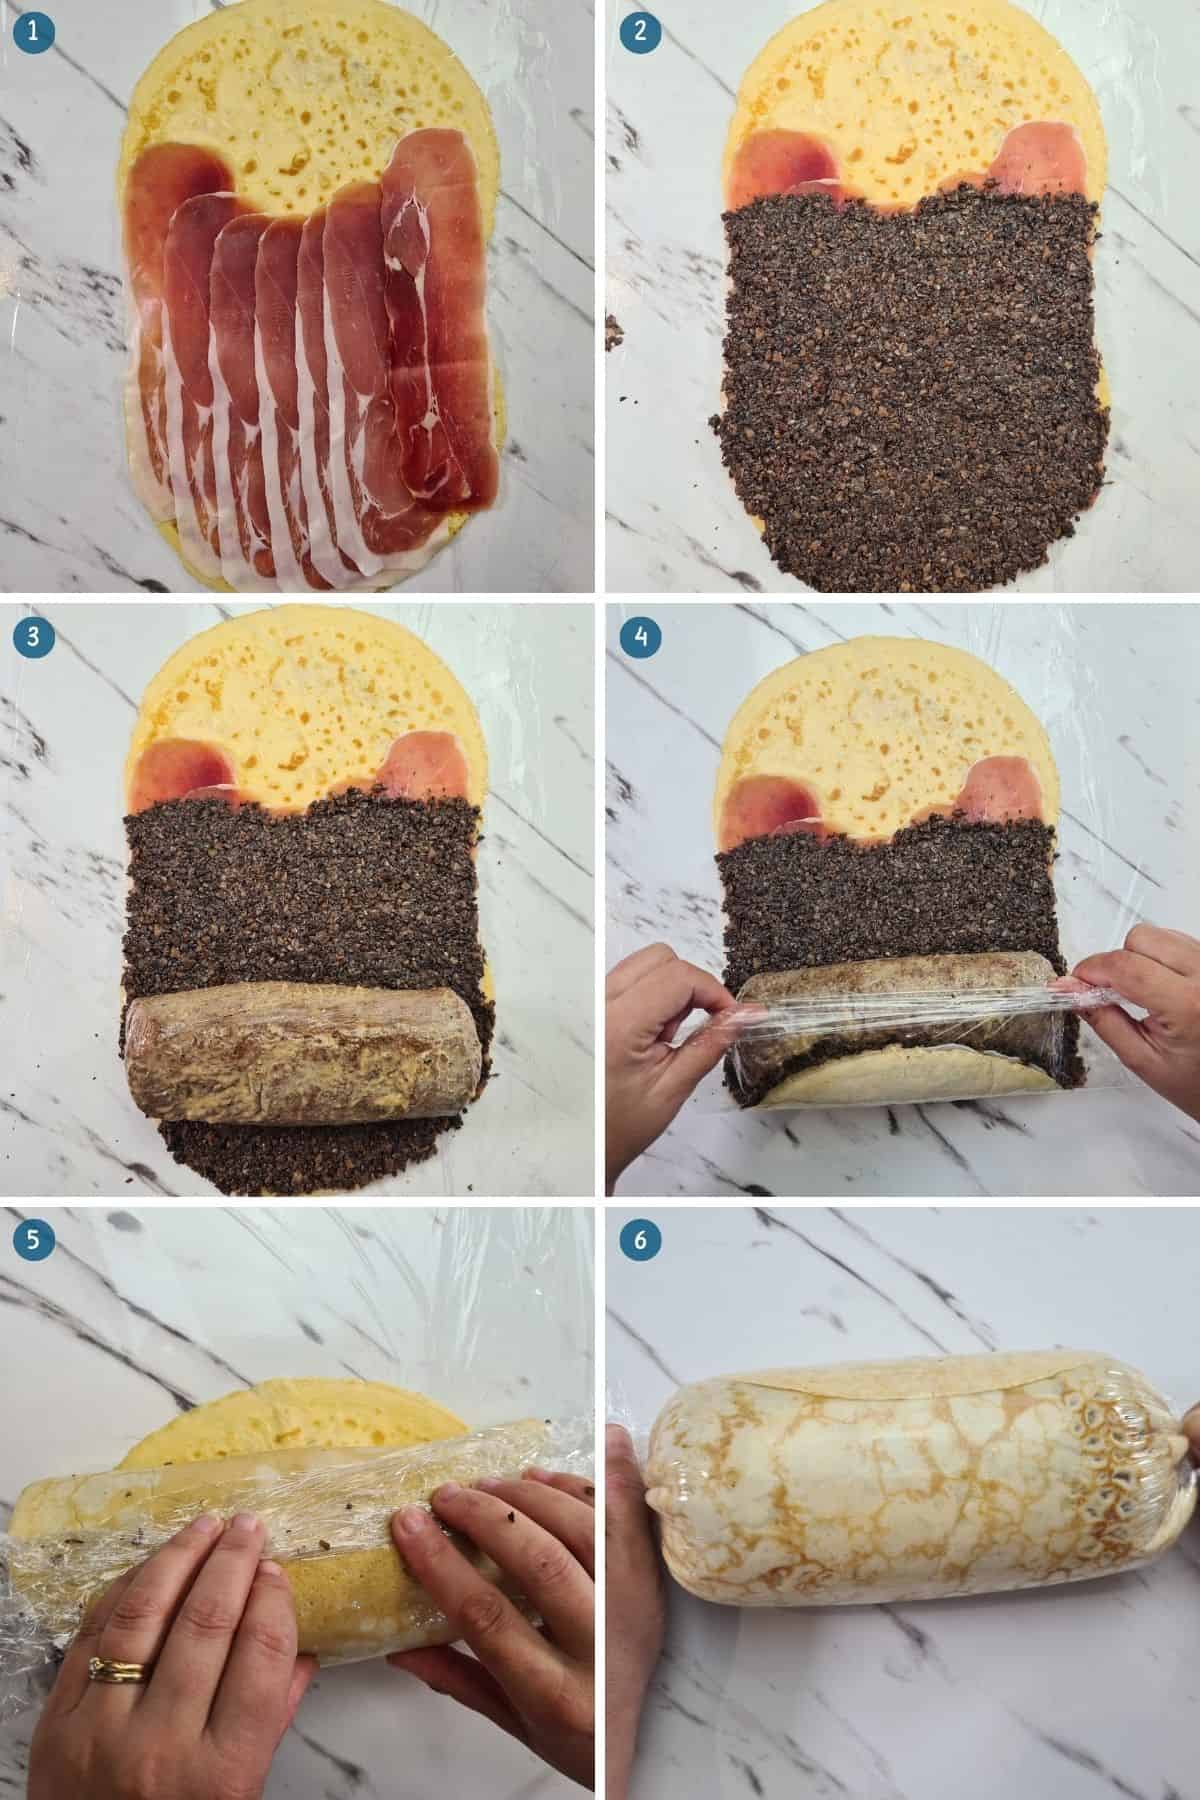
Lastly, we need to begin spreading our duxelles over the top of the prosciutto.
Using a spoon or spatula, begin heaping your duxelles onto the centre of the prosciutto.
Evenly spread the duxelles out and flatten until the prosciutto is fully covered.
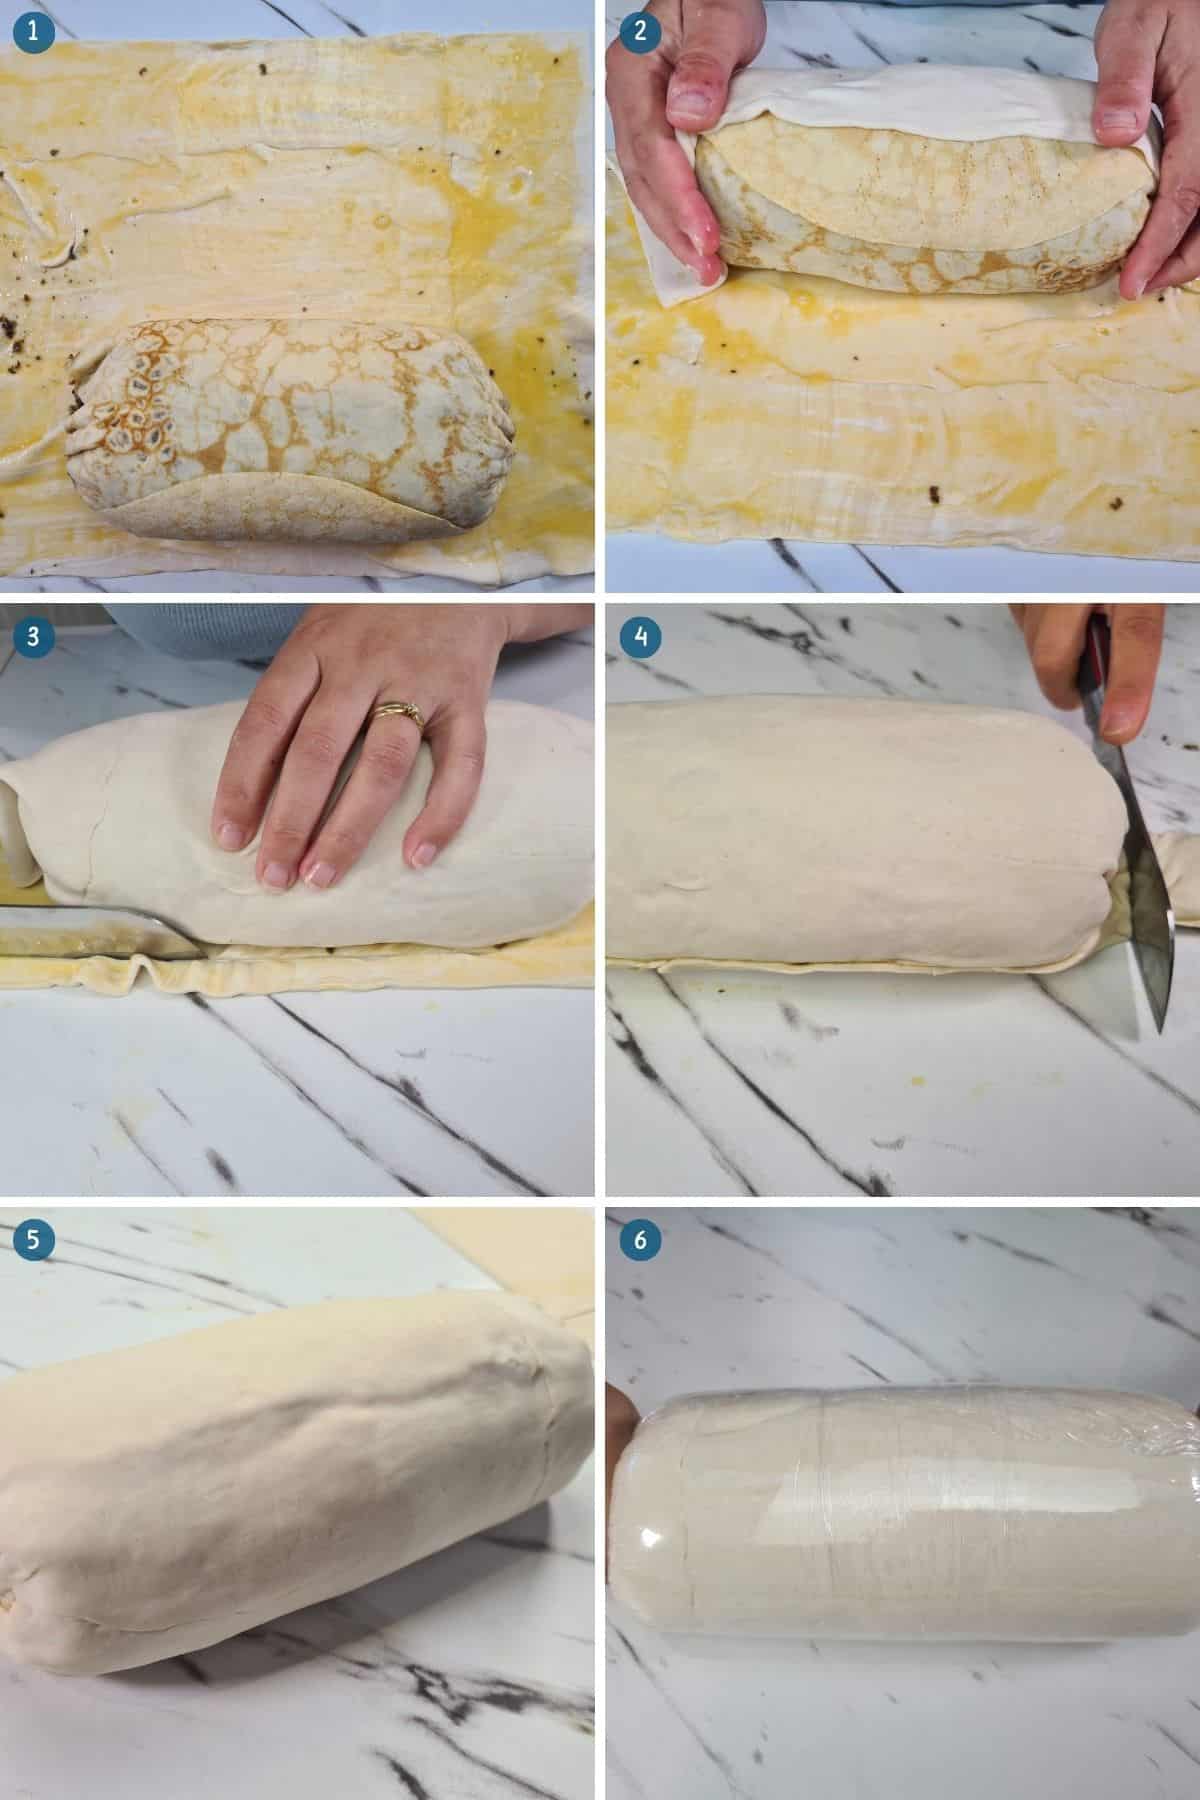
The next stage is crucial to Beef Wellington, and you will need to be patient.
Go slow and steady, and try not to panic.
Place the beef onto the base of the crepe and fold over a small amount of plastic wrap to act as a handle.
Then slowly and carefully begin rolling until the two crepes meet and fold any excess crepe without tucking the plastic wrap.
Then simply cut off any excess plastic wrap.
Power Tip: It’s crucial not to tuck the plastic wrap, as it can get caught in the crepe. Pinch the ends of the plastic and twist, then simply roll the meat until it’s nice and tight.
Place back in the fridge to set and chill for 1 hour.
Stage one of our Wellington is complete!
If you’re not using crepes in my recipe, then simply place the prosciutto onto the plastic wrap directly and follow the same instructions.
Assembling a Beef Wellington – Stage 2
The assembly of your first Beef Wellington is almost complete.
Now all that’s left to do is our pastry.
Make a simple egg wash whisking 2 egg yolks with 1 tbsp of water.
Sadly, in Australia, pastry options are not great. Our pastry is square and small. So some doctoring will be required.
To fully encase your Wellington, brush on the egg wash where you want to join the pieces. Then use a rolling pin to seal the pieces of pastry together.
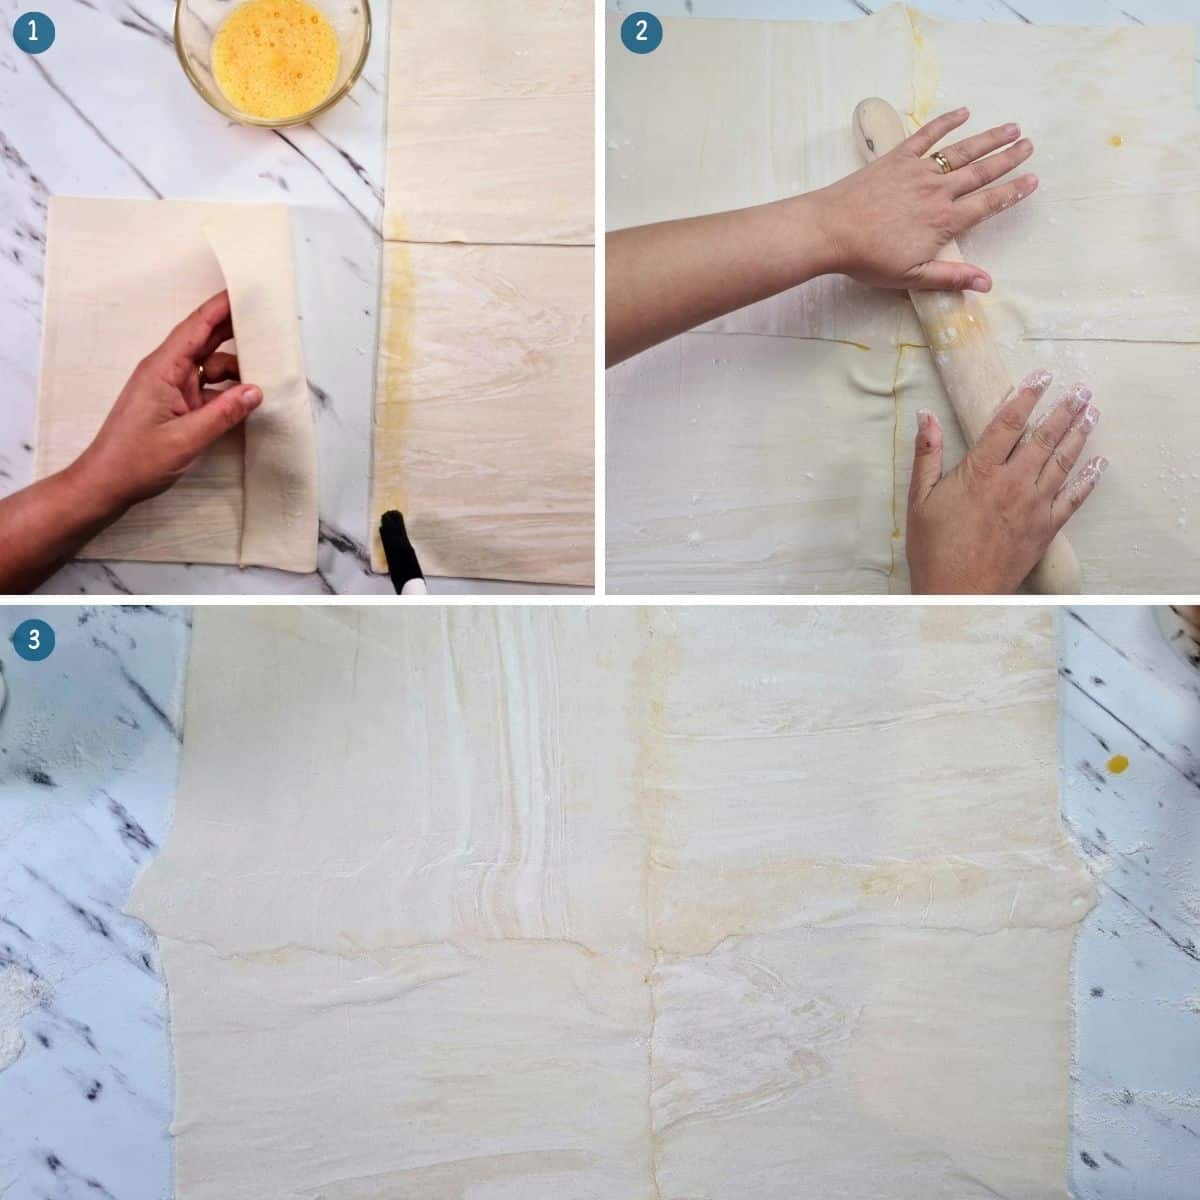
Power Tip: If pastry gets too warm, it will stick to everything. Add a liberal amount of flour to your work surface to avoid sticking. Try to only work with pastry when it’s cold.
Spread a small amount of flour onto the surface of your pastry and kitchen counter and spread it using your hands.
Then lay down your sheet/s of pastry.
Remove the Beef Wellington from the fridge and carefully unravel the plastic wrap.
Place the meat onto the base of the pastry and begin rolling just like you did previously.
Only roll the pastry until it meets the other end and slightly overlaps.
Don’t tuck the pastry underneath. Simply pinch and press the ends together from underneath.
Pinch the pastry together on the sides and again cut off any excess.
What you’re looking for is a completely encased Beef Wellington.
Then place the Wellington onto enough plastic wrap and roll it similarly as you did earlier, making sure it’s nice and tight.
Place back into the fridge to chill for 1 hour or overnight.
And that’s it! You have made what I hope to be a successful Beef Wellington.
How to decorate a Beef Wellington? – Optional Steps
You could just bake your Beef Wellington now and be done with it.
But what is a Beef Wellington without decoration?
It’s also a celebration of all that hard work you’ve done. You’re going to want to make an impression with your guests. Am I right?
So why not go the extra mile, your Wellington will look fabulous, and your guests won’t believe you did all of this yourself.
There are a few ways you can decorate your Wellington.
- Brush egg wash onto the top, sides and ends of the Wellington and score shapes into the pastry using the back of a knife.
- Cut any excess pastry into strips and lay a criss-cross pattern.
- Use a crinkled pastry cutter wheel and create leaves or other patterns.
- Go all out and create a lattice using a lattice pastry cutter.
Just remember before doing any decorations to brush egg wash onto the Wellington before laying any decorations.
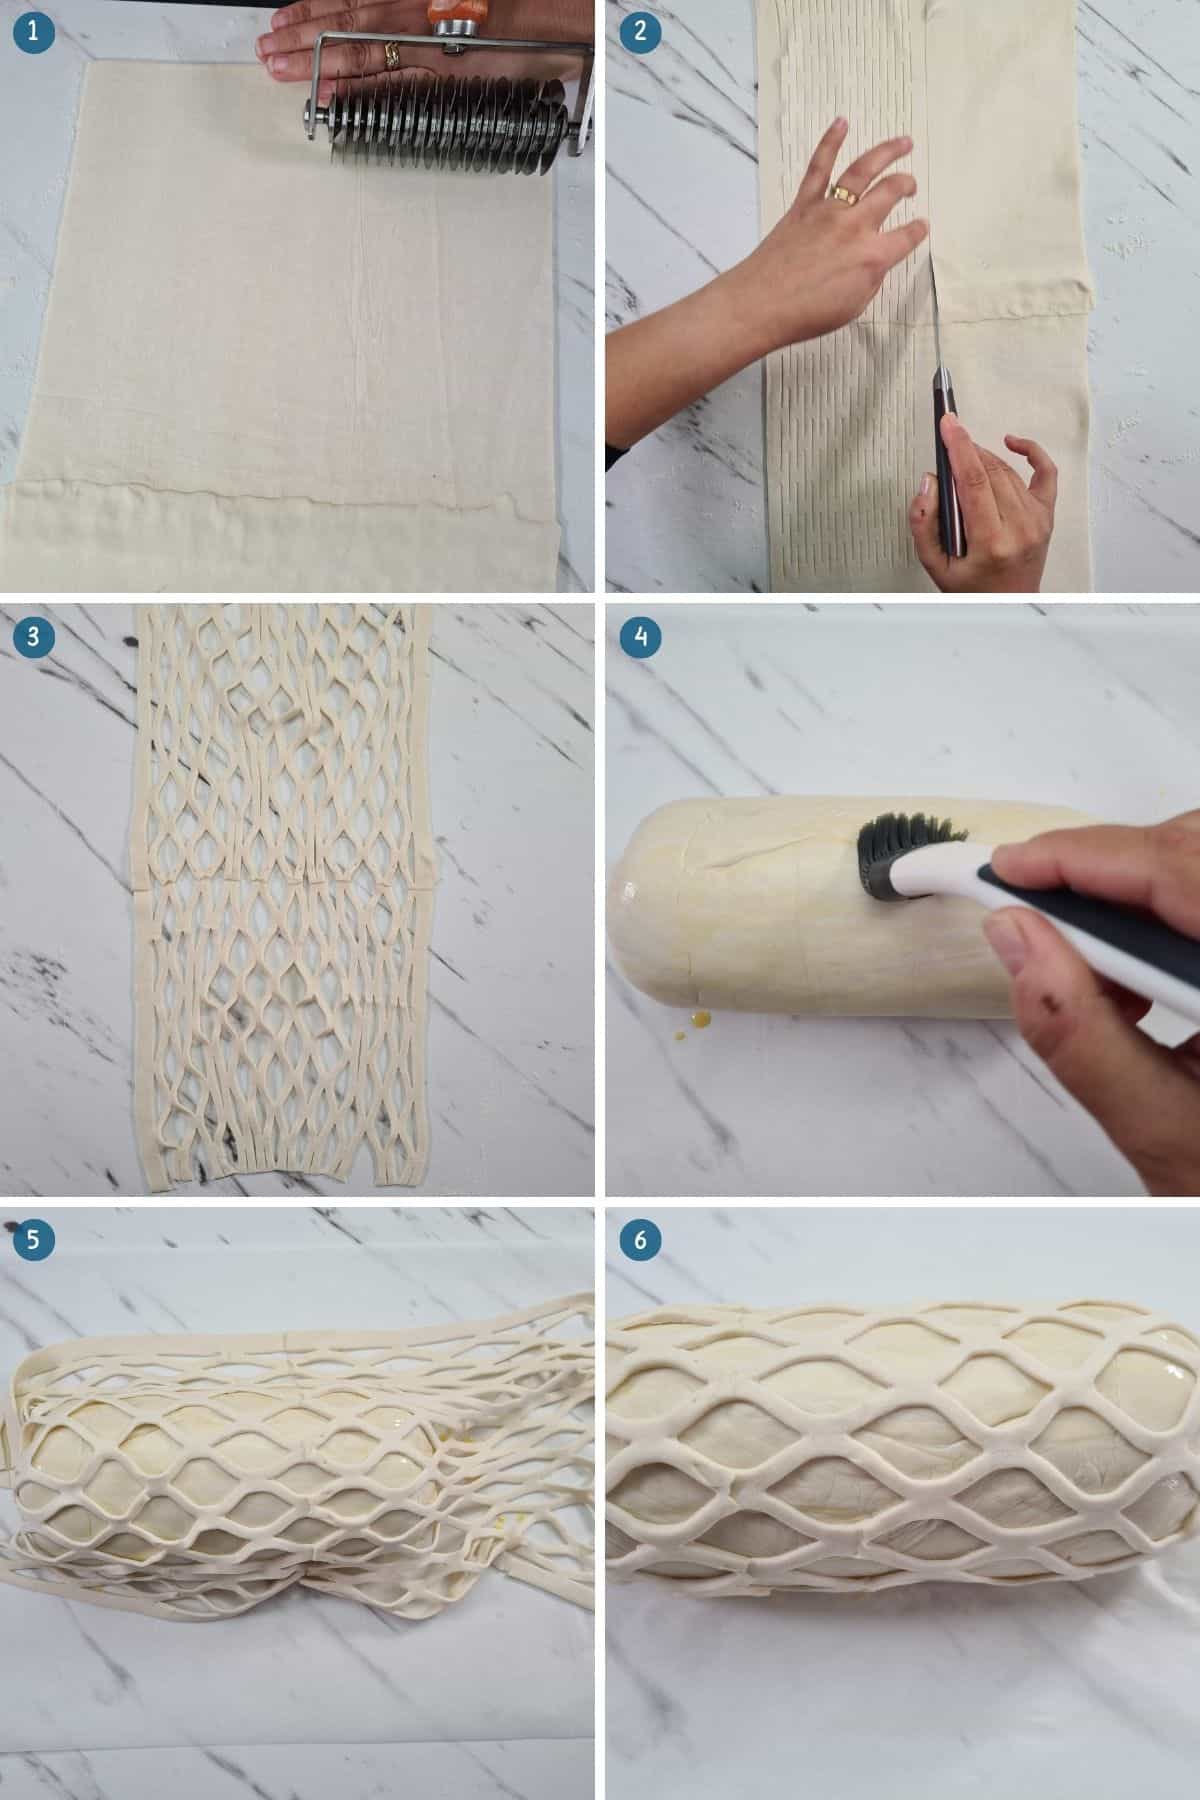
If your plan is to go all out and create a lattice, begin firmly rolling the lattice cutter from the base of the pastry to the end, leaving an edge on both sides.
Carefully fan the lattice out and drape it over the top of the Wellington.
Make sure to cut off any excess at the base and sides and, using your fingers adhere the lattice to the egg wash.
Brush more egg wash onto your decorations/lattice and finally sprinkle sea salt flakes over the top and sides.
The salt will give the Wellington a nice appearance and help make the pastry a little extra crispy.
And it just looks cool!
Pop your beautiful new Wellington into the fridge to chill while you pre-heat your Weber Q
And that’s it. Your Weber Q Beef Wellington is ready for baking.
How to bake a Beef Wellington in a Weber Q?
You’ve accomplished so much, and so many things have had to go right by this stage. Congratulations!
Now it’s time to pre-heat your Weber Q.
Place a convection tray and trivet onto your grill.
Baby Q and Medium: Turn the gas control knob to the START/HIGH position and fire up your Weber Q.
Close the lid and pre-heat for 10 minutes.
Family Q: Turn both gas control knobs to the START/HIGH position and fire up your Weber Q.
Close the lid and pre-heat for 10 minutes.
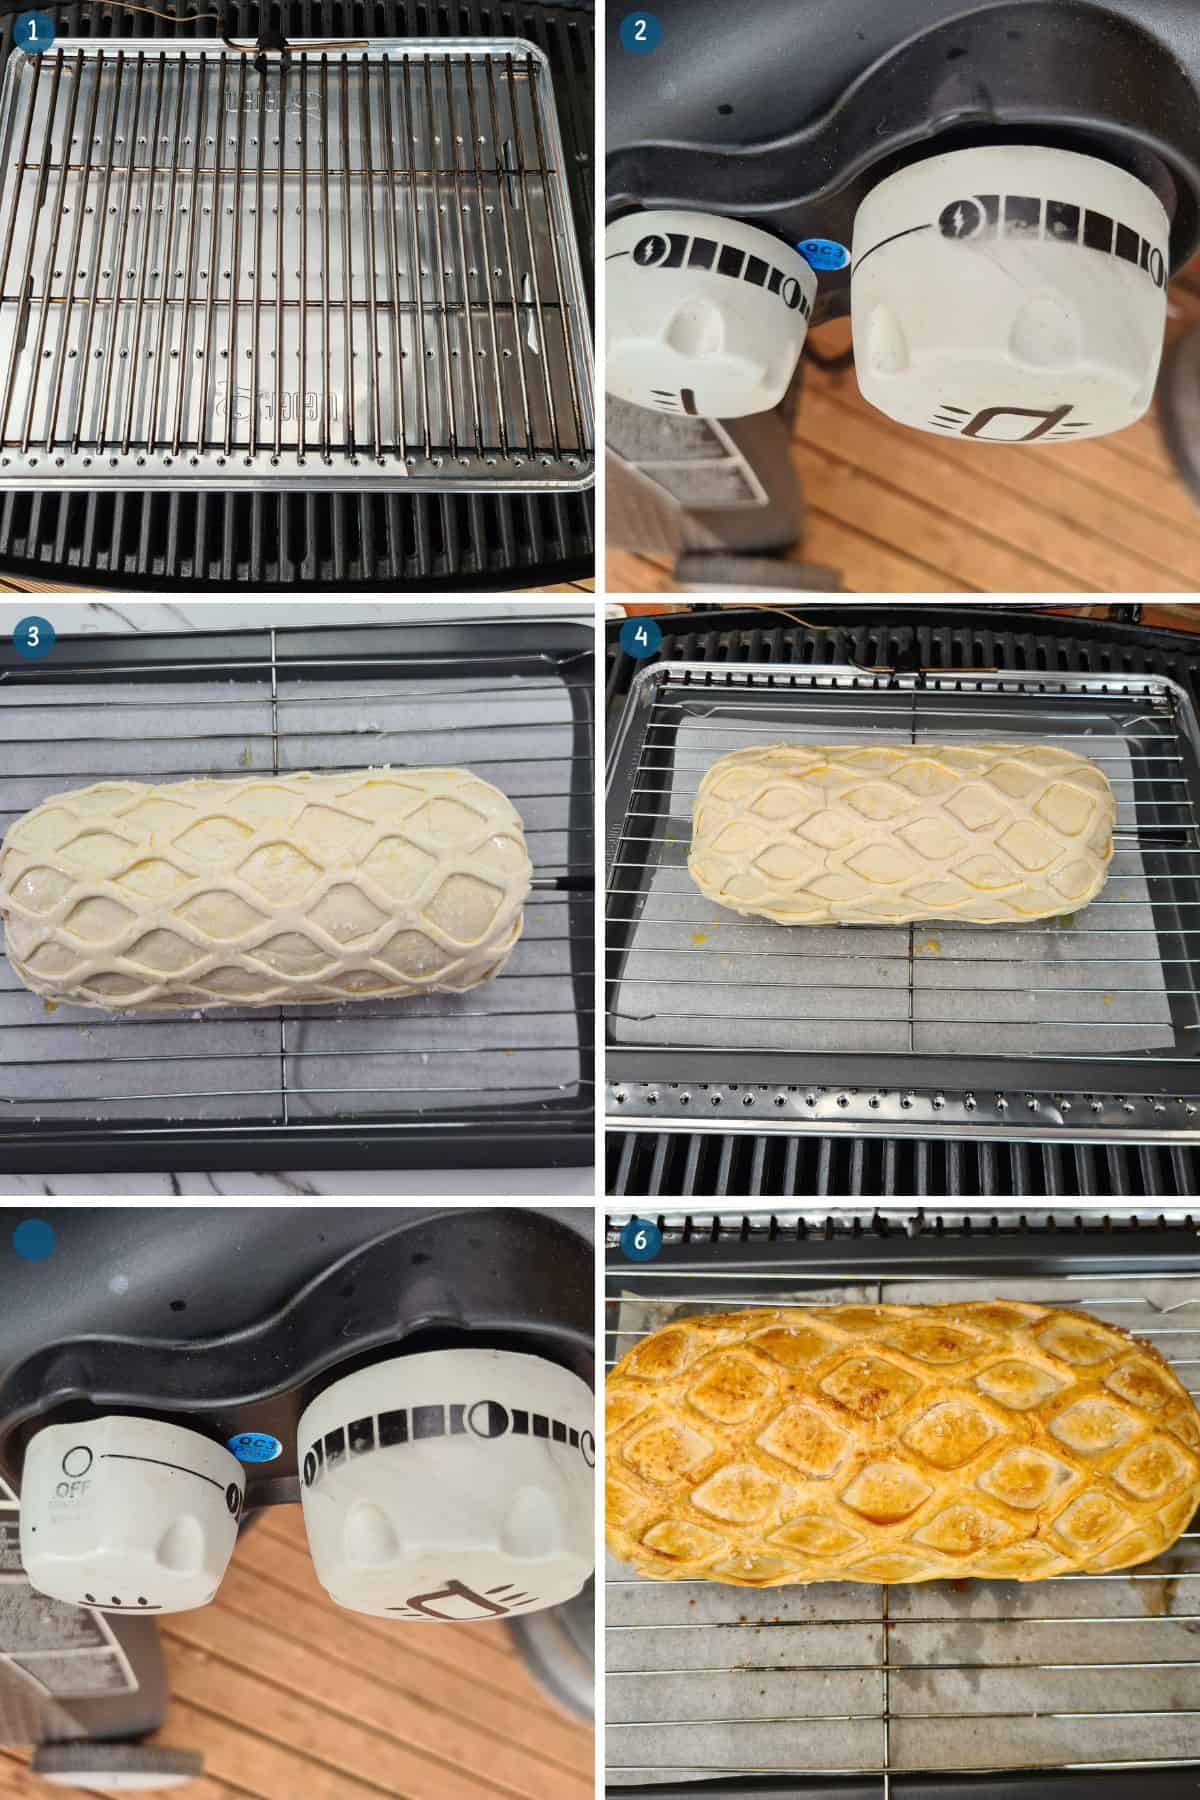
Place the Wellington onto a baking tray lined with baking paper, then quickly pop the Wellington onto the centre of the trivet and close the lid.
Turn the gas control knob down to the middle position or 1 to 2 notches above medium.
And close the lid.
Family Q: Turn the small gas control to the off position and the large gas control knob down to the middle position or 1 to 2 notches above medium.
Power Tip: As you can see by the photos, I baked my Wellington on a wire rack. Although mine looks great, I did have a slightly soggy bottom. I don’t recommend doing this.
Try to maintain the temperature of your Weber Q between 200°C (390°F) 220°C and 430°F) at all times. But closer to 200°C (390°F) is ideal.
Bake your Weber Q Beef Wellington until the pastry has puffed and golden brown, or 40-50 minutes.
If using a wireless meat thermometer, remove your Wellington once the internal temperature reaches 44°C (110°F) for rare or 48°C (120°F) for Medium-rare.
Don’t let the temperature go beyond medium-rare, or the Wellington will become difficult to cut and tough to eat.
Let the Wellington rest for 10 minutes uncovered.
Don’t skip this step. The juices must run back into the beef. Or your pastry will become soggy.
While resting, the internal temperature will rise another 10°C, bringing the Wellington to a rare or medium-rare.
When well-rested, carefully slice using a sharp knife and serve.
Can I use a meat thermometer when baking a Beef Wellington?
Yes, you can, and I wouldn’t do it any other way.
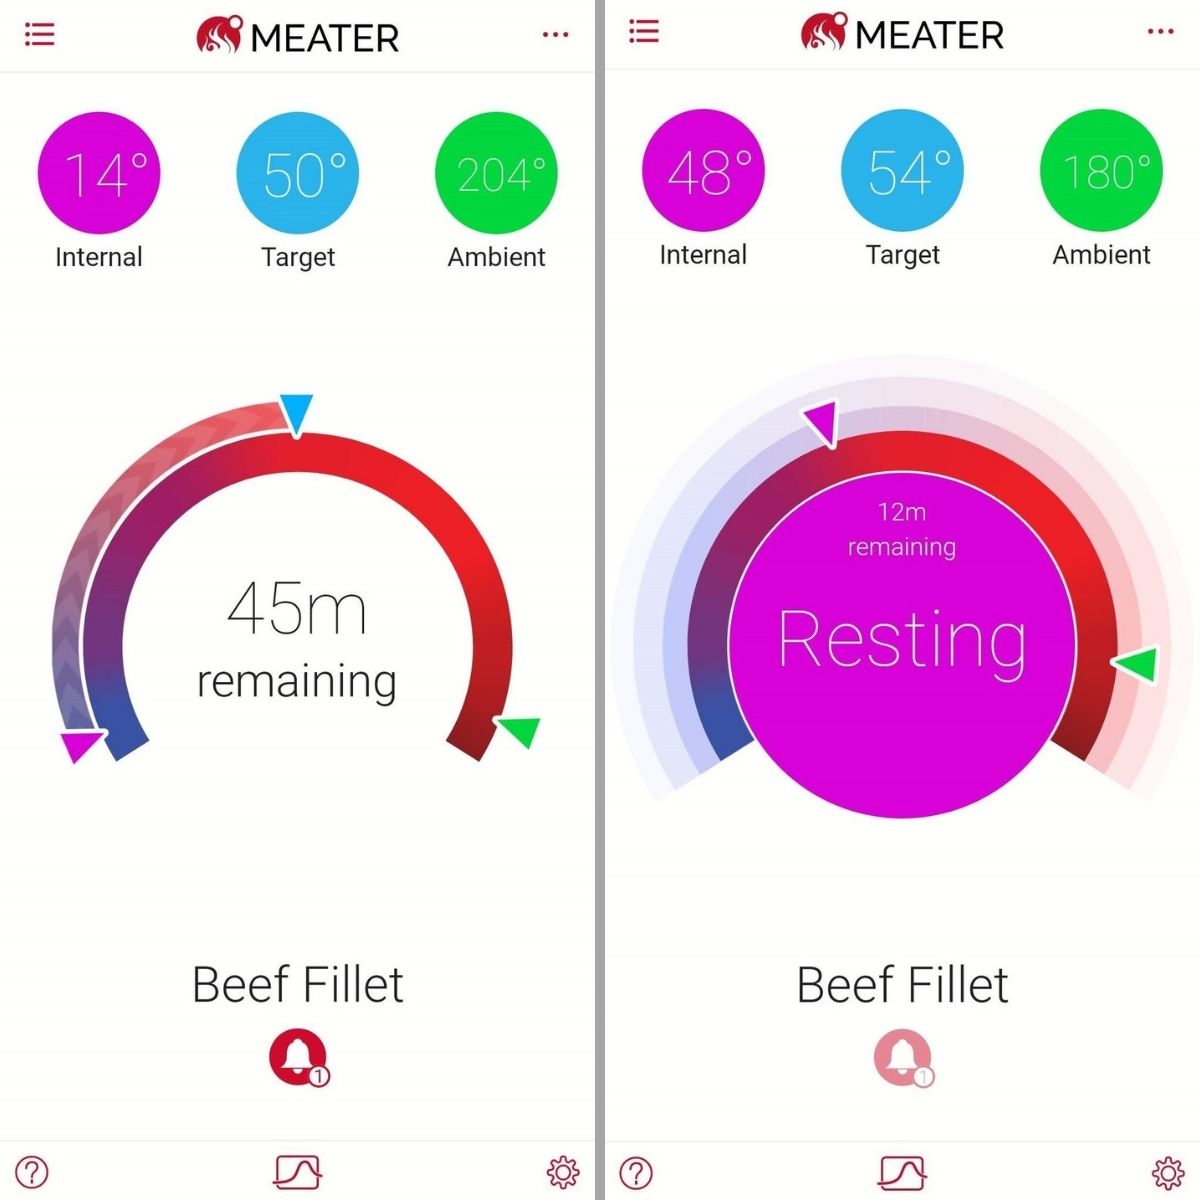
Using a wireless meat thermometer, you can continually monitor the Wellington and Weber Q temperature from your smartphone.
The general idea is when the pastry is puffed and golden brown, the Wellington is ready.
But sometimes, things can go wrong, and everything needs to go right.
If the pastry doesn’t brown before the beef has reached rare or medium-rare, you can make adjustments. Or vice versa.
I can recommend some great meat thermometres from Amazon that will do a fantastic job of keeping track of your Wellington.
Just remember to insert the probe into the middle side of your Wellington before baking.
Weber Connect: This is a deadly accurate wireless meat thermometer from Weber. I used the ambient probe to measure the temperature of the Weber Q throughout the cook.
Inkbird Wireless Meat Thermometer: A cheaper alternative and still does a great job of forwarding the information to your smartphone.
Inkbird Instant Read Thermometer: A deadly accurate thermometer but can be impractical as you have to lift the lid on your Weber Q to get the internal temperature. And “if you’re looking, it ain’t cooking”.
Meater+: This little guy is spot on when it comes to doneness. And the best part is there are no wires. I used the meater+ to keep an eye on the internal temperature of my Wellington and it was baked to a perfect medium-rare 58°C (135°F).
What can I serve with Beef Wellington?
Knowing what to serve your beautiful new creation can be tricky.
But like I said way back in the beginning, I’ve got you covered.
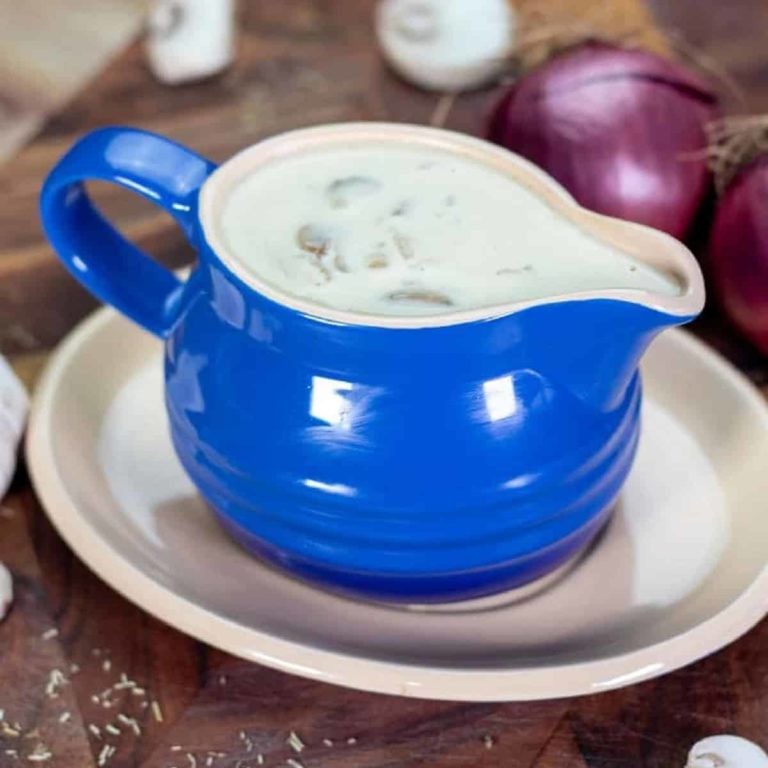
My lovely partner put together a beautiful red wine sauce to complement your Beef Wellington.
It will make your guests envoy your superb craftsmanship.
And better still, it can be made ahead as it’s served at room temperature.
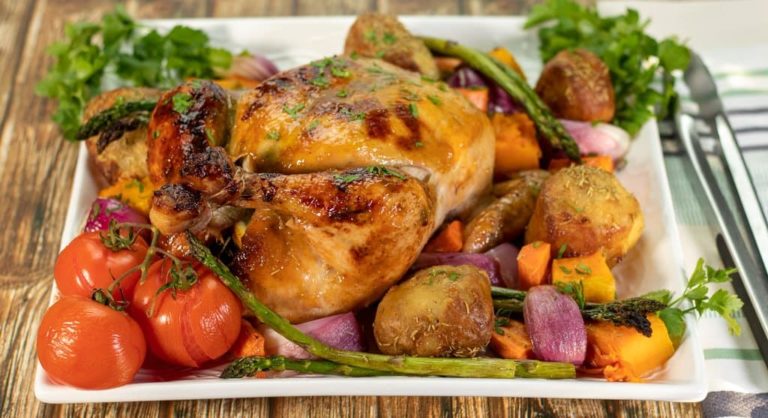
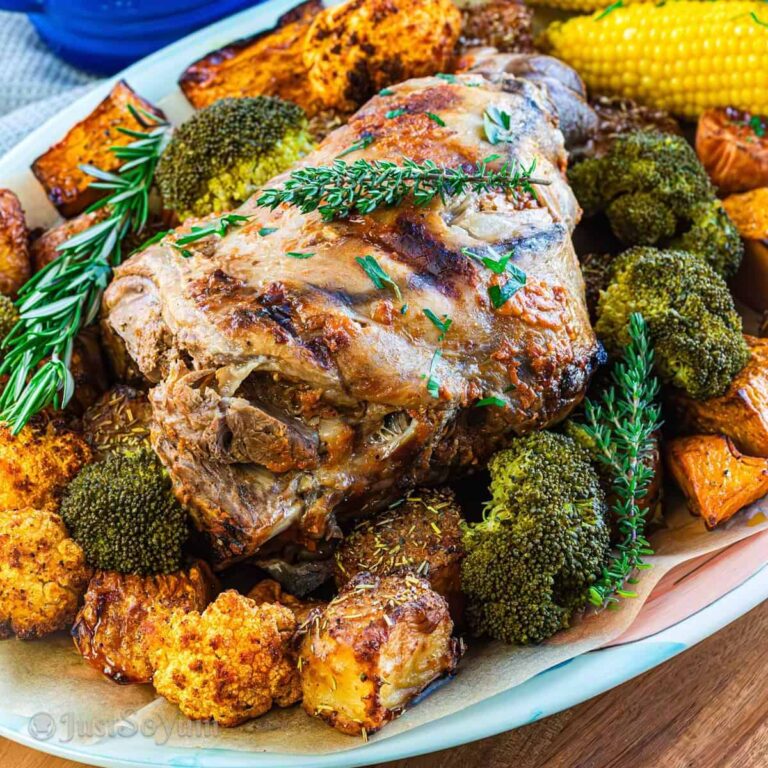
Most importantly, you’re going to want to serve your Weber Q Beef Wellington with a combination of Vegetables.
Try our creamy garlic and chives mashed potato recipe, or just make a mixture of your favourite garden variety veggies such as:
Whatever you choose to serve with your Beef Wellington, I’m sure your guests will be marvelling at what you have created.
Well Done!
My aim for this recipe was to break every step down, so it’s easy to follow for you guys.
I hope I’ve achieved that. And you guys put together the perfect Weber Q Beef Wellington that looks not only wonderful but also tastes amazing.
We’re an affiliate
We hope you love the products we recommend! Just so you know, we may collect a share of sales or other compensation from the links on this page. Thank you if you use our links. We really appreciate it!
Amazingly Tender Weber Q Beef Wellington

Equipment
- Lattice Pastry Cutter optional
Ingredients
Beef Wellington
- 650 g beef tenderloin (eye fillet) centre cut (22cm in length)
- 2 tbsp dijon mustard
- 3 tbsp canola oil or vegetable oil
- 6 puff pastry sheets 2 sheets for the decorative lattice
- 6-7 slices of procioutto
- salt & black pepper to taste
Duxelles
- 700 g portabella mushrooms or mixture of different mushrooms
- 2 shallots finely diced
- 3 garlic cloves crushed
- 2 thyme sprigs leaves only
- 2 tbsp olive oil
- salt & black pepper to taste
Crepe (optional)
- 3 ½ tbsp all-purpose flour
- 140 ml milk
- 1 egg beaten
- salt just a pinch
Egg Wash
- 2 egg yolks beaten
- 1 tbsp water
Instructions
Prepping the beef tenderloin
- Remove any silver skin on the tenderloin and trim the edges making sure the thickness is even from one end to the other. The tenderloin should weigh 650g and be 22cm in length and 6-7cm thick. Then set the tenderloin aside to come up to room temperature. (See note 1)
Duxelles
- Finely cop 700g of mushrooms, and two shallots (See Note 2)Add 2 tbsp olive oil to a deep pan, then add the diced shallots and three cloves of crushed garlic. Saute the onion and garlic over medium heat until they become translucent, not brown.
- Next, add the finely chopped mushrooms and season with salt. Then add 3 tbsp of whiskey and the leaves from two sprigs of thyme. Continue cooking over medium heat, often stirring until the mushrooms have released and simmered off all of their liquid. Roughly 10-12 minutes.
- Spread the duxelles evenly onto a flat tray and flatten using the back of a spatula, then place in the fridge to cool.
Searing the beef
- Heat 3 tbsp of canola oil in a large pan over medium-high heat. Pat the beef tenderloin dry with a paper towel and wait until the oil in the pan is smoking. Remove the butchers twine if any.
- While you're waiting, add a generous amount of salt and pepper onto your counter or cutting board and roll the tenderloin around fully covering the beef. Drop the tenderloin into the pan and sear on all sides for 1 to 1 ½ minutes total, not forgetting the ends. (See note 3)
- When the beef is seared, remove it from the pan and brush it on all sides with dijon mustard while still warm. Then place in the fridge wrapped in plastic and give the beef 30 minutes to absorb the dijon mustard.
Crepes optional steps (see note 4)
- To a medium bowl, add 3 ½ tbsp of all-purpose flour, 140ml milk, one egg, and a pinch of salt, then whisk.
- Pre-heat a medium-sized non-stick pan over medium heat, and add a tiny amount of butter to cover the bottom of the pan.
- Pour just enough batter to the centre of the pan and swirl until the batter reaches the edge of the pan. Let that cook for 1-2 minutes, flip and cook for another 45 seconds to 1 minute and repeat that until you have 2 to 3 crepes.
Assembling the Beef Wellington – Stage 1
- Layout two large pieces/s of plastic wrap slightly overlapping each other.
- Place two crepes onto the plastic wrap vertically and slightly overlap them. At the base, place the beef and make any adjustments to the crepes to ensure the beef will fit.
- From the base, begin laying down the prosciutto horizontely and from end to end, overlapping each piece along the way. Roughly 6 to 7 slices of prosciutto will be required.
- Using a spatula, begin laying the duxelles over the prosciutto. Starting from the base, carefully spread the duxelles to coat the prosciutto evenly.
- Fold a small flap at the base of the plastic wrap to grab onto and slowly begin rolling until the beef is fully wrapped. Pinch both ends of the wrap and roll the beef forwards until you have a tight little package. Place the wellington in the fridge to firm up for 30 minutes an hour.
Assembling the Beef Wellington – Stage 2
- Egg wash – In a small bowl, add two egg yolks and 1 tbsp water, then whisk.
- Place a small amount of flour onto your counter and layout enough pastry to fully encase the wellington. If one sheet of pastry isn’t enough, then connect 2-4 sheets brushing egg wash between the layers to connect the sheets. Then roll the pastry to seal them together.
- Place the Wellington at the base of the pastry and slowly begin rolling until the ends meet and slightly overlap. Cut off the excess and gently pinch the base together. Cut any excess off the ends and fold or pinch off until you have a fully encased Wellington. Use more egg wash if the pastry isn't sticking. (See Note 5)
- Roll the Wellington tightly as you did earlier with the crepes, prosciutto, and duxelles. Then pop in the fridge for 30 minutes or overnight.
Decorating Beef Wellington
- Brush the top, ends and sides of the Wellington with egg wash.
- Decorating (optional) – Remove the wellington from the plastic wrap. Layout one or two sheets of pastry onto a lightly floured surface. Firmly roll the lattice cutter over the pastry from the base to the top. Then gently fan the lattice out and drape it over the top of the wellington. Cut the lattice at the base and push the ends in, and cut off any excess. Lastly, brush egg wash onto the lattice and season with sea salt.
- If you aren't making the lattice, you can use the back of a knife to score a pattern into the pastry or use any offcuts to make patterns. Sprinkle a generous amount of sea salt over the top
- Place the Wellington onto a baking tray lined with baking paper and set it aside.
Baking Beef Wellington
- Place a convection tray and trivet onto the grill and pre-heat your Weber Q for 10 minutes on High with the lid down.
- If you're using a wireless meat thermometer, insert the probe into the side of the wellington, making sure it's inserted directly into the middle.
- Close the lid and turn the heat down to medium/medium-high. Try to maintain a temperature between 200°C (425°F) at all times. Bake until the wellington has an even golden crust. Rotate the wellington 180 degrees if not browning evenly.
- For medium-rare, bake the wellington until the internal temperature reaches 48°C (120°F) internally which should take 45-50 minutes to reach.
- Rest the wellington uncovered for 10 minutes. The internal temperature will continue to rise a further 10°C. Slice thick pieces using a sharp knife and serve with red wine sauce. (See Note 6)
Notes
Bake in a convection oven at 220°C (430°F) or 200°C (390°F) fan-forced until the pastry has puffed and is golden brown on all sides. Note 1: Tie the centre cut beef tenderloin with butcher’s twine to help hold its tubular shape. Note 2: You can use any mushroom combination that you like, such as shitake, oyster, enoki or Crimini. Whatever mushrooms you decide on, their liquid needs to be fully cooked out to prevent the pastry on your Wellington from becoming soggy. Note 3: It’s important to remember that you’re not cooking the beef. A quick sear on all sides is all that’s required. The Weber Q will do the rest. Note 4: Crepes are entirely optional. The crepes help hold the Wellington together and assist in keeping any liquid inside. If you’re not using crepes, place strips of prosciutto on top of plastic wrap and continue following the method. Note 5: Making sure your Wellington is completely encased in pastry is crucial to avoid liquid from leaking out. Make sure your pastry is smooth out and even throughout. Note 6: Under no circumstances should you begin slicing your Wellington before it has fully rested. The beef needs time to absorb the liquid. If sliced too early the liquid will pour out turning the pastry soggy.