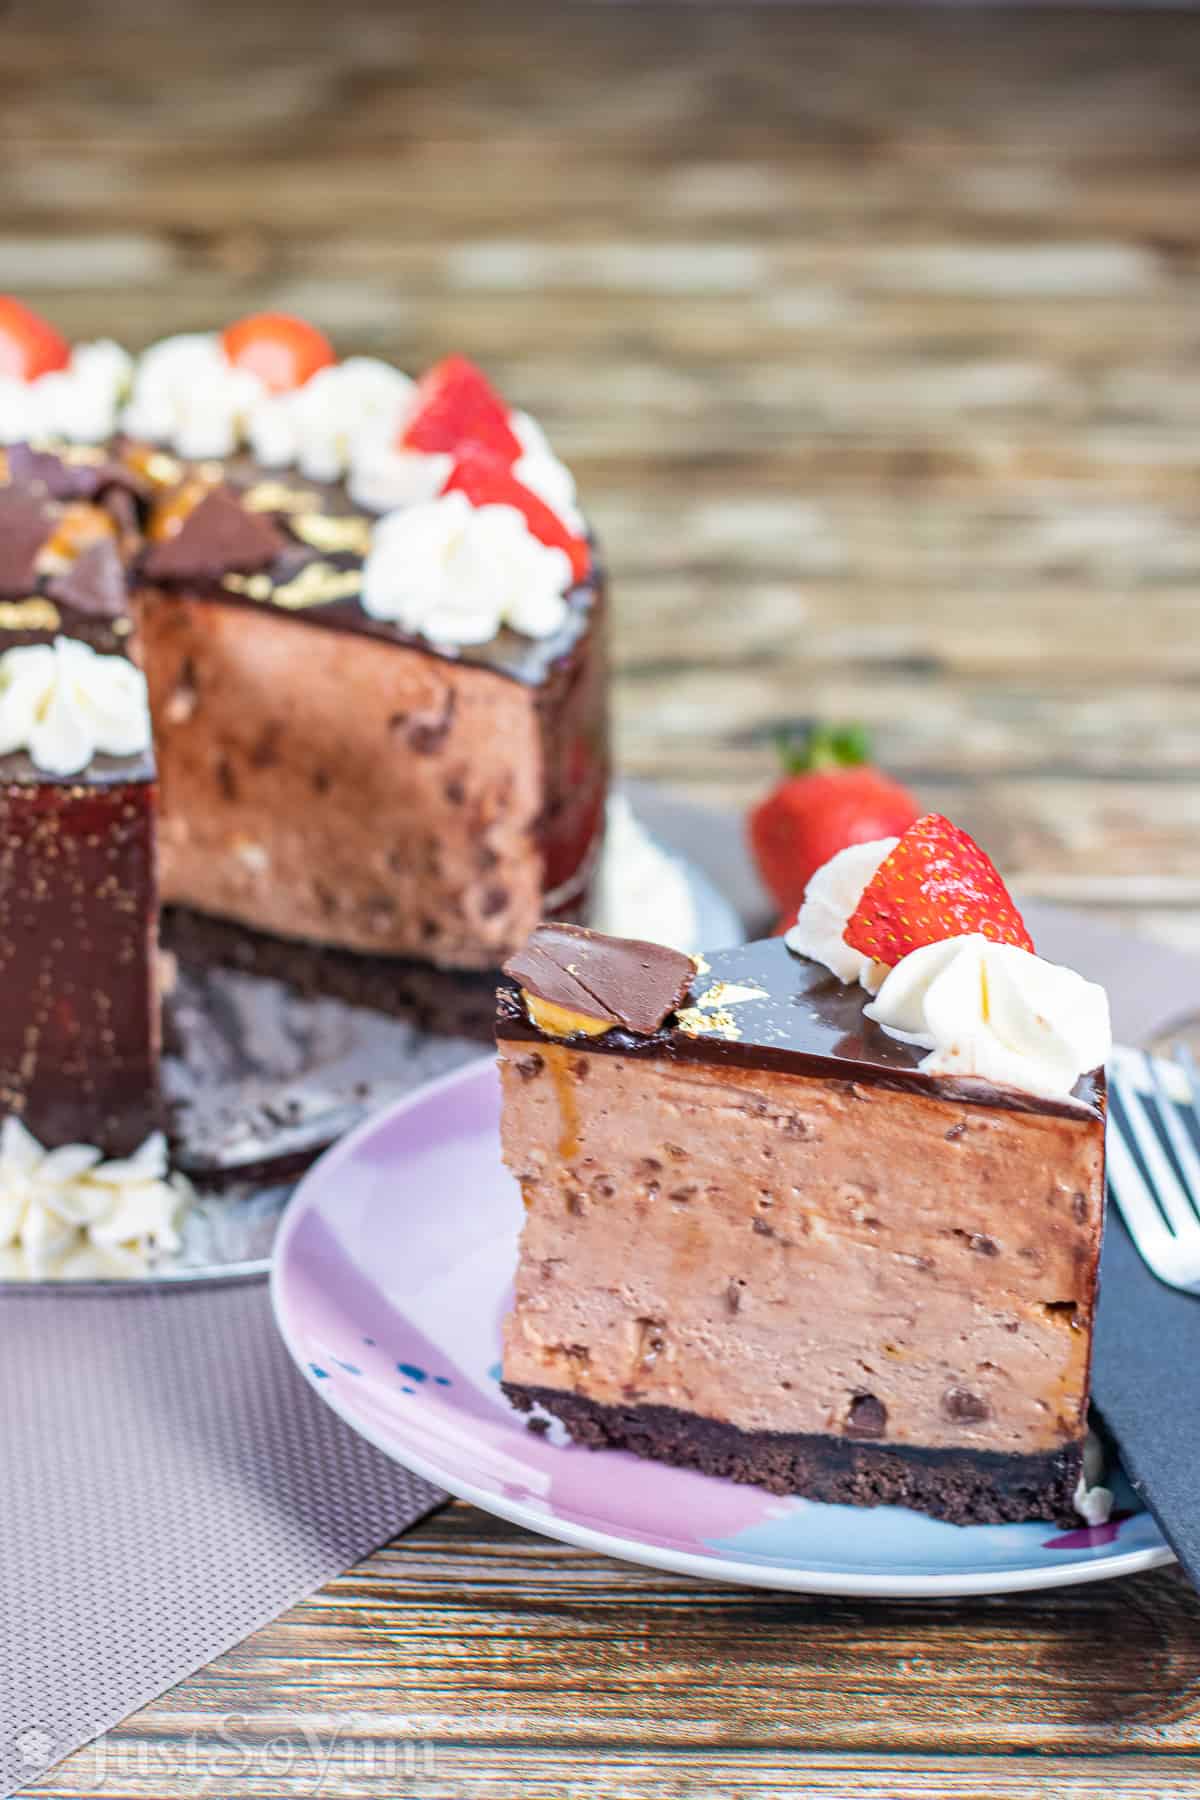
No-Bake Chocolate Honeycomb Cheesecake with a Mirror Glaze
Give your family and friends the WOW factor when you place this Chocolate Honeycomb Cheesecake in the centre of the table.
With this recipe, I have taken some inspiration from the trendy Illusion Cakes.
But, instead of making my cake look like a glass of water or a flower box, I have created my cheesecake to look like a cake.
A little on the simple side, compared to some illusion cakes out there, but hey, you got to start somewhere, right!
I love making cheesecake, from Jelly Slice to New York Cheesecake.
They make a great dessert that I know will not last long when we have guests to something to bring to a family BBQ.
And they are so super easy to make, even if the method looks complicated; once you start, you would have to wonder what you were worried about?
So how do you make this yummy no-bake chocolate honeycomb cheesecake with a mirror glaze?
Firstly you need to consider the tools you are going to use.
I use my KitchenAid Stand Mixer for everything except the whipped cream. And that is because it is a small amount. So I use a hand mixer for that.
An excellent high cake pan with a loose bottom is ideal for this. The one I use is from Harris Scarf in Australia, which is 8×3.5 to 4 inches or 20×9.5cm.
But if you do not have one, a round spring release cake pan is ok; you may need to halve the cheesecake filling if it is not high enough.
Although a great alternative to the cake pan is a cake collar, these are available on Amazon.
Making the Chocolate Honeycomb Cheesecake.
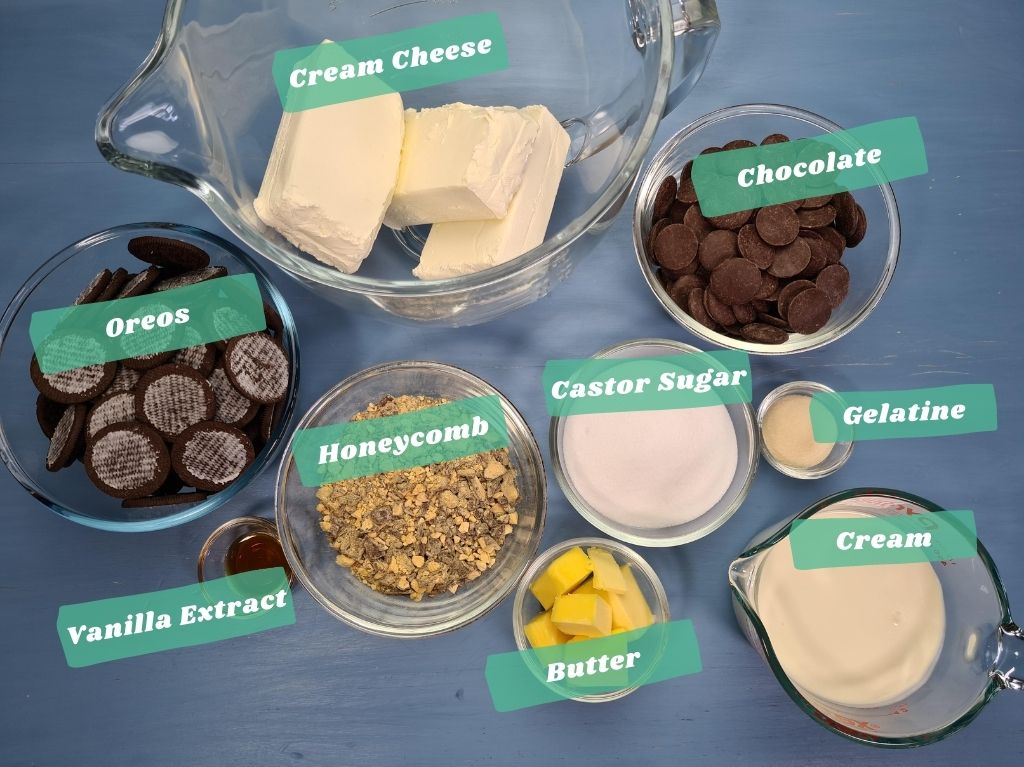
You will need the following ingredients to make this:
- Original Oreo Biscuits
- Unsalted Butter
- Honeycomb Pieces (chocolate coated)
- Gelatine Powder
- Water
- Cream Cheese
- Heavy Whipping or Thickened Cream
- Milk or Dark Melting Chocolate
- Granulated or Caster Sugar
- Vanilla Extract
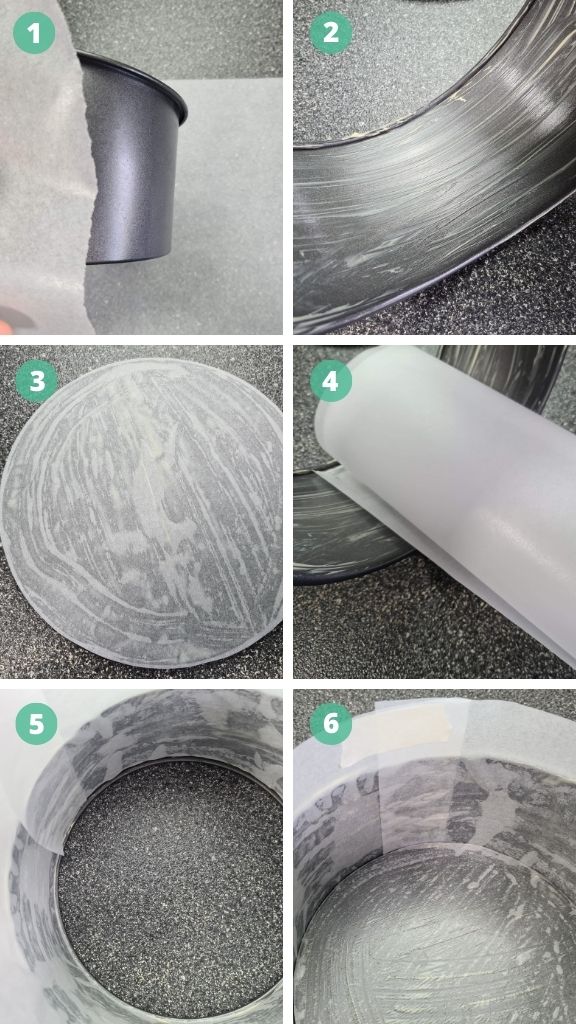
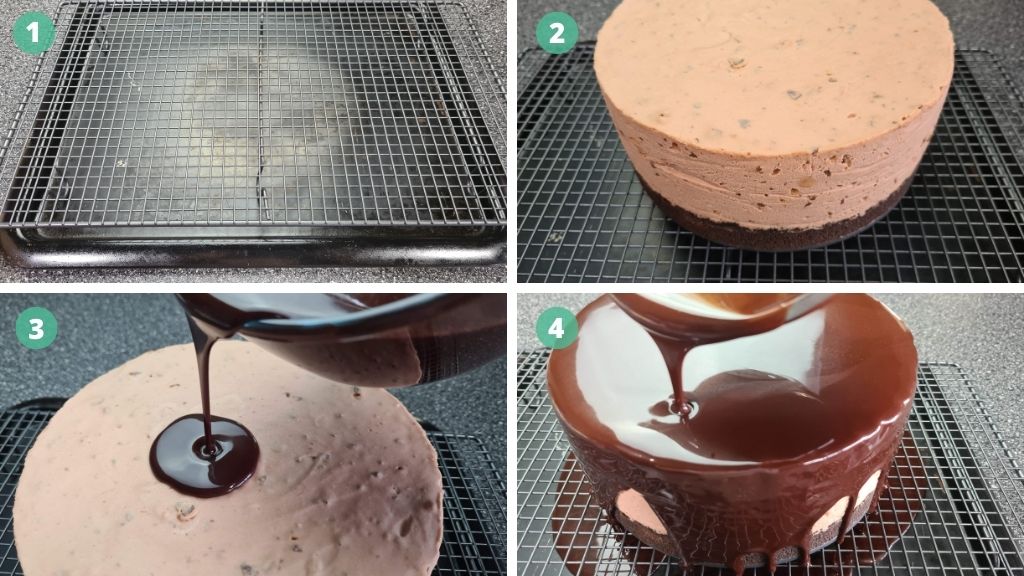
Before you start you need to measure out the parchment or baking paper and cut to size. Trace around the base of the pan, and then roll and wrap the parchment paper around the outside of the tin. Then cut when the paper overlaps itself.
Coat the base and side with butter and place the baking paper on the base and around the side of the cake pan.
Greasing the pan with butter and then adding the parchment paper helps keep the paper in place while you make the cheesecake. At this stage, the parchment paper may be quite high.
Using tape, tape the inside and the outside of the parchment paper just above the rim of the pan to hold the parchment paper that is higher than the pan in place.
As it is baking paper the tape will be easy to remove later on. Then cut the parchment paper down so around an inch is higher than the pan.
Then to stop the cheesecake from sticking to the parchment paper, lightly grease that is butter also. Then place the base into the cake pan, and you are ready to make the cheesecake.
How to make the biscuit base?
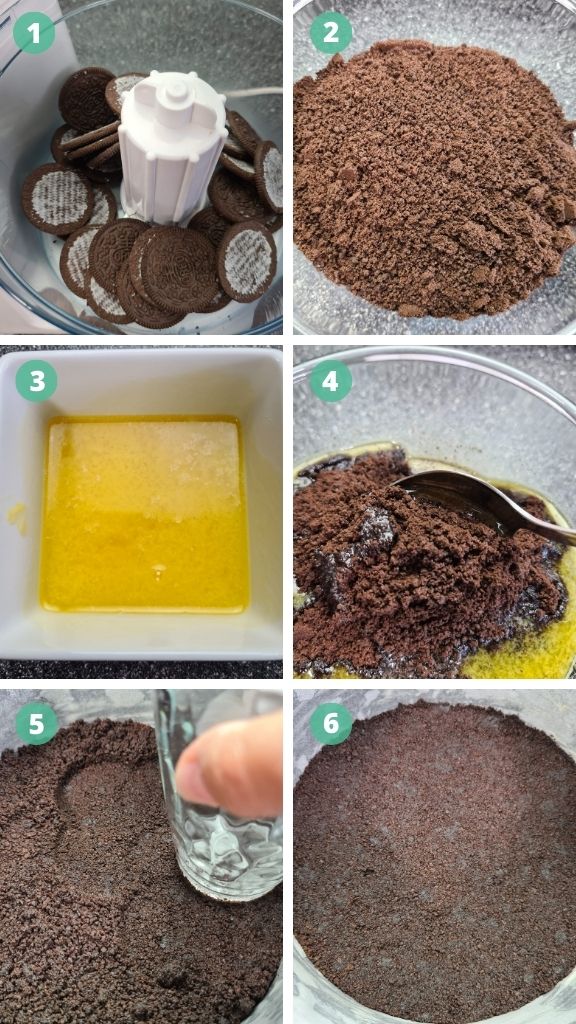
I use three packets of the original oreo biscuits to make the base for the cheesecake.
The first step is to separate the biscuits and remove the cream.
To separate, you just gently twist; the oreo biscuits are very easy to separate.
Then using the back of a butter knife for this, scrape off the cream.
In batches, place the biscuits in a food processer to crush, or you can use a zip lock bag to do this also.
The biscuits need to have the same consistency as breadcrumbs.
Melt the butter either in the microwave or over low heat on the stove.
Combine the biscuits and melted butter into a bowl, mix with a spoon until all the butter is incorporated.
Pour the mixture into the base of the cake pan. Spread as evenly as possible with the back of the spoon.
Then using a flat-based glass, compact the mixture to create a firm base.
Place the cake pan in the refrigerator for at least one hour.
How to make the chocolate honeycomb cheesecake filling?
For this part, I use that same recipe as my Jelly Slice with Cream Cheese. Just with a few extra ingredients added.
I also double the mixture to create a higher cheesecake to create the illusion that it is an actual cake.
If you are not looking to create the cake look or your cake pan is not as high, you can halve the filling mixture to suit what you are making.
Firstly using the packet your honeycomb comes in or a ziplock bag, crush up the honeycomb by hitting it with a rolling pin or something else hard.
Do not do this in a food processer, as you want small chunks, not fine dust. Then put aside, till later.

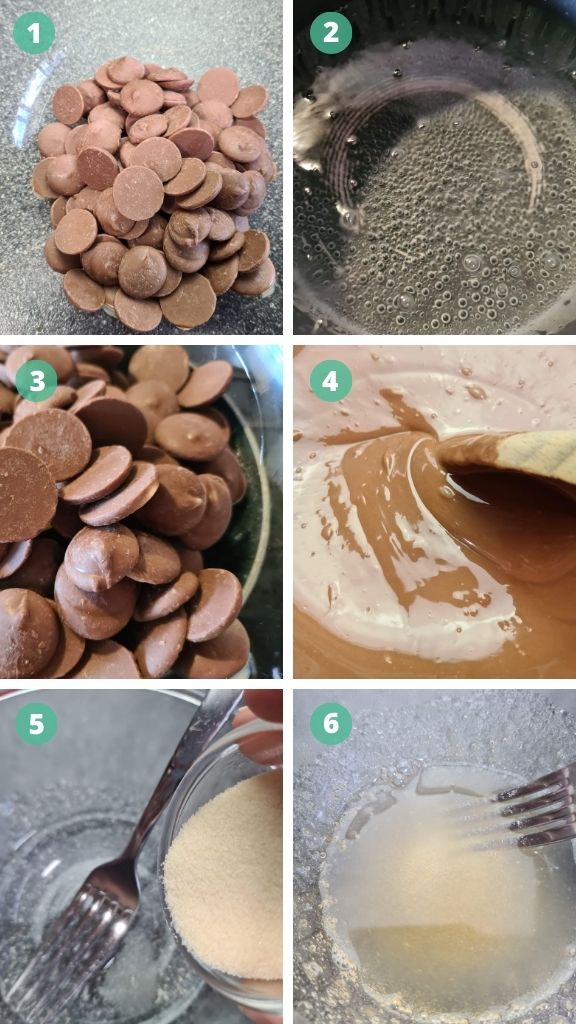
Using a small saucepan 3/4 filled with water and a large heatproof bowl, add the chocolate to the bowl and place it on top of the saucepan.
Using medium-high heat, bring the water to simmer while continuously stirring the chocolate.
Once the water starts to simmer, turn the heat to medium-low and stir the chocolate until it is all melted.
Once melted, place the bowl aside to allow the chocolate to cool while you make the filling.
Next, place the tablespoons of boiling water into a small bowl. And while slowly stirring with a folk, sprinkle the gelatine powder over the top.
Continue stirring until the gelatine has dissolved.
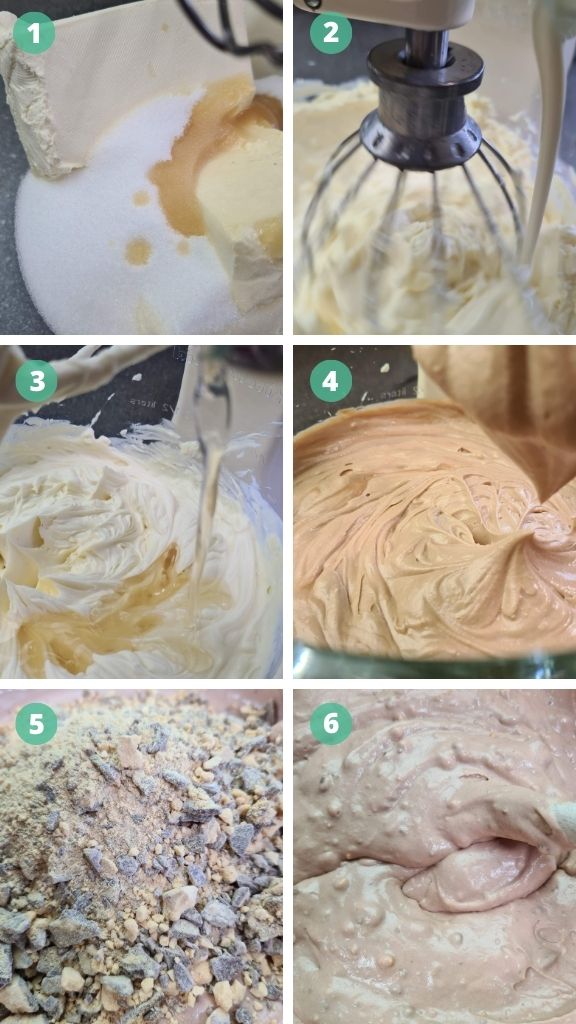
In a large mixing bowl, add the cream cheese, granulated/caster sugar, and vanilla extract.
Mix at a medium-high speed until everything is smooth.
Using a low speed, slowly add the cream and the gelatine, and continue to mix through.
Then add the melted chocolate a mix using a medium speed until the chocolate is well incorporated.
Add the crushed up honeycomb and mix through using a spatula or spoon.
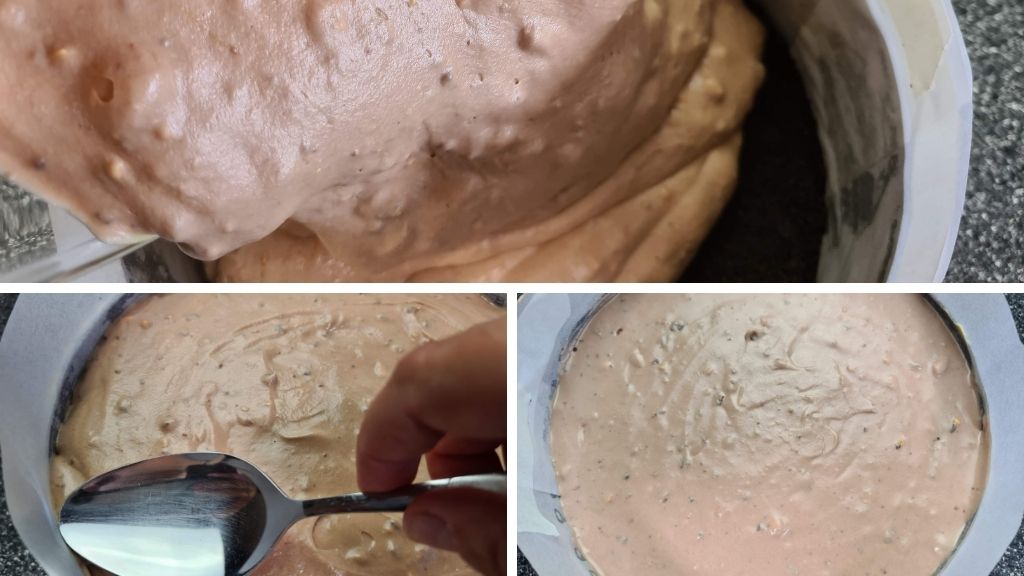
Pour the mixture into the cake pan, with the back of a spoon spread as evenly as possible.
Tap the cake pan on the bench a few times to also even it out.
Then place the cake pan back into the refrigerator for around 5 hours to set.
*NOTE – you can also leave this to sit overnight if you want to add the glaze the next day.
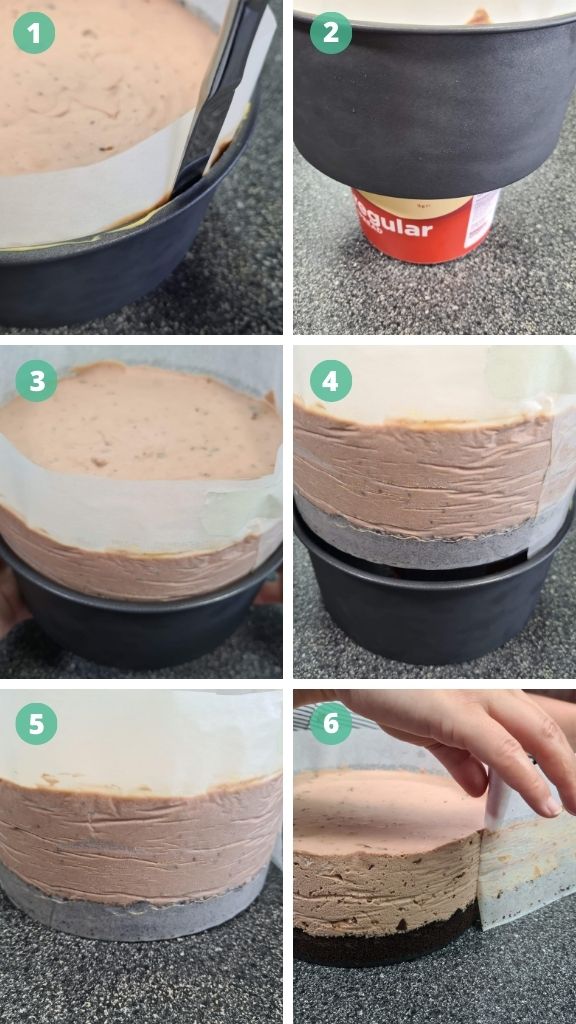
How to remove the cheesecake from the cake pan?
The best part of having a cake pan with a loose base is that it makes it easy to remove the cheesecake and other cakes.
To do this, gently slide a butter knife between the edge of the cake pan and the parchment or baking paper, loosening the paper from the rim. Remember, I used butter to hold it in place.
Use something tall and wide enough to sit the cake pan on. I used a 1kg margarine container to do this.
And slowly side the cake pan down. Doing this Leaves the parchment paper in place and the chocolate honeycomb cheesecake on the base.
If you are not adding the glaze, you can remove the cheesecake from the pan’s base and place it on a cake board or cake stand.
Otherwise, leave the cheesecake on the base or place it on a cake board that is 20 cm or 8 inches in diameter.
*NOTE – to remove the cheesecake, use a cake lifter to avoid the biscuit base from breaking.
How to make the mirror glaze for the top of your cheesecake.
Adding the mirror glaze is optional. It does make the cheesecake taste a lot sweeter than it usually would.
But to dull the sweetness down, I use strawberries and cream as this creates an offset to the sweetness.
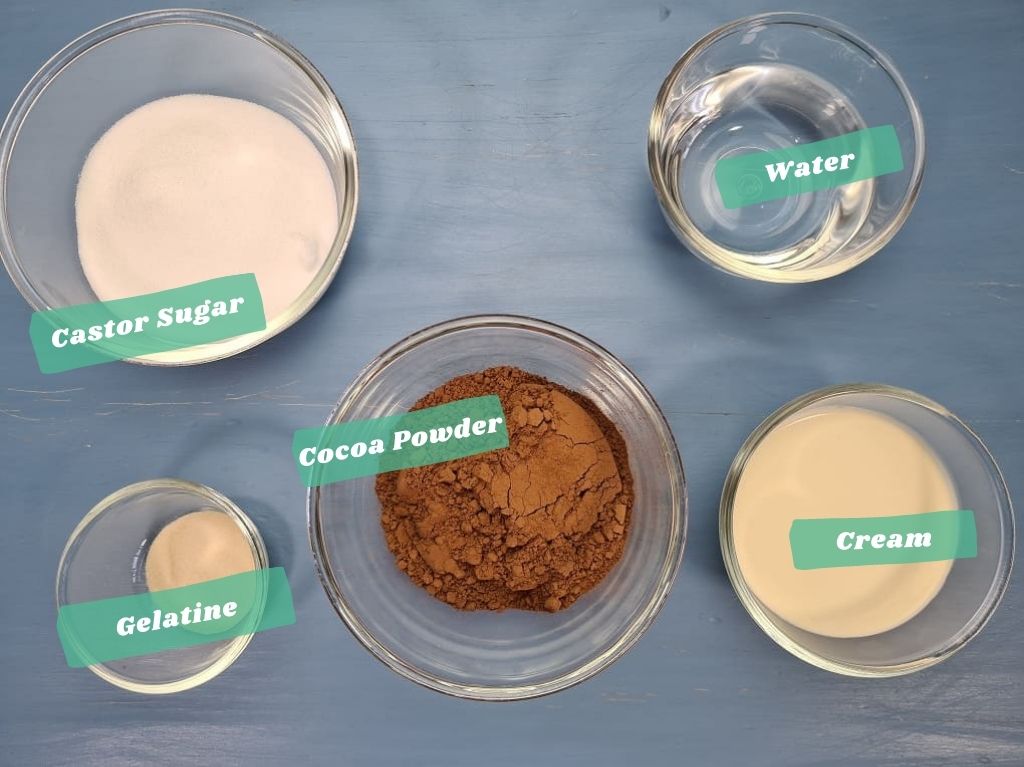
To make the mirror glaze, you are going to need the following ingredients:
- Cold Tap Water
- Gelatine Powder
- Heavy Whipping or Thickened Cream
- Cocoa Powder
- Superfine or Castor Sugar
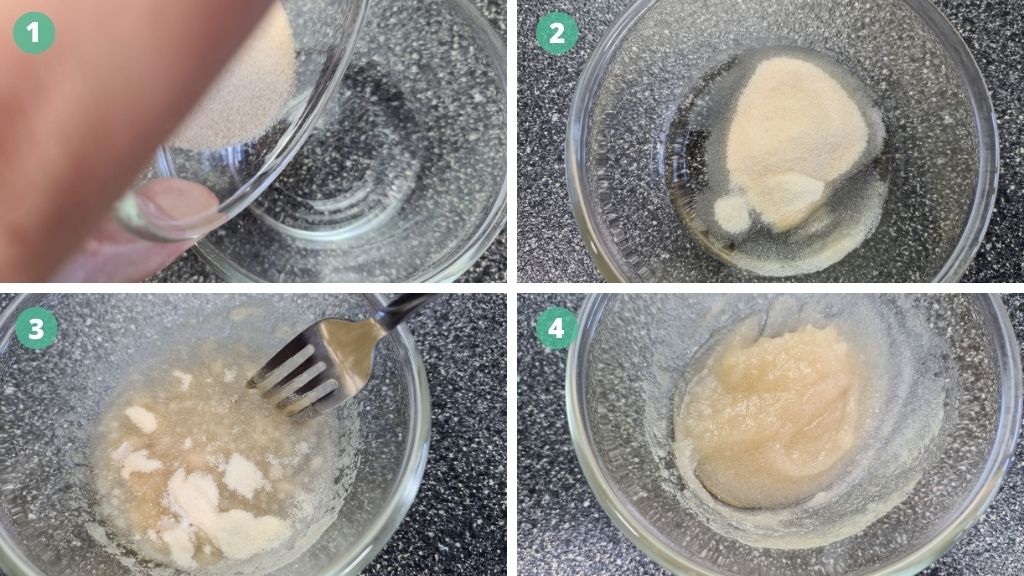
The first step is to bloom the gelatine. Blooming the gelatine is mixing the powdered gelatin into a cold liquid and mixing it instead of dissolving it in hot liquid.
By using this method, it helps to create a smooth finish to what you are making.
To bloom the gelatine, you need to add two and a half tablespoons of cold tap water to a small bowl. Then mix in the gelatine powder until it forms a paste.
Put the mixture aside to let it sit while you do the other steps. The gelatine will form a solid mass, but not hard; it will still be squishy.
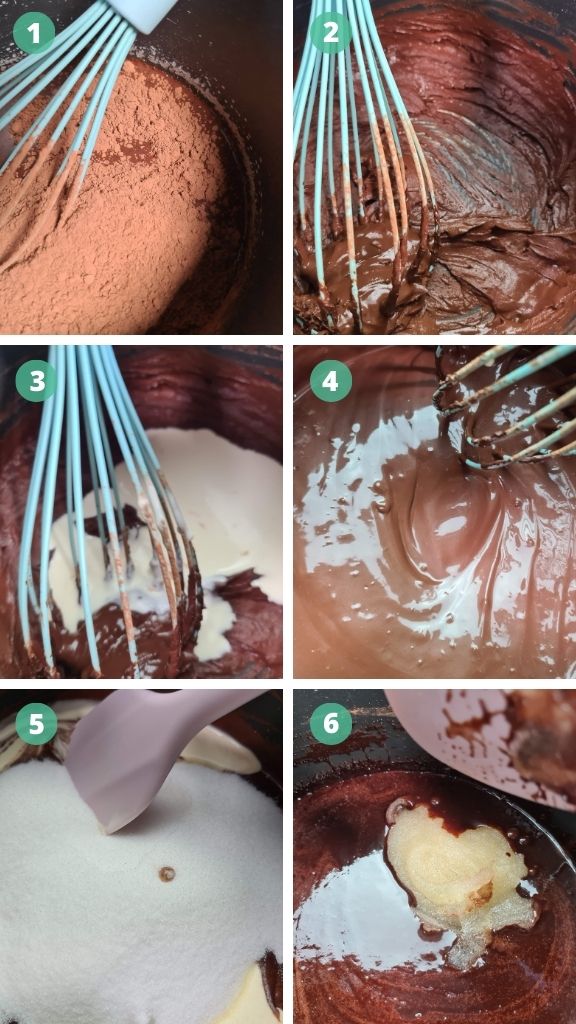
Next, you need to add the rest of the cold tap water to a small saucepan and place it over medium heat. Add the cocoa powder and stir continuously until the water and cocoa powder has formed a paste.
You can use a whisk to do this; I find it is easier to break up and lumps in the cocoa.
Using a spoon or whisk, add a small amount of the cream to the mixture and slowly stir through. The cream will break up the paste and create more of a runny consistency to the mixture.
Then while slowly stirring, with a spoon only, add the rest of the cream and the superfine or castor sugar.
While slowly stirring with a spoon, turn the heat up to high and bring the mixture to a boil. Once it has reach boiling point, please remove it from the stove and add the gelatine.
Slowly stir until the gelatine has dissolved.
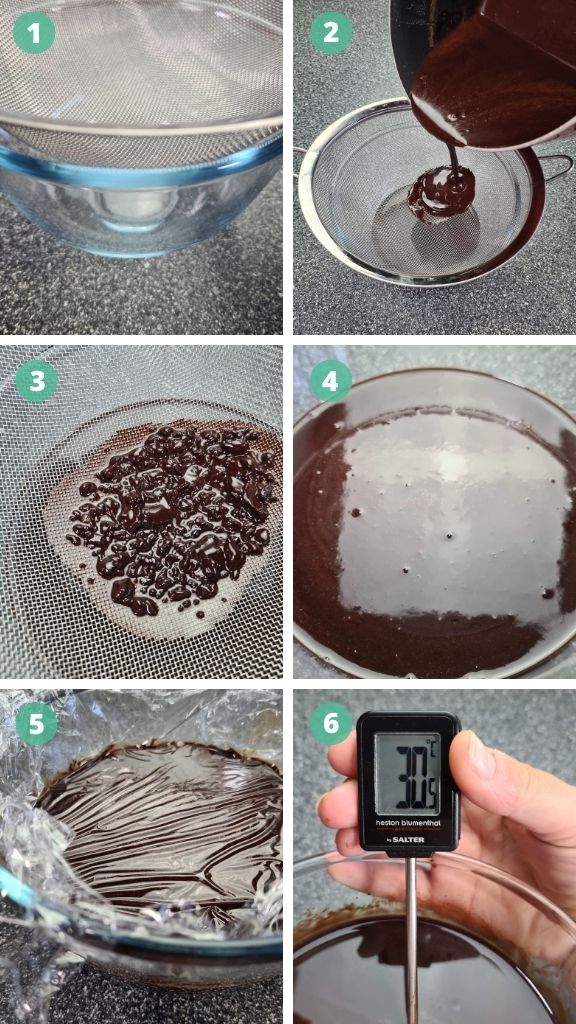
*Note – do not use a whisk for this part, as the whisk will create air bubbles in the mixture. Only stir very slowly with a spoon or spatula.
Once the gelatine has dissolved, strain the liquid into a small heatproof bowl and cover with cling wrap.
The cling wrap needs to be touching the top of the liquid to avoid a skin forming on the top.
Set aside to cool for approximately two to two and half hours or until the glaze has reached a temperature of 30°c or 86°f.
Depending on the temperature of your kitchen or home, it may take longer.
Once the glaze has reached the right temperature, it is time to pour it over the cheesecake.
And don’t worry, it does not melt the cheesecake.
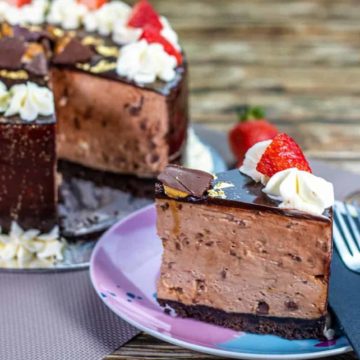
Adding the mirror glaze and decorating.
Before adding the mirror glaze to your chocolate honeycomb cheesecake, place a cooling rank on top of a large baking tray.
The glaze will drip down, and the tray will catch the excess.
Place the cheesecake while still on the base or cake board onto the cooling rack centre.
Slowly pour the mirror glaze over the top. Use a circular motion, starting from almost the cheesecake’s centre and moving out to the edge.
Ensure that most of the glaze goes around the edge and drips down to coat the side of the cheesecake thoroughly.
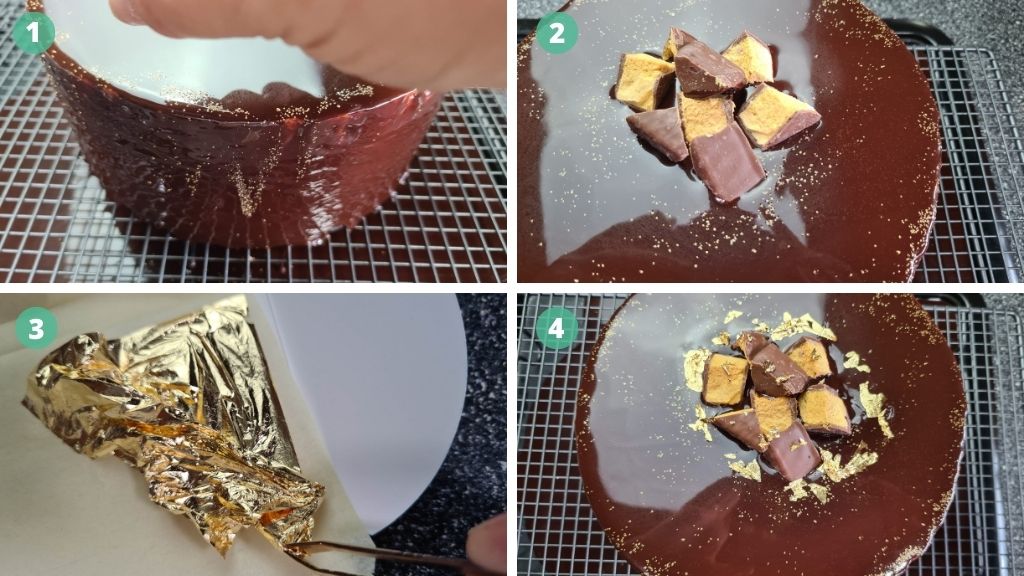
Before the glaze sets, and it does set quickly, sprinkle the gold dust around the edge and side.
Place cut up honeycomb in the centre, and sprinkle more gold dust on the top.
And then place gold leaf on the glaze.
To apply the gold leaf, use some tweezers to tear bits off. I find using a knife to hold the rest down works well.
Gold leaf is very sticky; the best way I can describe it is like it is magnetized. But because of this, it makes it easy to place it anywhere on the cake you like, without worrying it will not stay where you put it.
Although you do not need to do any of this to decorate, you can use whatever you like.
Once the mirror glaze is on and you have decorated it, please place it in the refrigerator while preparing the cream and strawberries.
Even if you do not want the strawberries and cream, I advise placing the cheesecake in the fridge to bring the glaze to the same temperature as the cheesecake.
I also find it helps to firm the glaze just a little too.
How to make the whipped cream for piping.
I am not a fan of mock cream, I prefer to use fresh cream for decorating. The taste is much better.
But when you whip cream, it will not hold its shape for long when you pipe it onto a cake.
So by adding a little confectioners’ or icing sugar to the cream, helps it to hold its shape.
But just like any form of icing, you need to have the right consistency.
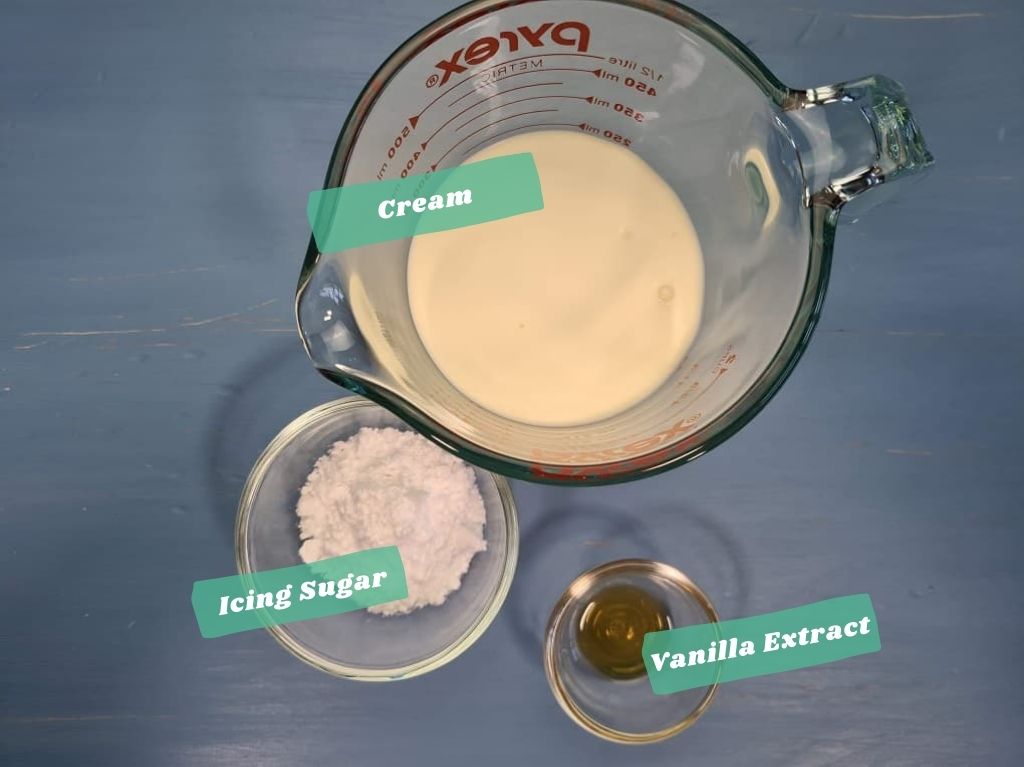
To make the whipped cream for pipping, you will need the following:
- Heavy Whipping or Thickened Cream
- Confectioners’ or Icing Sugar
- Vanilla Extract
- A large open star piping tip
- A large piping bag or zip lock bag
In a small or medium mixing bowl, add the cream, sugar, and vanilla extract.
Whip on a medium-high speed with a hand mixer until stiff peaks form. It should only take a few minutes.
You can test this by turning the mixer off and lifting out the whisk attachment. Touch the top of the cream with the whisk attachment and lift it straight off again.
If the cream holds its shape and does not fall over, you are good to go.
Be careful not to overwhip the cream as it will form a butter-like texture instead.
Cut the end off your piping or ziplock bag and attach the tip.
Open the bag, and place it in a tall wide glass, folding the edge down over the glass, to hold it in place.
Spoon the cream into the piping bag, bring the top of the bag back up.
Holding the top of the bag shut, give it a little shake to get the cream down to the bottom.
Then twist the bag shut just above the cream and squeeze the bag till a bit of the cream starts to come out of the piping tip.
Doing this helps to remove any air from the bag and cream.

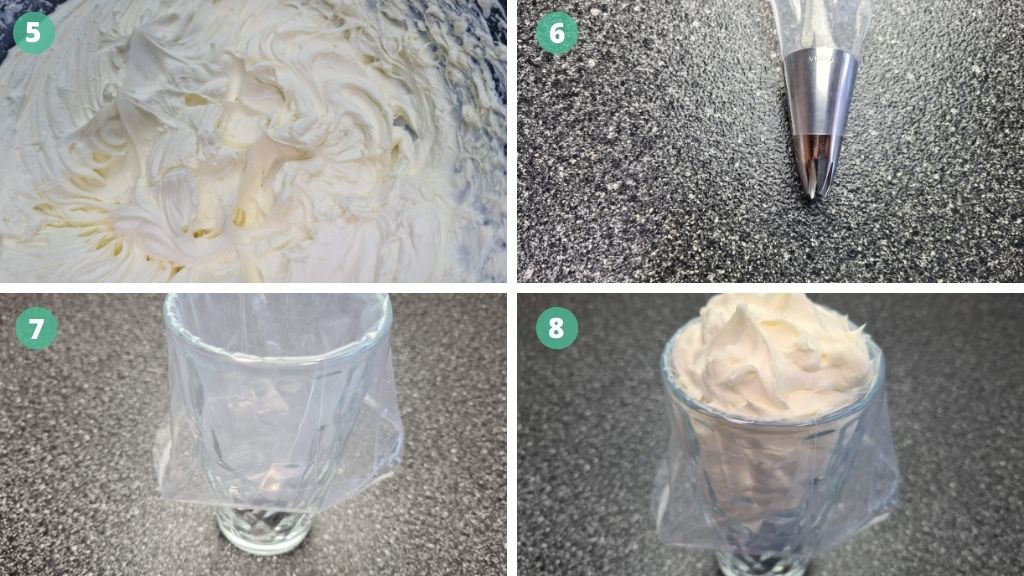
Holding the bag in an upright position, then pipe swirls around the edge of the cheesecake.
Then holding your piping bag on a 90-degree angle pipe small stars along the bottom of the cheesecake.
Of course, you can pipe waves or use other piping tips to create different designs on your chocolate honeycomb cheesecake.
Place strawberries, either whole or cut into the cream around the edge of the cake.
Then serve with extra cream and strawberries.
Some of Our No-Bake Recipes on Just So Yum are:
We have a few recipes that you can use this mayonnaise for, here are just a few of our favourites!
- No-Bake Pink Gin Raspberry Swirl Cheesecake – a cheesecake with a difference, delicously yummy and great for special occasions.
- How to make Licorice Ice Cream at Home – if you love licorice icecream, you are going to love this no cook icecream recipe
- Delicious Jelly Slice with Cream Cheese – classic jelly slice with a cheesecake middle and biscuit base. And super easy to make!
No-Bake Chocolate Honeycomb Cheesecake with a Mirror Glaze
Ingredients
The Oreo Base
- 300 g Original Oreo Biscuits 3x133g Packets with cream removed
- 80 g Unsalted Butter
The Cheesecake Filling
- 180 g Chocolate Coated Honeycomb
- 400 g Milk Chocolate for melting
- 4 tbsp Boiling Water
- 4 tsp Gelatine
- 750 g Cream Cheese
- 1 cup Caster Sugar
- 2 tsp Vanilla Extract
- 400 ml Whipping/Thickened Cream
The Mirror Glaze
- 2 ½ tbsp Cold Tap Water
- 4 tsp Gelatine Powder
- ⅔ cup Cold Tap Water
- ⅔ cup Heavy Whipping/Thickened Cream
- 1 cup Cocoa Powder
- 1 cup & 2 tbsp Superfine/Caster Sugar
The Whipped Cream
- 1 cup Heavy Whipping/Thickened Cream
- 2 tbsp Confectioners'/Icing Sugar
- ½ tsp Vanilla Extract
Instructions
Prep
- I recommend a Round Cake Pan 20×9.5cm or 8x4in with a lift-out bottom. But a spring release is ok, just halve the filling if it is not high enough.
- Line the cake tin with baking or parchment paper.
The Oreo Base
- Remove the cream from the Oreo biscuits, and crush in a food processer until they resemble breadcrumbs.
- Melt the butter over low heat until melted or in the microwave.
- Pour the butter into the crushed-up biscuits and mix until well combined.
- Add the mix into the cake tin, spread with a spoon as evenly as possible, and then using a flat-based glass, press the biscuit base firmly down to compact it.
- Place the tin in the refrigerator for 1 hour to set.
The Cheesecake Filling
- Either in the packet or in a zip lock bag, crush the honeycomb pieces up using a rolling pin.
- Melt your chocolate either on the stove or in a microwave. Put aside to cool.
- In a small bowl, add the boiling water and sprinkle the gelatine over the top, then mix well with a fork until the gelatine has dissolved. Set aside to cool.
- Add the cream cheese, caster sugar, and vanilla extract into a large bowl. Using a stand mixer or hand mixer, beat on high medium speed until smooth.
- Slowly add the cream and mix through. And then add the gelatine, continue to mix until combined.
- Add the cooled melted chocolate, and mix until all the chocolate is well incorporated with the cheesecake mixture.
- Using a spatula or wooden spoon mix in the crushed up honeycomb.
- Pour the mixture into the tin, and spread evenly. Then tap the tin on the bench a few times to help even it out. Place it in the fridge for 5 hours or longer if you wish.
The Mirror Glaze
- Add the 2 ½ tbsp of cold tap water to a small bowl, add the gelatine and mix with a small spoon or fork, until a paste is formed. Then set aside to bloom.
- In a small pot, add the ⅔ cup of cold tap water and the cocoa powder, using a spoon or whisk, cook over medium heat, stirring continuously until the cocoa and water have become a thick smooth paste.
- Add a small amount of the cream and using a spoon or spatula only stir slowly until the mixture loosens. Turn the heat up to high, add the rest of the cream, while slowly stirring. along with all the superfine sugar. Bring to the boil while very slowly stirring until the sugar is dissolved and the mixture is smooth.
- Remove from the heat and add the gelatine. Dissolve the gelatine while gently stirring, until all lumps are gone.
- Using a small bowl and wire strainer, slowly strain the glaze mixture into the bowl. Catching any lumps that you may have missed.
- Cover with cling wrap, making sure the cling wrap is touching the entire top of the glaze, to avoid a skin forming on top. Let it cool down to a temperature of 30°c or 86°f. This takes 2 to 2½ hours depending on the temperature of your home.
- Once the glaze is reached the required temperature, place your cheesecake on a wire cooling rack with a baking tray underneath. Using a circular motion, pour the glaze over the top, starting from just near the middle and working your way out, making sure you get most along the edges to ensure the sides are covered.
- The baking tray will catch the excess glaze.
- Then decorate with broken bits of honeycomb, gold dusting powder, and gold leaf. Along with whipped cream and strawberries.
The Whipped Cream
- In a mixing bowl add the cream, sugar, and vanilla extract. Then whip on a medium-high speed until stiff peaks start to form.
- Add the cream to a piping bag with a large open star tip attached, and then pipe swirls around the edge of the cheesecake and small stars along the base, using the same tip.
Notes
Did you make this recipe? Tag @justsoyum on Instagram or Facebook so we can find your masterpiece.
Alternatively, you can leave a comment below and let us know how you went.