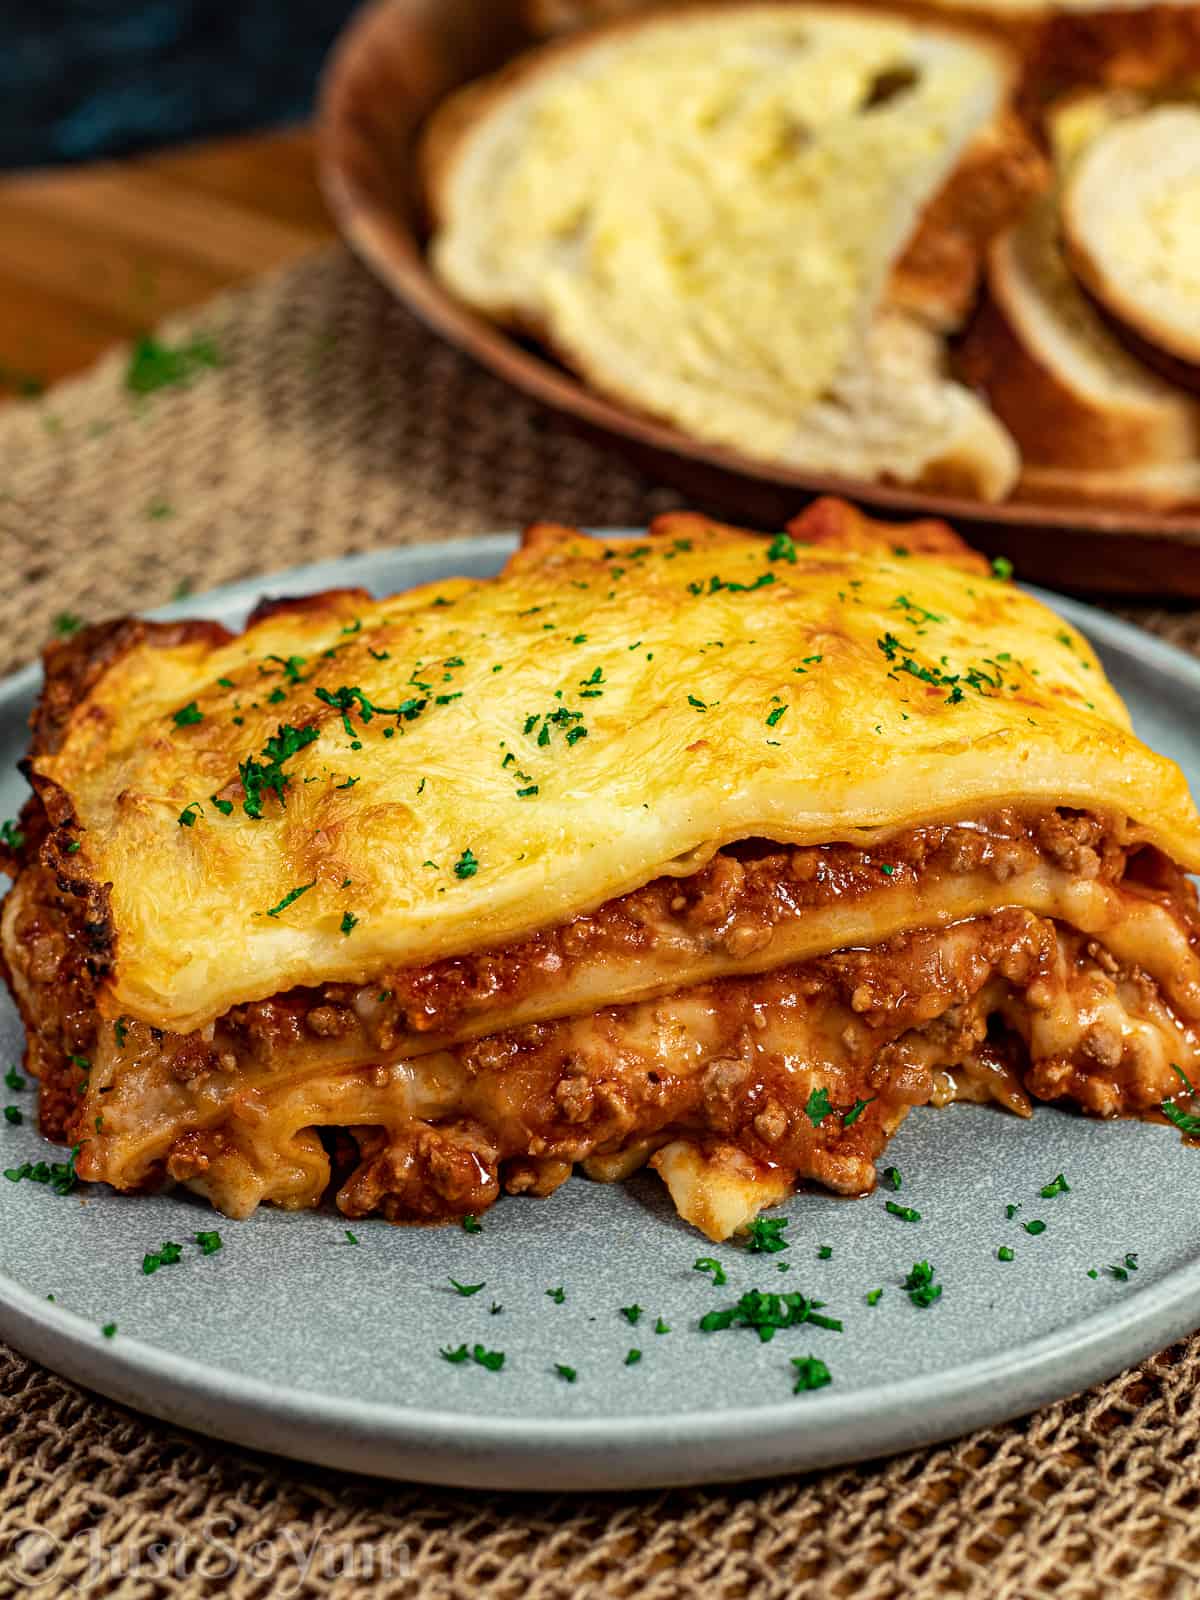
Cheesy Weber Q Beef and Pork Lasagna
Delicious layers of pasta, cheesy béchamel sauce, and a beef and pork bolognese, what more can you ask for with this Cheesy Weber Q Beef and Pork Lasagna.
It is a super easy lasagna recipe to make on the Weber Q, even if you are camping.
And if you don’t have a Weber Q, it is easily adapted to cook in the oven.
I love lasagna, always have, and the rest of the family do, so making this at home or camping is excellent. And at least I get a turn cooking on the Weber Q (laugh out loud).
This recipe combines two different recipes, my cheese sauce from Grilled Cheese Sauce For Broccoli and Cauliflower, with a couple of changes, and my soon to come Weber Q bolognese sauce recipe.
How to make Cheesy Weber Q Beef and Pork Lasagna
Besides needing a Weber Q to cook this on, you will also need an aluminium foil tray that is 31 x 26 x 6.5 cm. Even when I am at home making this, I use that tray to make cleaning up easier.
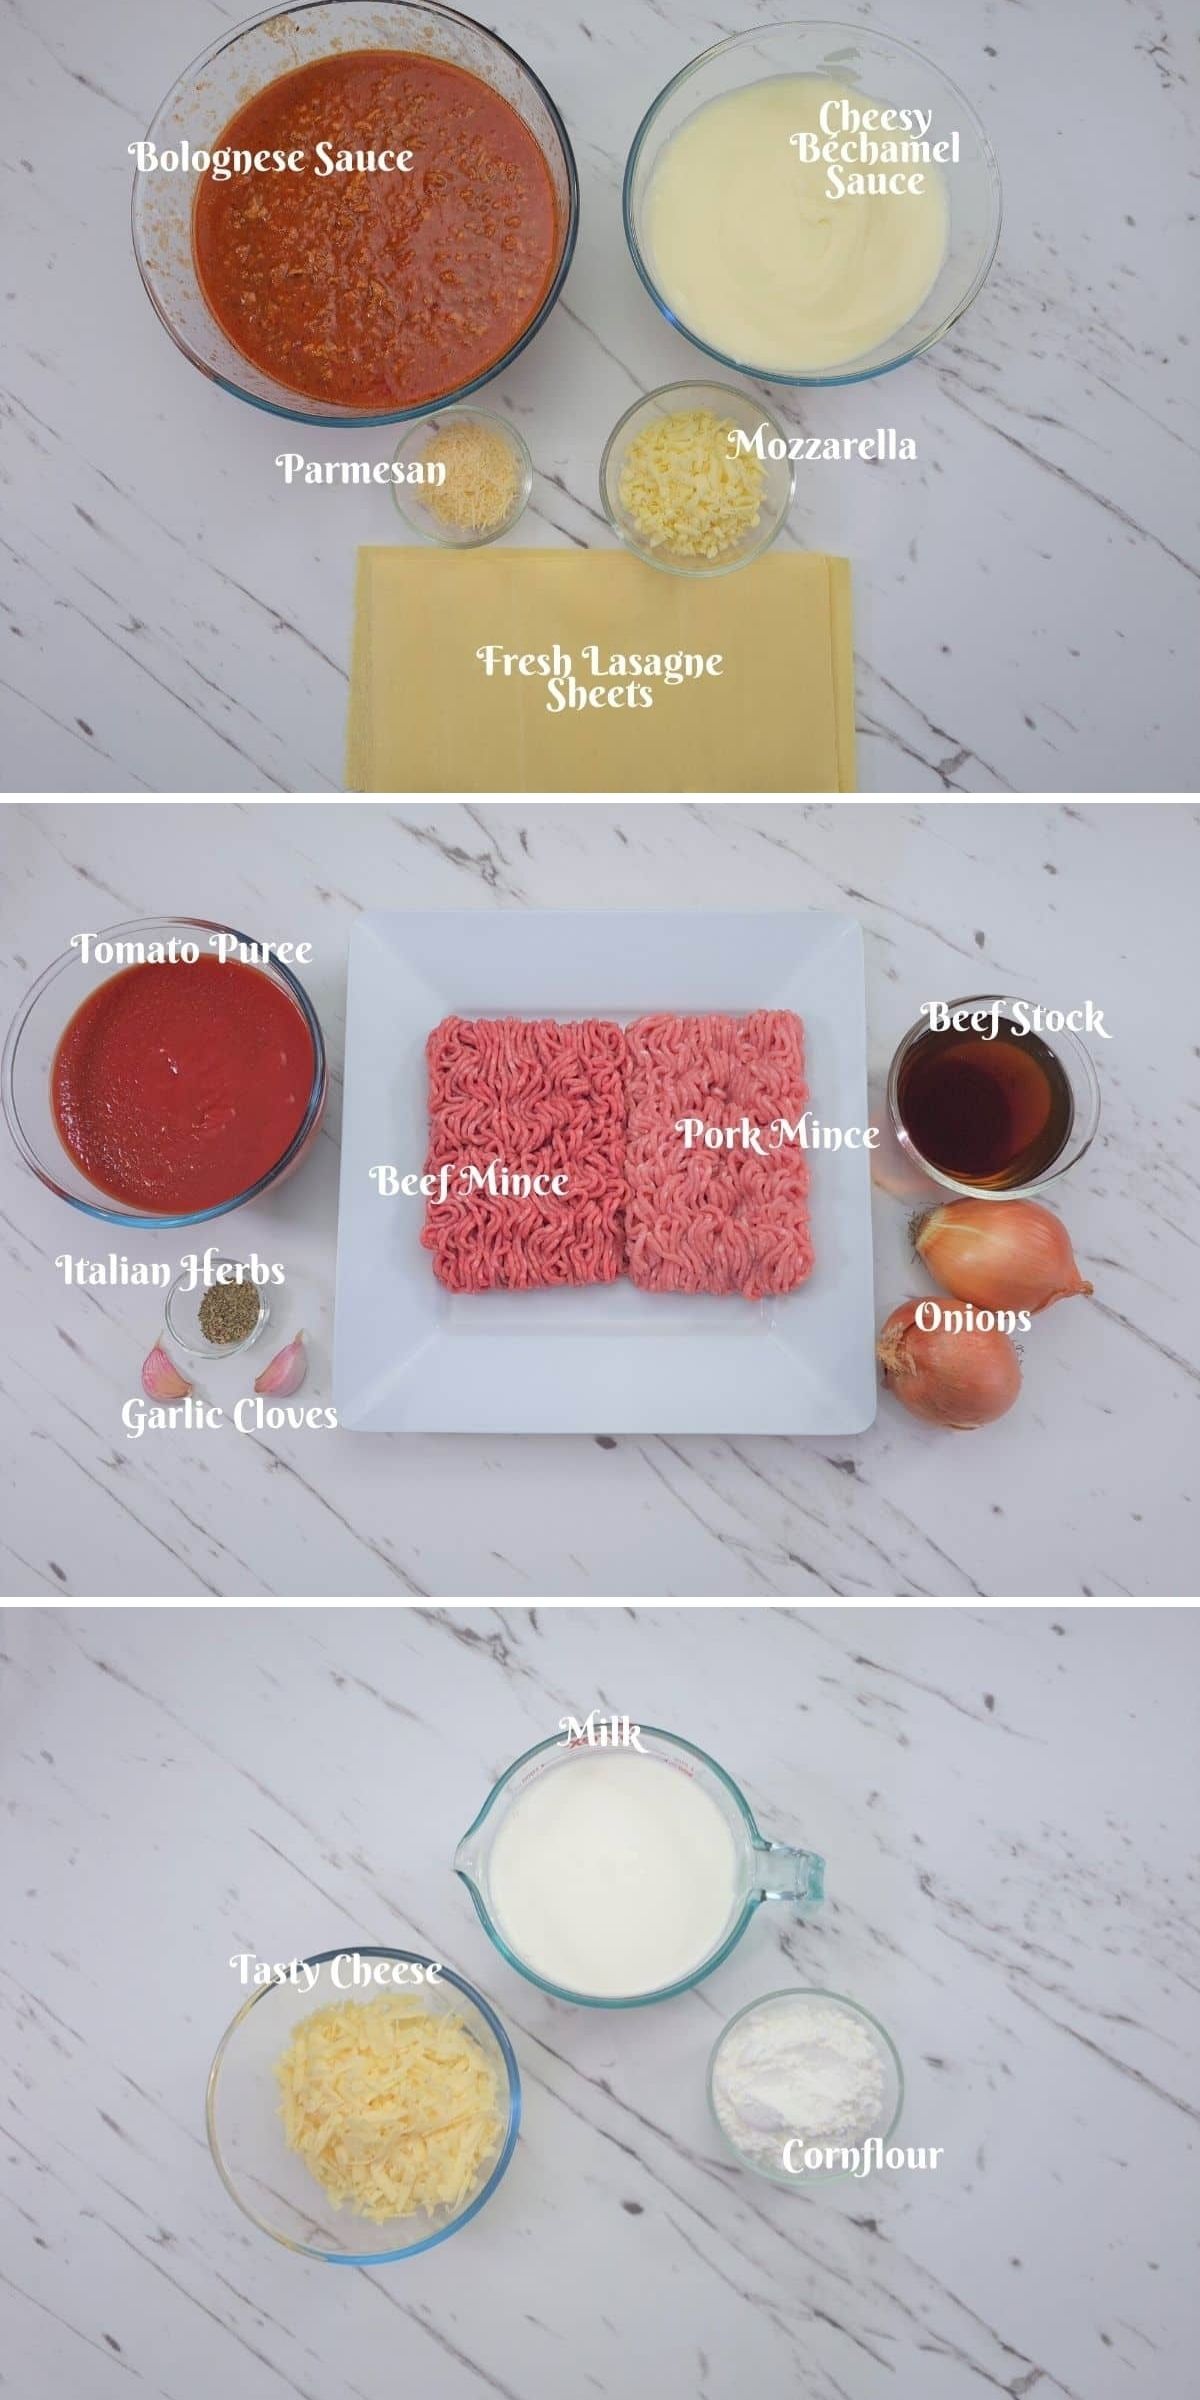
Ingredients
- Fresh Lasagne Sheets
- Grated Mozzarella
- Grated Parmesan
- Fresh parsley (for garnishing)
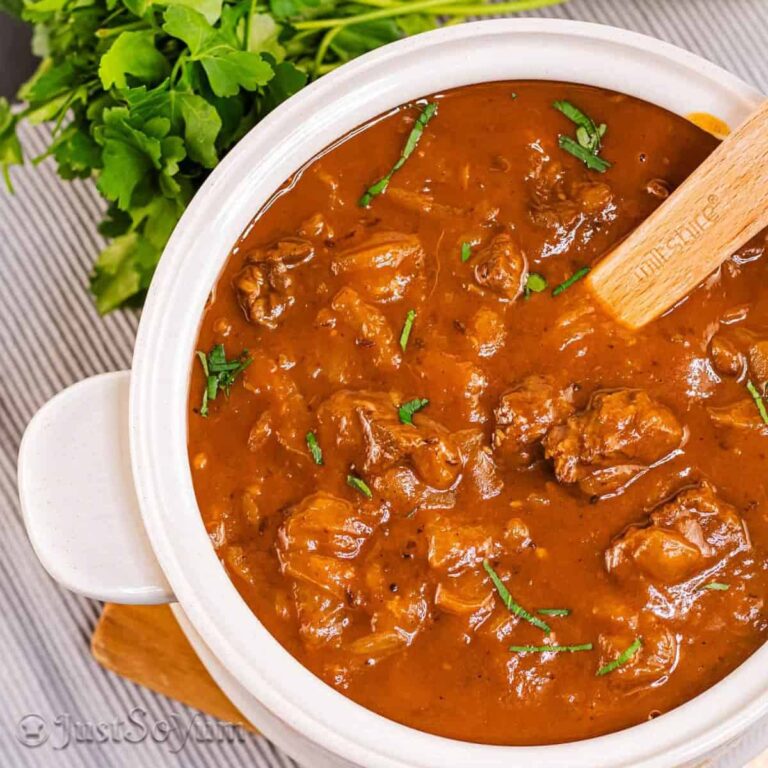
Bolognese Sauce
- Olive Oil
- Onions
- Garlic Cloves
- Beef Mince
- Pork Mince
- Tomato Puree
- Beef Stock
- Dried Mixed Italian Herbs
- Salt and Pepper
Cheesy Béchamel Sauce
- Milk
- Cornflour
- Grated Tasty Cheese
Method for Bolognese Sauce
I am using a stovetop method for this recipe. However, if you can only use your Weber Q to cook the bolognese sauce, you can still follow this and adjust where needed.
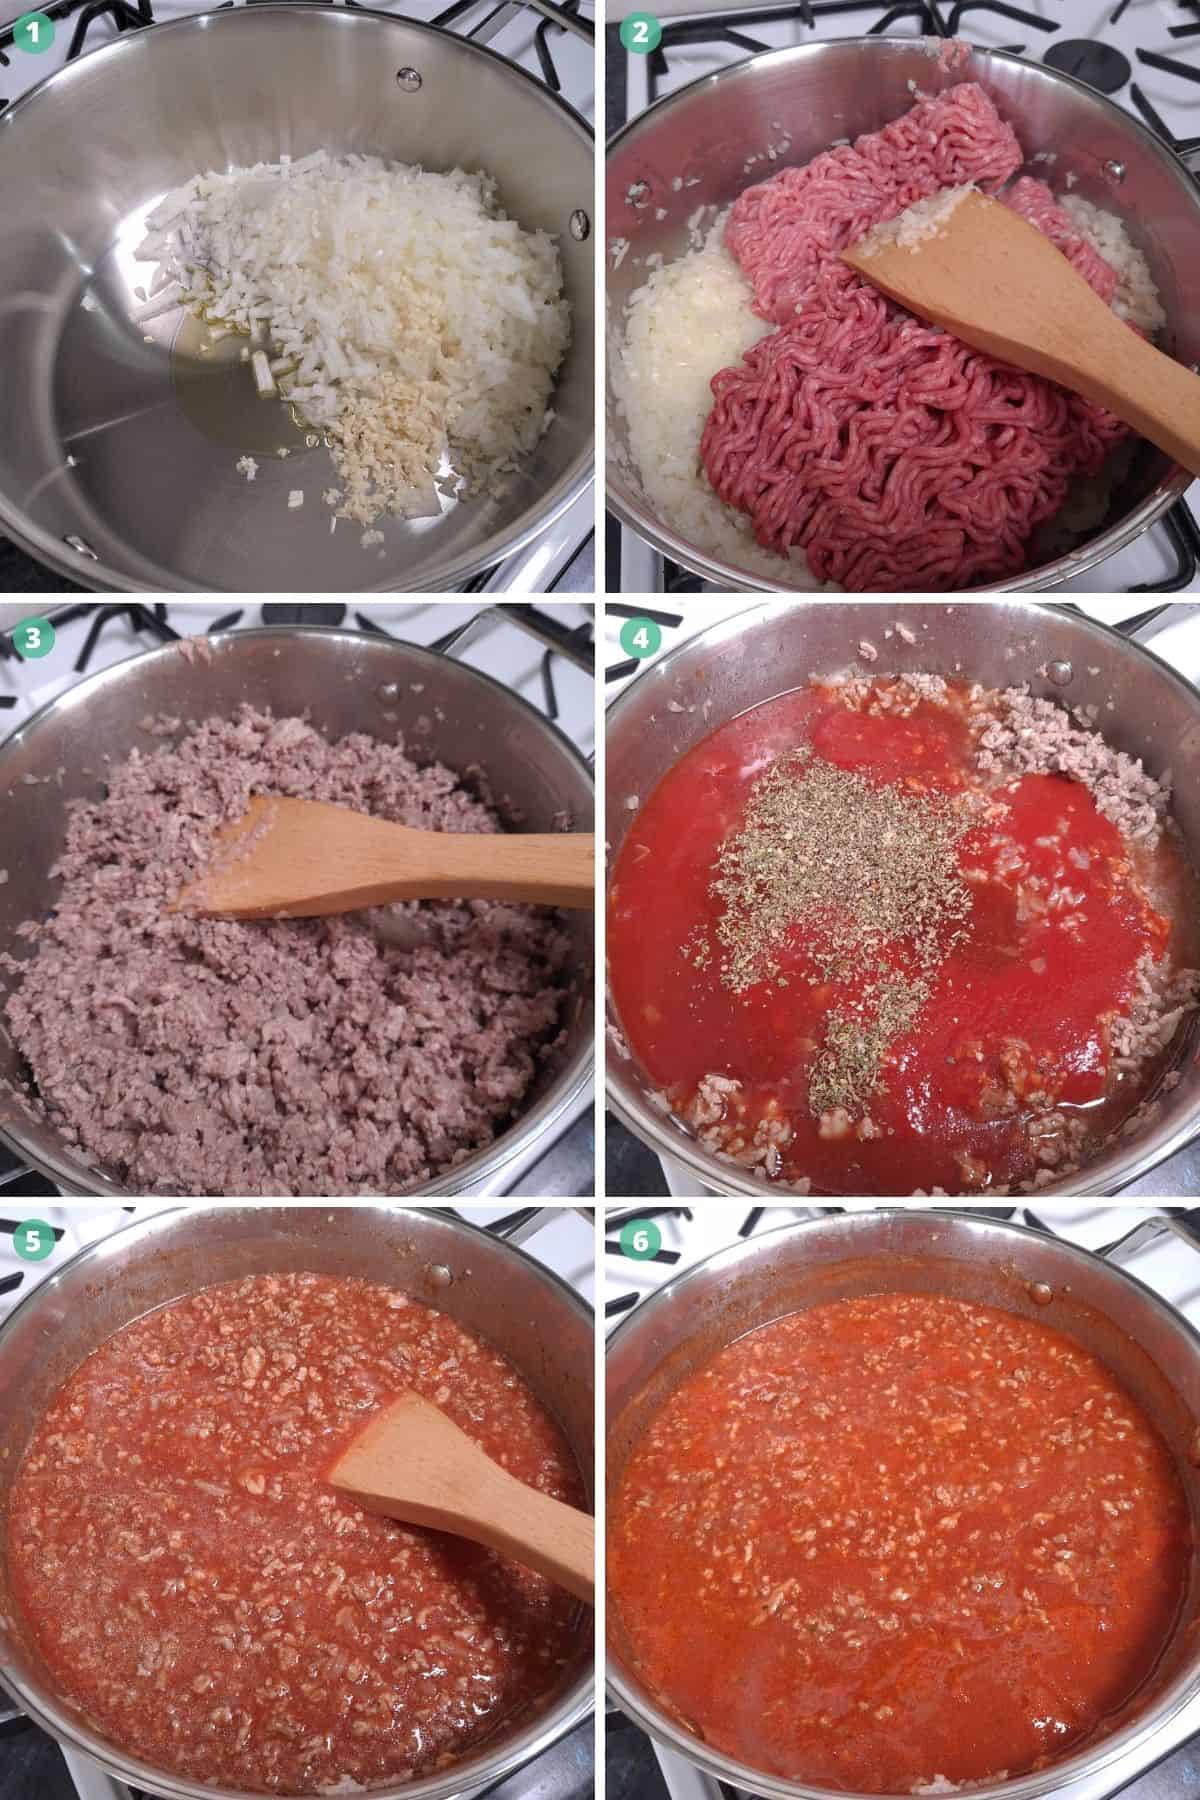
Finely chop your onions and garlic cloves.
Place a deep pot over high heat and heat two teaspoons of olive oil.
Add the onions and garlic and fry for around three minutes or until the onion is soft and you can smell the aroma from the garlic.
Add the tomato puree, beef stock, Italian herbs and salt and pepper to taste.
Stir to combine while over high heat, and once it starts to boil, turn down to low and simmer for 15 minutes uncovered.
Once cooked, set aside.
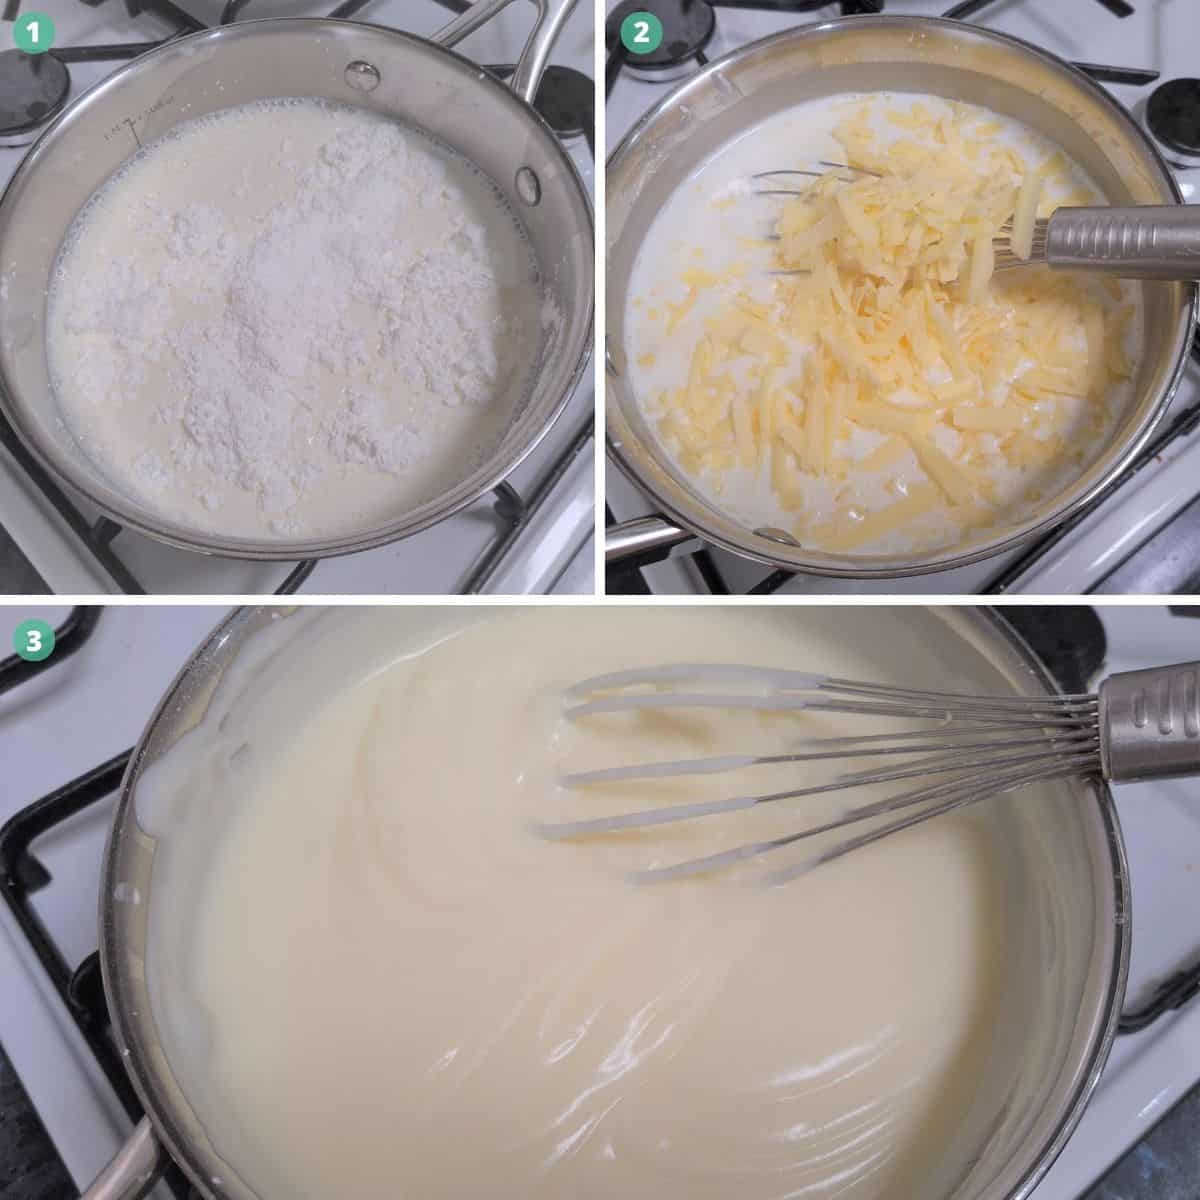
Method for Cheesy Béchamel Sauce
In a saucepan, place your milk and cornflour, then stir until the cornflour has dissolved.
Place over high heat, continue stirring until the milk starts to warm, and then add the grated tasty cheese.
Continue stirring until the cheese has melted and the sauce starts to thicken. Then remove from the heat, and stir until smooth.
Once ready, place aside.
*Note: this is a thick béchamel sauce; if you find it is too thick for you, add a little more milk (a bit at a time) to get the desired thickness
Assembling the Weber Q beef and pork lasagne
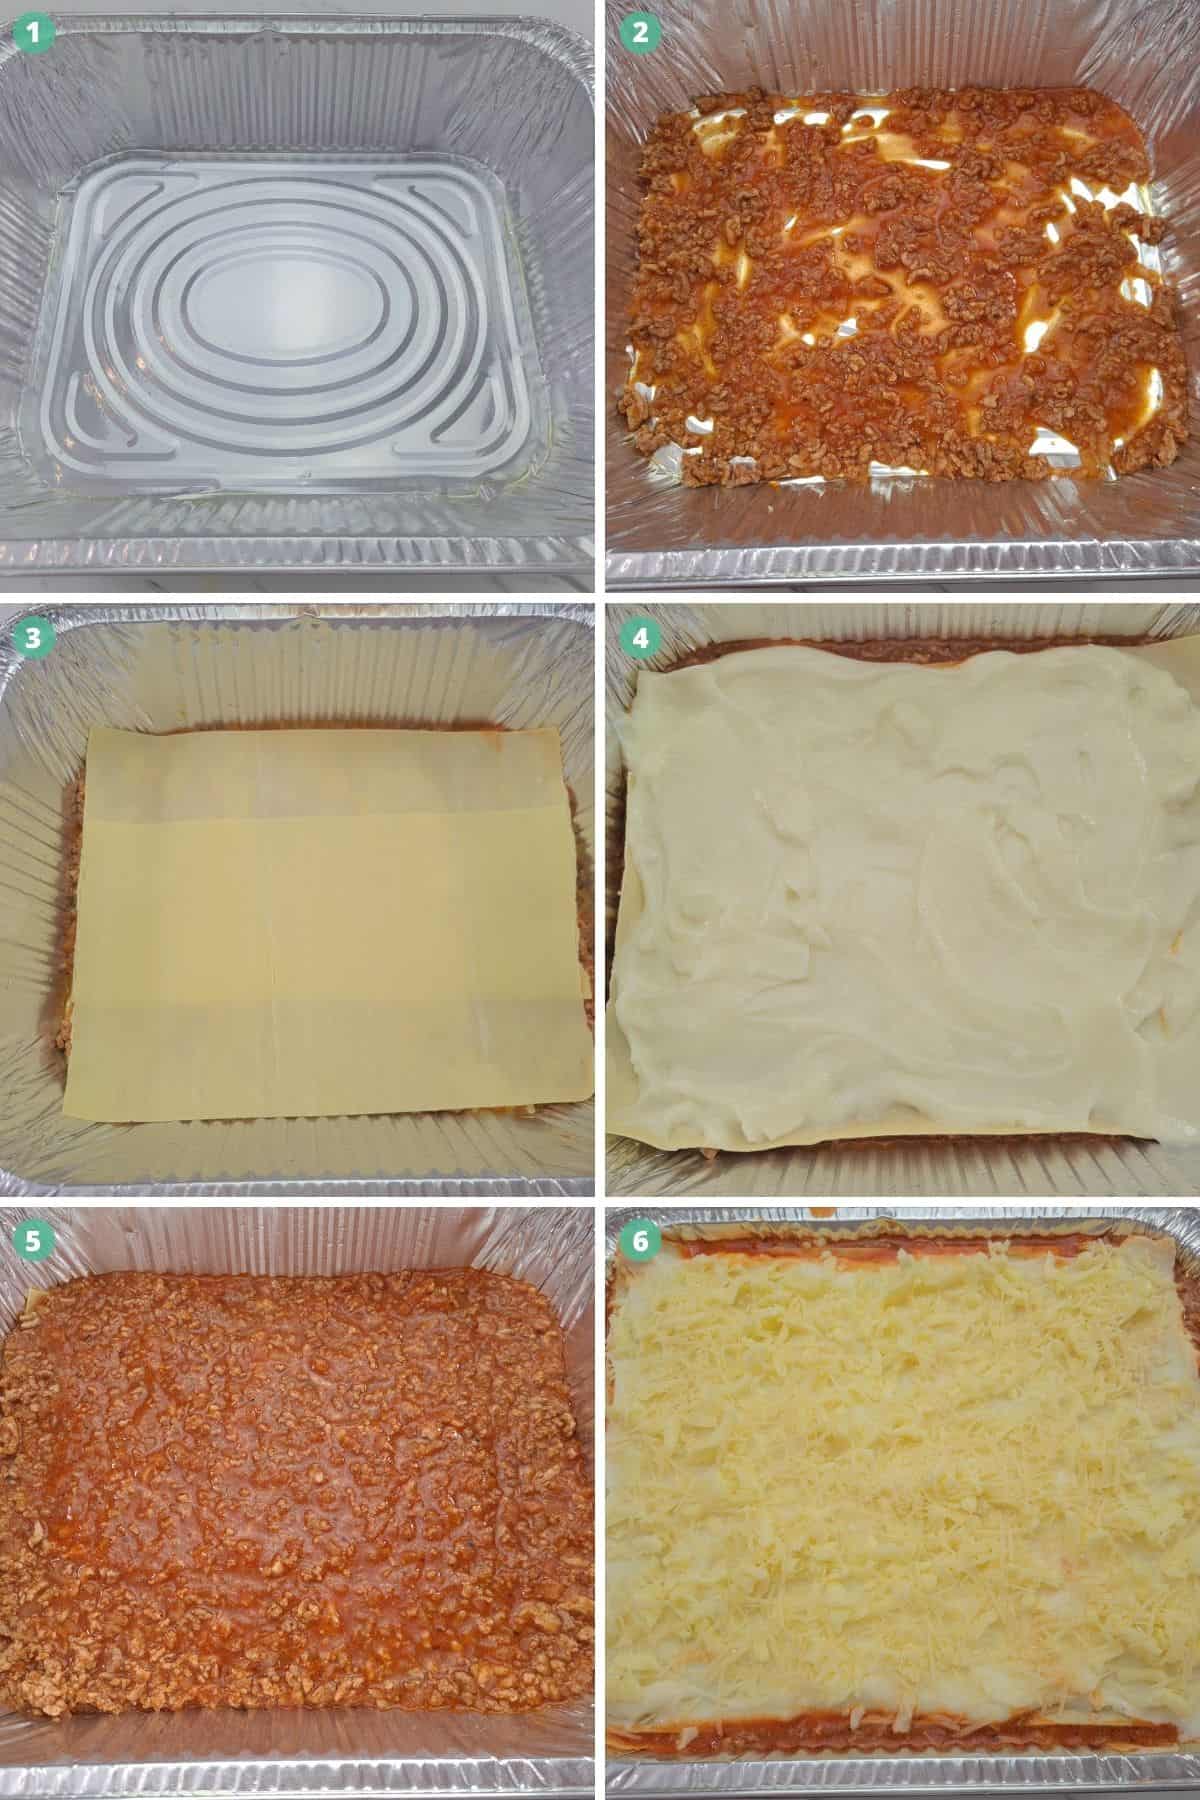
Coat your foil tray lightly with olive oil.
Add a light layer of the bolognese sauce to the bottom of the tray, along with the oil stops the first layer of lasagne sheets from sticking. Then a layer of lasagne sheets to create the base.
Give the bechamel sauce a good stir, then add 1/4 of the béchamel sauce followed by 1/3 of the bolognese sauce, then another layer of lasagne sheets. Repeat for the rest of the layers, making sure you finish with the béchamel sauce on top.
Once you have finished with the layers, sprinkle the grated mozzarella and parmesan cheese over the top of the béchamel sauce.
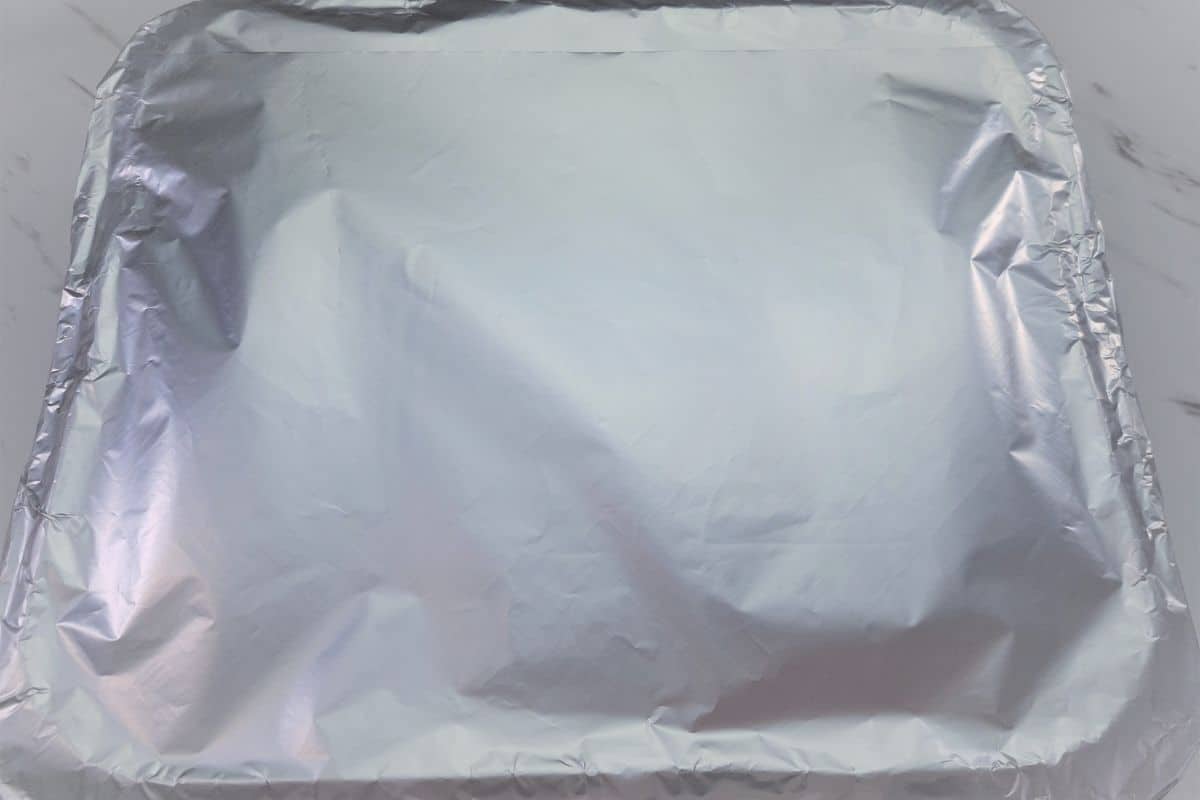
Cover with Aluminium foil (shiny side down).
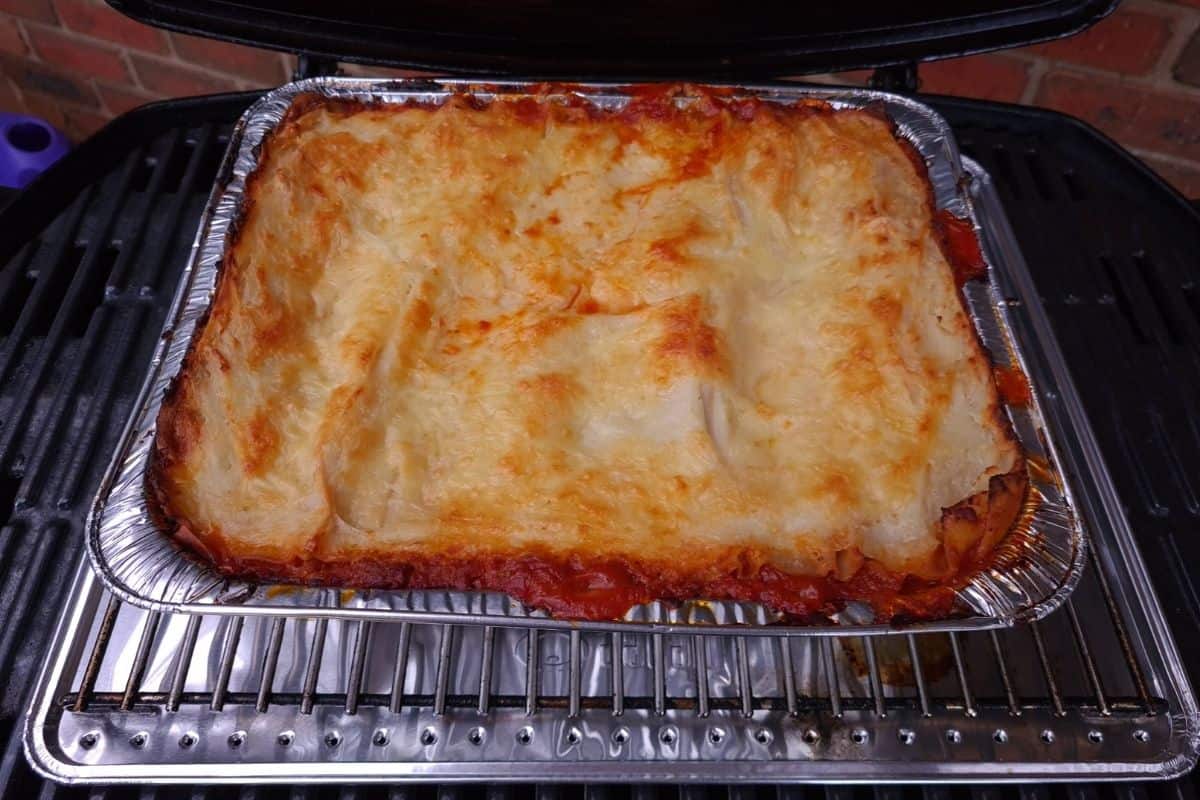
Cooking the Weber Q beef and pork lasagna
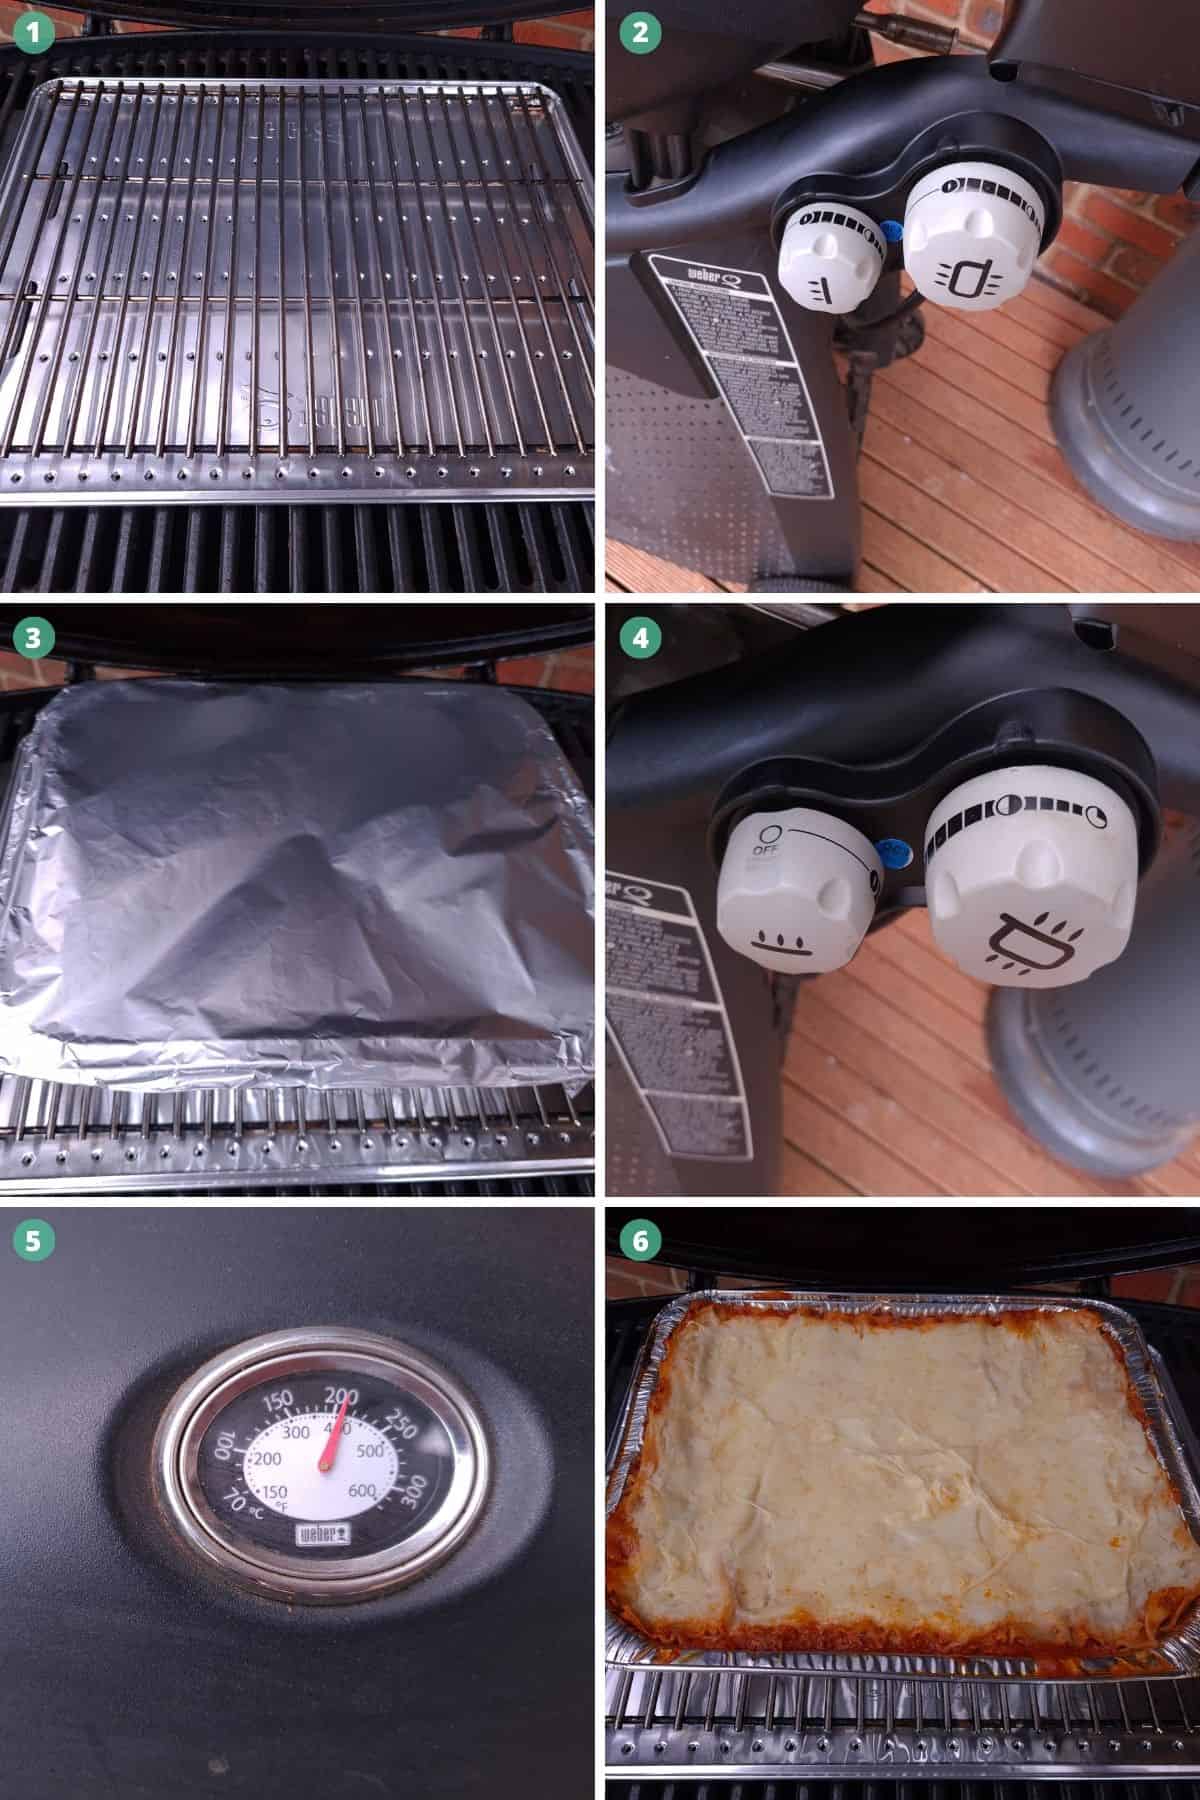
Place a convection tray and trivet in the centre of your Weber Q, then preheat for 10 minutes on high (both knobs if you are using the Family Q).
After 10 minutes, turn the inner burner knob off (if you are using the Family Q) and turn the outer burner down to medium.
Place the lasagne onto the trivet and cook for 40 minutes at 200°C.
After 40 minutes, carefully remove the aluminium foil and continue cooking for a further 20 to 30 minutes or until the top is golden brown.
Once cooked, remove the lasagne from the weber and let it rest uncovered for 10 to 15 minutes before cutting and serving.
It’s hard, I know, you want to start eating that delicious looking and smelling lasagne, but trust me allowing it to rest is well worth it.
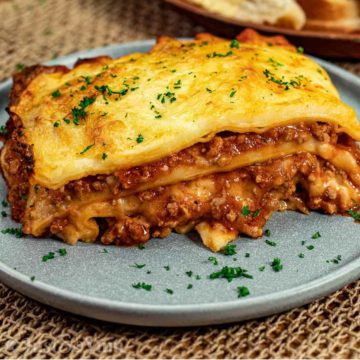
Garnish with finely chopped parsley, cut and serve with bread, light salad or chips.
Why should lasagna rest before cutting?
Allowing the cooked lasagne to rest avoids a sloppy mess when serving. When it comes out of the oven or weber, in this case, the sauces are hot. Allowing this to cool for 10 to 15 minutes, even 20 if you prefer, lets the sauces cool slightly, and set thus keeping your slices intact when serving.
And as tempting as it is, do not cover while it is resting; covering the lasagne will trap moisture making your sauces more watery.
Check out our favourite pasta recipes at JustSoYum!
Creamy Chicken And Mushroom Carbonara: Super quick and easy to make when looking for a last-minute pasta dish
Creamy Beef and Bacon Stroganoff with Mushrooms: Delicious stroganoff flavour combined with the flavours of mushroom and bacon.
Bacon-wrapped cannelloni: Again, with the perfect combination of beef and pork mince, combined with the pasta wrapped in bacon. Add topped off with a yummy sauce and melted cheese.
Want more Weber Q recipes to try, Click Here For More
Cheesy Weber Q Beef & Pork Lasagna
Equipment
- Weber Q Convection Tray
- Weber Q Trivet
- 31 x 26 x 6.5 cm Aluminium Foil Tray
Ingredients
Ingredients
- 375g g Fresh Lasagne Sheets 8 Sheets
- ¾ cup Grated Mozzarella
- ¼ cup Grated Parmesan
Bolognese Sauce
- 2 tsp Olive Oil For Frying
- 2 medium Onions
- 2 Garlic Cloves
- 500 g Beef Mince
- 500 g Pork Mince
- 820 g Tomato Puree 2 x 410g tins
- 1 cup Beef Stock
- 1 tsp Dried Mixed Italian Herbs
- Sea Salt to taste
- Cracked Black Pepper to taste
Bechamel Sauce
- 1 batch Cheese Sauce Recipe Add 1 extra cup of milk and 2 extra tablespoons of cornflour (Click Here For Full Recipe)
Instructions
Making the Bolognese Sauce
- Finey chop onions and garlic cloves.
- Heat oil in the frying pan, add the onion and garlic, cook over a high heat until soft, approx 3 minutes.
- Add the beef and pork mince and brown, while breaking up the mince with the back of the wooden spoon.
- Once the mince is brown, add the tomato puree, beef stock, dried italian herbs. Then salt and pepper to taste.
- Bring to the boil while stiring, then turn heat down to low and simmer for 20 minutes.
- Then set aside.
Making the Bechamel Sauce
- See Recipe for full instructions Add 1 extra cup of milk. Refer to notes for further information
Assembling the Weber Q Beef and Pork Lasagna
- Lightly coat your tray in olive oil, then place a thin layer of the bolognse sauce on the botton.
- Place a layer of lasagne sheets on top, then a ¼ of the bechamel sauce, followed by a ⅓ of the bolognese sauce. Then repeat, finishing off with the bechamel sauce on top.
- Sprinkle grated mozzarella and parmesan cheese over the top, then cover with aluminium foil, making sure the shiny side of the foil is down.
Cooking
- Place a convection tray and trivet in the centre of the Weber Q. Turn on high and preheat for 10 minutes.
- Place the lasagne on the trivet, turn down to medium heat and cook the lasagne for 40 minutes at 200°C
- Carefully remove the aluminium foil, then further cook for 30 minutes or until the top is golden brown.
- Remove from the weber and let the lasagne rest for 10 to 15 minutes before cutting and serving.
- Ganish with finely chopped pasley (optional)