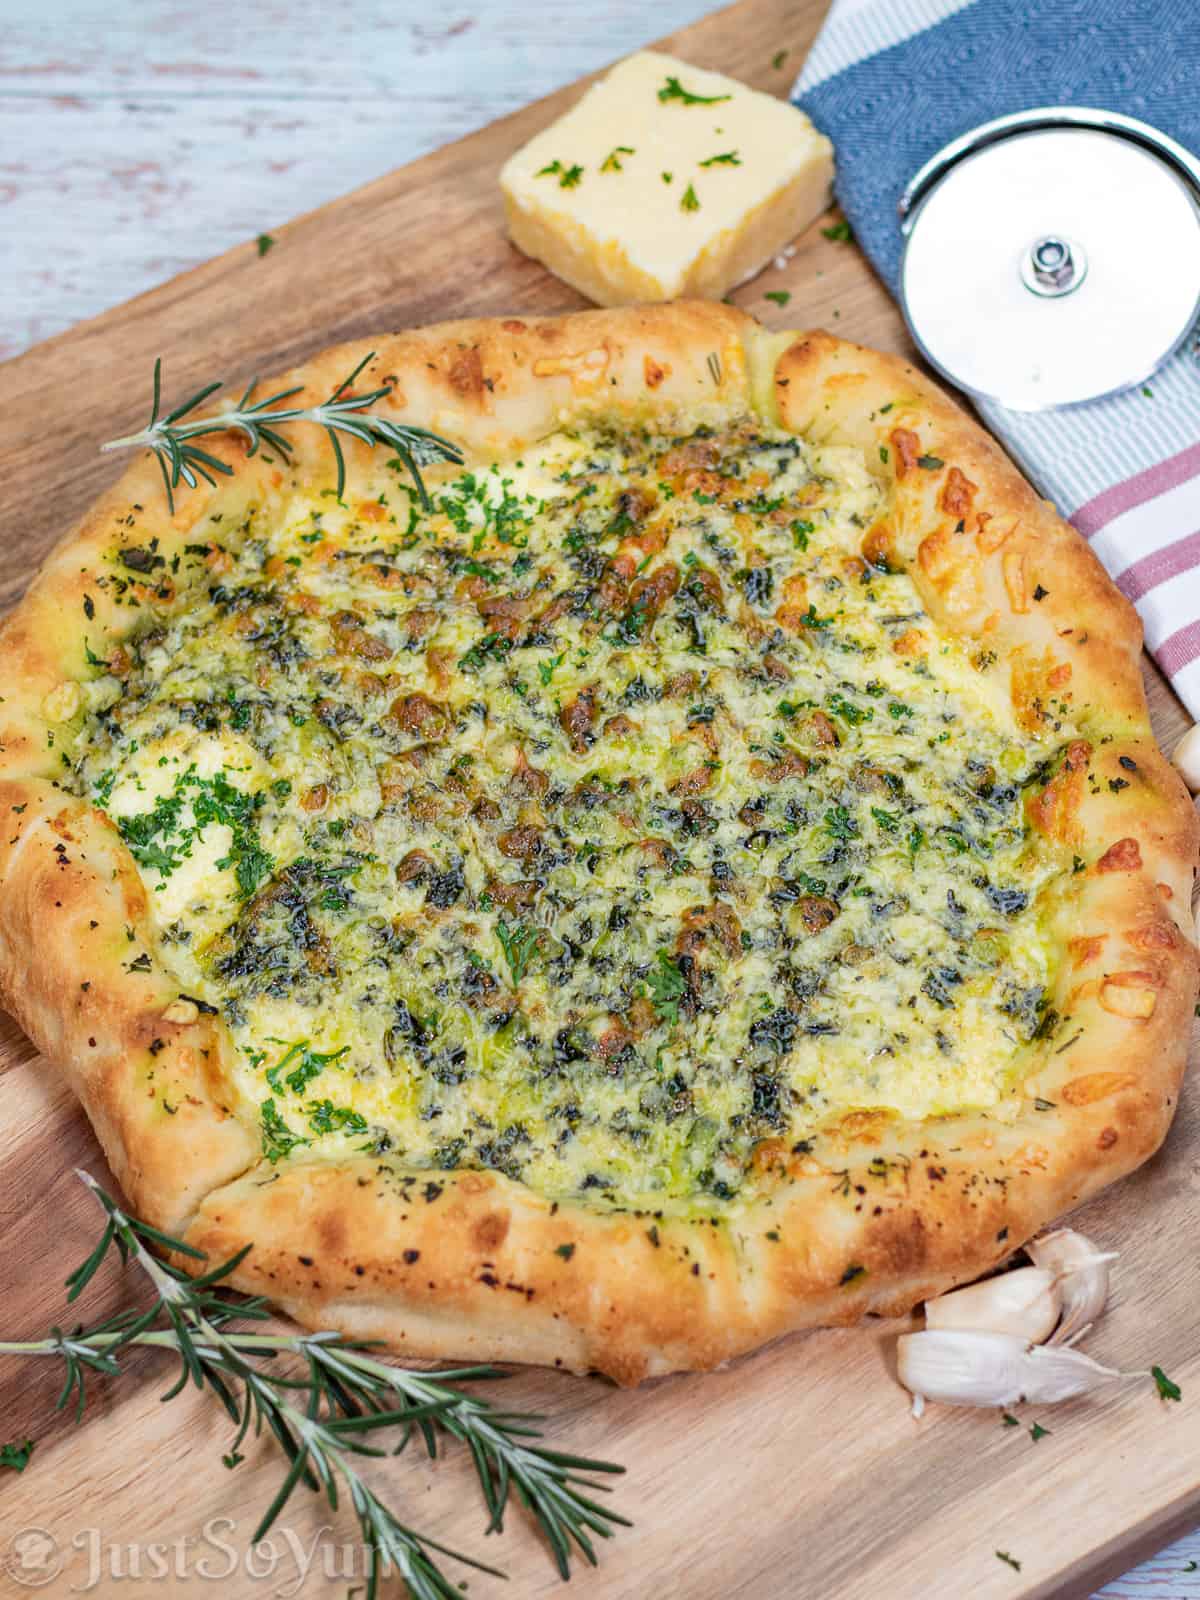
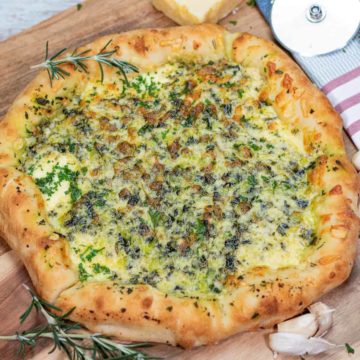
Weber Q Cheesy Stuffed Crust Garlic Pizza and Herbs

My Weber Q Cheesy Stuffed Crust Garlic Pizza is packed with a delicious combination of flavours that you’re just simply going to fall in love with.
Topped with mozzarella, cheddar, and parmesan cheese and a handpicked selection of garlic and herbs. And the best part is there is no need to throw away the crust.
Because I’ve packed the crust in delicious cheddar cheese as well.
What Ingredients Make a Weber Q Cheesy Stuffed Crust Garlic Pizza?
Boy, I love a good pizza cooked in a Weber Q. There’s just something about garlic and melted cheese that goes oh so well together.
And this pizza is no exception, entirely designed by myself with an added touch. The crust is stuffed with cheese, and I’ve jazzed it up with a combination of herbs.
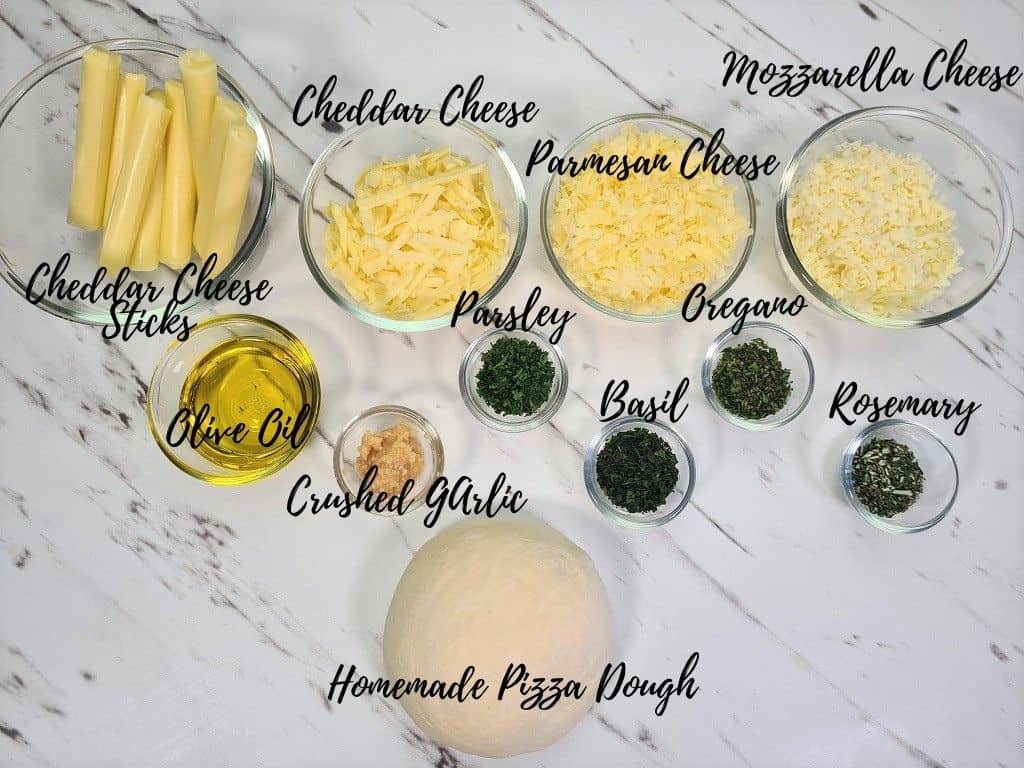
To make my Weber Q cheesy stuffed crust garlic pizza, you’re going to need:
- Mozzarella Cheese
- Cheddar Cheese (Tasty)
- Parmesan Cheese
- Crushed Garlic (Minced)
- Cheddar Cheese Sticks (To make the stuffed crust)
- Fresh Basil
- Fresh Oregano
- Fresh Rosemary
- Fresh Parsely
- Olive Oil
Note: You are going to need to make your own pizza dough for this recipe to work. Luckily I’ve got you covered.
Check out how to make the best Weber Q pizza dough right here.
If you prefer to use store-bought pizza bases, then that’s perfectly fine also. Just don’t add the cheddar cheese sticks to make the stuffed crust.
Prepping Your Weber Q to Cook Pizza
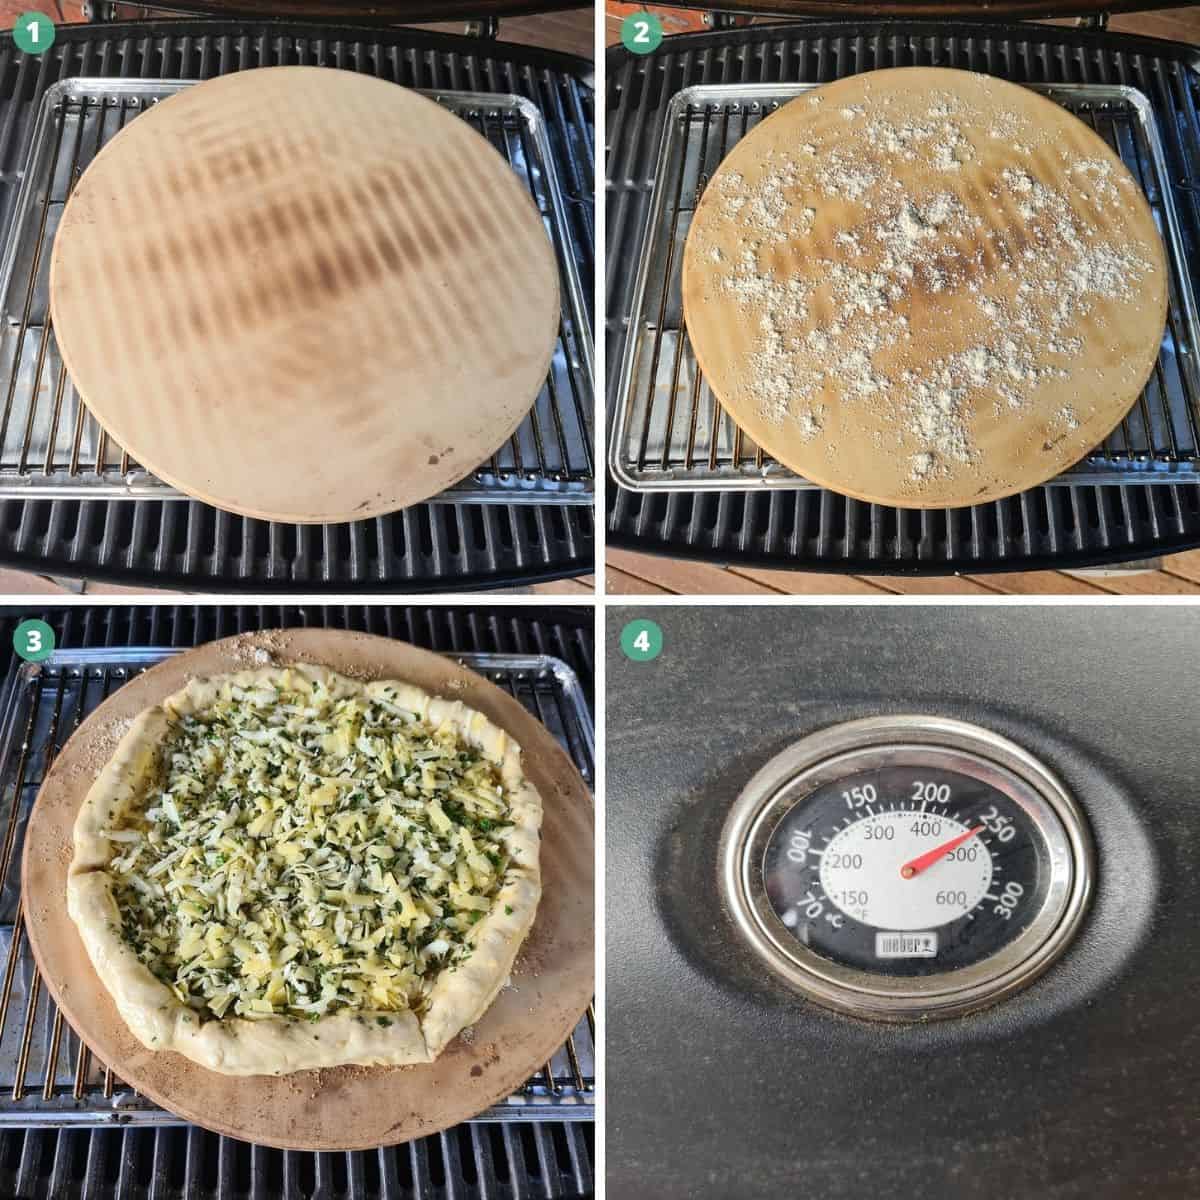
We need to cook our pizza via the indirect method, place a convection tray onto the grill and your trivet on top of the convection tray.
Finally, place your Weber Q pizza stone on top of the trivet.
We want our Weber Q to be really hot during this cook, guys. If you have a wireless thermometer, pop that onto the grill to monitor the temperature.
I use the Inkbird IBBQ-4T, a lifesaver because I can enjoy a beer without standing next to my Weber Q, and it’s incredibly accurate.
It’s well worth the investment.
Fire up your Weber Family Q and turn both gas control knobs to the Start/HI position for 10 minutes.
Then close the lid.
How to Make a Stuffed Crust Cheesy Garlic Pizza?
I’m assuming you have made your own pizza dough, so I will teach you this method.
Sprinkle a good amount of flour onto your workspace to prevent the pizza dough from sticking to your bench.
Using a rolling pin, roll the dough out to your desired size, and place it onto the Weber Q serving tray if you have one. Make sure to add flour to the serving tray as well.
I am using the 36.5cm Family Q size pizza stone and serving tray. Which is suitable for both 2000 and 3000 series Weber Q’s
Note: If you use the Baby Q and have the 26cm serving tray and stone, then make sure to accommodate the size difference by downsizing the ingredients.
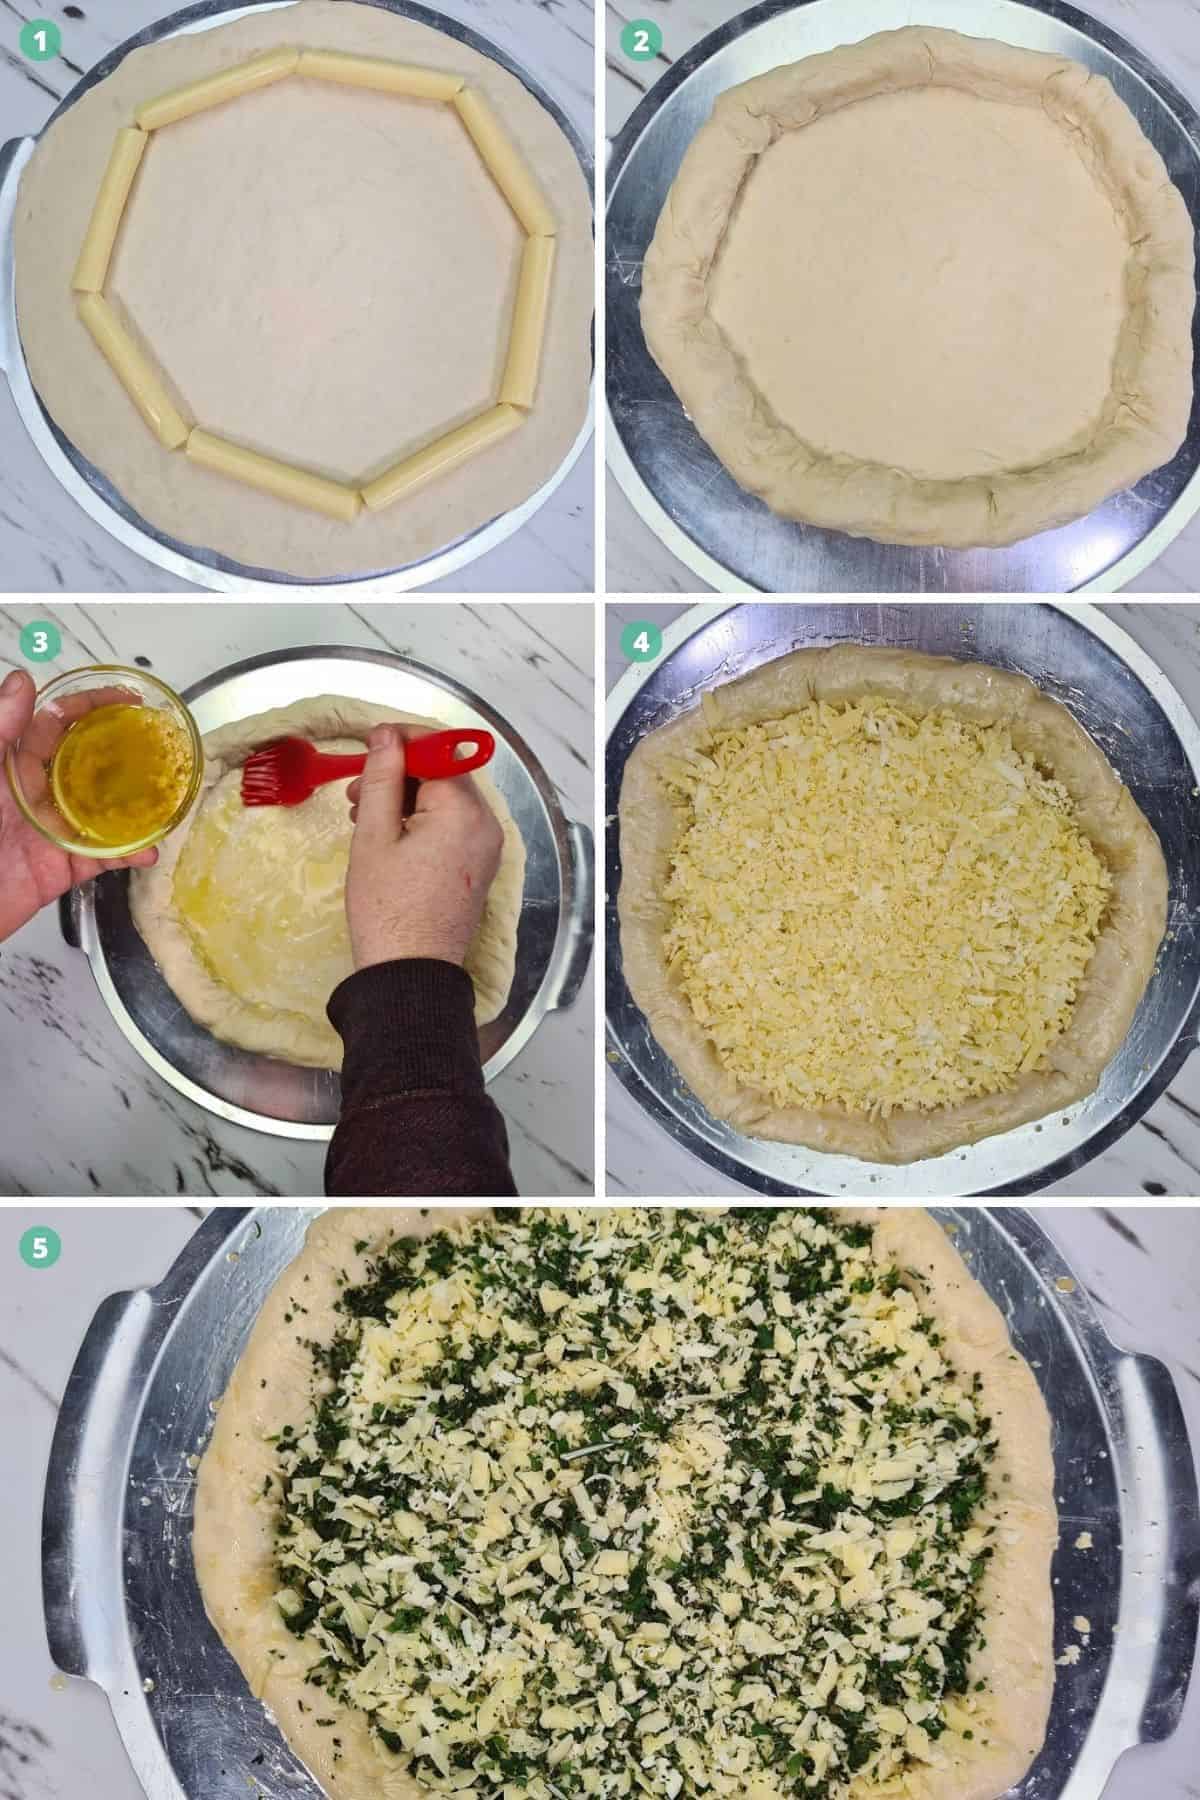
Begin placing the cheese sticks about 1 inch from the edge of the pizza dough.
Ensure the cheese sticks are touching each other, so there are no gaps in the crust when the cheese melts.
Gently fold the dough over the cheese sticks and tuck it under to avoid any cheese leaking out.
Add the garlic to the olive oil and begin basting the crust and the centre of the pizza.
Try not to drench the pizza dough in garlic oil. Just a light brushing is all that’s needed.
This can cause the oil to come to the surface of the pizza during cooking making it far too oily.
Hot Tip: Try to spread as much crushed garlic as you can onto the pizza to give it that garlic hit.
Add the mozzarella, cheddar, and parmesan, and finally dice the herbs and sprinkle evenly onto the pizza.
Should I Cook on the Serving Tray or The Pizza Stone Directly?
I’m assuming you have made your own pizza dough, so I will teach you this method.
Sprinkle a good amount of flour onto your workspace to prevent the pizza dough from sticking to your bench.
Using a rolling pin, roll the dough out to your desired size, and place it onto the Weber Q serving tray if you have one. Make sure to add flour to the serving tray as well.
I am using the 36.5cm Family Q size pizza stone and serving tray. Which is suitable for both 2000 and 3000 series Weber Q’s
Note: If you use the Baby Q and have the 26cm serving tray and stone, then make sure to accommodate the size difference by downsizing the ingredients.
Begin placing the cheese sticks about 1 inch from the edge of the pizza dough.
Ensure the cheese sticks are touching each other, so there are no gaps in the crust when the cheese melts.
Gently fold the dough over the cheese sticks and tuck it under to avoid any cheese leaking out.
Add the garlic to the olive oil and begin basting the crust and the centre of the pizza.
Try not to drench the pizza dough in garlic oil. Just a light brushing is all that’s needed.
This can cause the oil to come to the surface of the pizza during cooking making it far too oily.
Hot Tip: Try to spread as much crushed garlic as you can onto the pizza to give it that garlic hit.
Add the mozzarella, cheddar, and parmesan, and finally dice the herbs and sprinkle evenly onto the pizza.
Should I Cook on the Serving Tray or The Pizza Stone Directly?
I’ve noticed many ask if they should cook a pizza on a Weber Q pizza stone while it’s still on the serving tray.
You can, yes! But I don’t recommend it.
Why? A pizza stone is designed to cook the pizza base, giving you a crunchy and firm golden brown bottom.
It also distributes heat to the centre of the pizza and cooks it evenly.
If a pizza cooks while it’s on the serving tray, this will not happen, and the pizza will simply sag after it’s been sliced up.
Time to Cook this Bad Boy!
Sprinkle flour onto your pizza stone to prevent sticking, and gently slide the pizza onto the stone.
Suppose you are struggling to get the pizza off the Weber Serving Tray.
In that case, a great alternative is to assemble your pizza onto a rounded pizza spatula such as SCI Scandicrafts Pizza Oven Spatula, which you can grab from Amazon.
Hopefully, all went well, and your pizza is now on your pizza stone. You can then go ahead and close the lid on your Weber Q.
If you are cooking your pizza on the Family Q, turn the small gas control knob to the off position and leave the large gas control knob on hi or 2 or 3 notches under HI.
The Baby Q users simply turn the gas control knob to medium or 2 or 3 notches above medium.
You will need to maintain a temperature between 240°C (465°F) and 250°C (480°F) at all times. This will ensure the pizza is super crispy.
Cook for 15-20 minutes or until the crust is golden brown and cooked evenly.
Hot Tip: If it is browning on one side of the pizza, simply turn it halfway through the cook to help evenly brown the other side.
Once your pizza is done, carefully move the pizza back onto the serving tray and give it a few minutes to cool before slicing.
Give Some of JustSoYum’s other Weber Q Recipes a Crack!
Fully loaded Weber Q Meatlover’s Pizza – I mean it when I say, “it’s fully loaded.” Full of meat and topped with bbq sauce, and it goes great with a beer.
Weber Q Pizza Dough – Homemade pizza dough, and you can get it right here on JustSoYum.
Do you feel like making something different?
Weber Q Roast Pork – Who says you can’t crackle vacuum-sealed roast pork. If you’ve always struggled to get the perfect crackle, then don’t worry because I got you covered.
Weber Q Roast Lamb – Amazingly juicy and super tender, this one will melt in your mouth. Rosemary and garlic are all that’s needed to make the best roast lamb you’ve ever tasted.
Weber Q Twice Baked Roast Potatoes – The perfect camping food, packed with super-smooth mashed potato, with the addition of bacon, garlic butter, and herbs. This one will make you go that’s “Just So Yum”.
We’re an affiliate
We hope you love the products we recommend! Just so you know, we may collect a share of sales or other compensation from the links on this page. Thank you if you use our links, we really appreciate it!
Weber Q Cheesy Stuffed Crust Garlic Pizza and Herbs
Ingredients
- 1 cup Cheddar Cheese Shredded
- 1 cup Parmesan Cheese Shredded
- 2 cups Mozzarella Cheese Shredded
- 1 tbsp Basil Freshly Chopped
- 1 tbsp Oregano Freshly Chopped
- 1 tbsp Rosemary Freshly Chopped
- 1 tbsp Parsley Freshly Chopped
- 8 Cheddar Cheese Sticks
- 2 tsp Crushed Garlic
- 80 ml Ovlive Oil
Instructions
Prepping The Pizza
- Start your Weber Q and set it up for indirect cooking using a convection tray and trivet, and place your pizza stone on top. Turn the gas control knob to the highest setting to allow it to heat up for 10 minutes. Turn both gas control knobs too high on the Family Q, and close the lid.
- Grate all of the cheese and mix the olive oil and crushed garlic together into a small bowl and, finely chop up all of the herbs.
- Add plenty of flour onto the surface of the serving tray to prevent the dough from sticking.
- Roll out your pizza dough to the inner edge of your Weber Q serving tray. Place the cheese sticks 1 inch inwards from the edge, making sure the cheese sticks are touching each other on each end.
- Gently lift the edges of the pizza dough over the cheese sticks and tuck it under.
- Apply a small amount of garlic oil to the crust and inside of the pizza base. Try not to apply too much oil or it will rise to the surface of the pizza. Scoop out some of the garlic from the oil for added flavour.
- Evenly sprinkle the cheddar and parmeson cheese, and finally the mozzarella. Then evenly sprinkle the herbs.
Cooking The Pizza
- Evenly sprinkle a good amount of flour onto the pizza stone and gently slide the pizza onto the centre of the stone.
- Turn to the small gas control knob to the off position and the large gas control knob down 2 to 3 notches to maintain a temperature between 240°C (465°F) and 250°C (480°F)
- Cook for 20 minutes or until the crust is golden brown. If the pizza is browning on only one side simply turn the pizza stone to brown the other.
- Allow to cool for 2 minuutes, slice up and serve.
Notes
Alternatively, you can leave a comment below and let us know how you went.