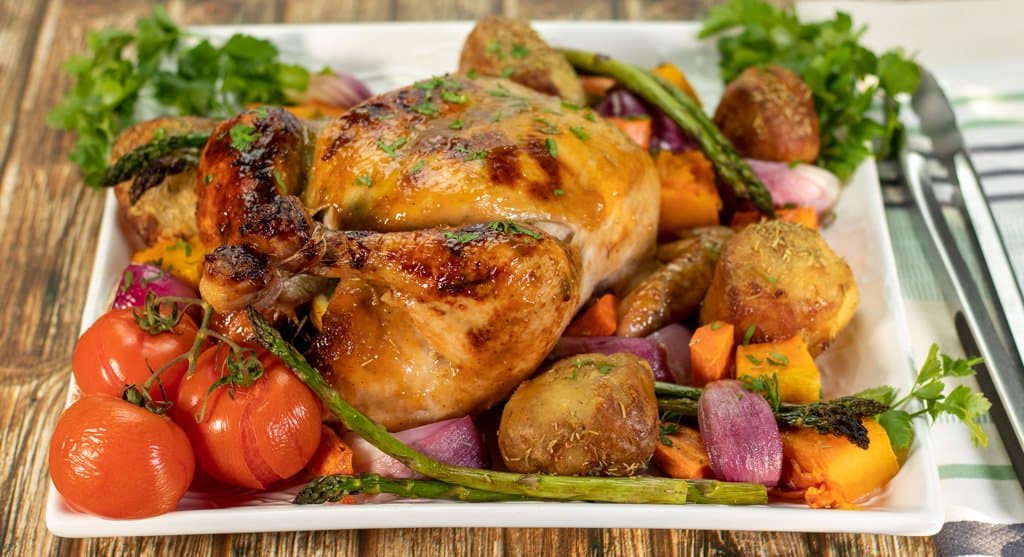
Tender Honey-Glazed Weber Q Roast Chicken
The weekend is almost here, the weather outlook is going to be beautiful, and the family is coming to visit.
WHAT are you going to feed them?
If your finances are a bit tight and you need to cook for a small army, then you must try my tender honey-glazed Weber Q roast chicken recipe.
We all know that chicken is one of the cheapest meats out of all the proteins. That is why it makes for such an attractive option when roasting for a larger group of people.
My roast chicken recipe is surprisingly inexpensive to bring together but at the same time will not sacrifice the taste.
Combining the natural flavours of the chicken and infusing them with a combination of lemon, garlic, and rosemary, you will be an instant hit with your guests. Still, at the same time, you won’t break the bank.
Now, there is some prep to do beforehand, but trust me, it’s worth it!
How Long Does it Take to Cook a Chicken in a Weber Q?
The weight of the chicken determines the cooking time. For example, if a chicken weighs 2.8kg (6.1lbs), then the cooking time would be about 1 hour and 15 minutes to 1 hour and 30 minutes between 190°C to 230°C (374°F to 446°F).
If the chicken is lower in weight, then less cooking time will be needed.
When we talk about cooking time on a Weber Q, we are talking about approximations only. Heat often fluctuates for several reasons. The type of day you are cooking on, is it cold? Windy? Or is it raining?
Suppose you are cooking a roast chicken on your Weber Q in any of these conditions. In that case, you will find yourself adjusting the control knob regularly.
The chicken will cook differently in a Weber Q when compared to a bbq or Weber kettle, so there is a learning curve here.
The easiest way to determine the cooking time on a Weber Q is by using a meat thermometer such as Webers iGrill 2 Meat Thermometer.
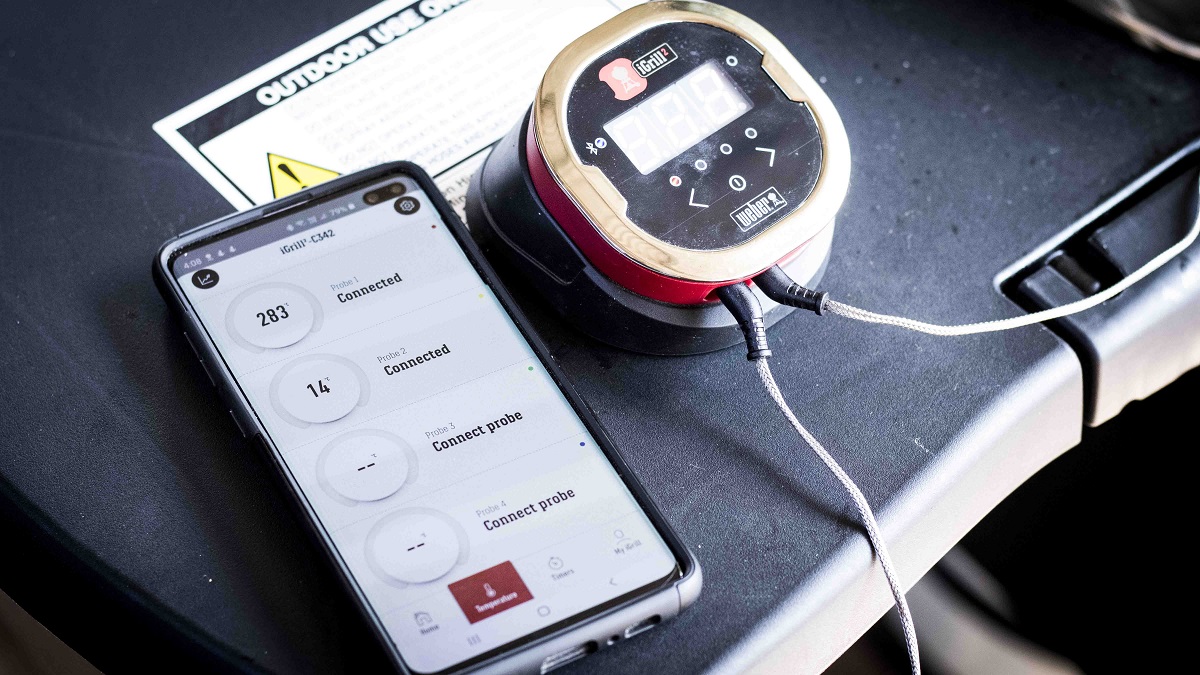
Trust me on this; it will take the headache out of worrying about the maths.
The Weber Q has its own set of rules when it comes to cooking time.
How Do You Know When A Weber Q Roast Chicken is Cooked?
When the chicken reaches 71°C (159°F), it is ready to take out and set down to rest for 10 to 15 minutes in which it will begin to rise in temperature by a further 3°C (37°F)
Final doneness of chicken is 74°C (165°F) and considered safe for eating.
Making the Seasoning for the Weber Q Roast Chicken
Have you ever noticed most of us at one point or another only flavour the outside of the chicken, but the meat is so bland?
I have a trick that will make the whole chicken taste magical, infusing the entire chicken with flavour.
Seasoning the chicken the day before will give the garlic and rosemary time to infuse into the meat.
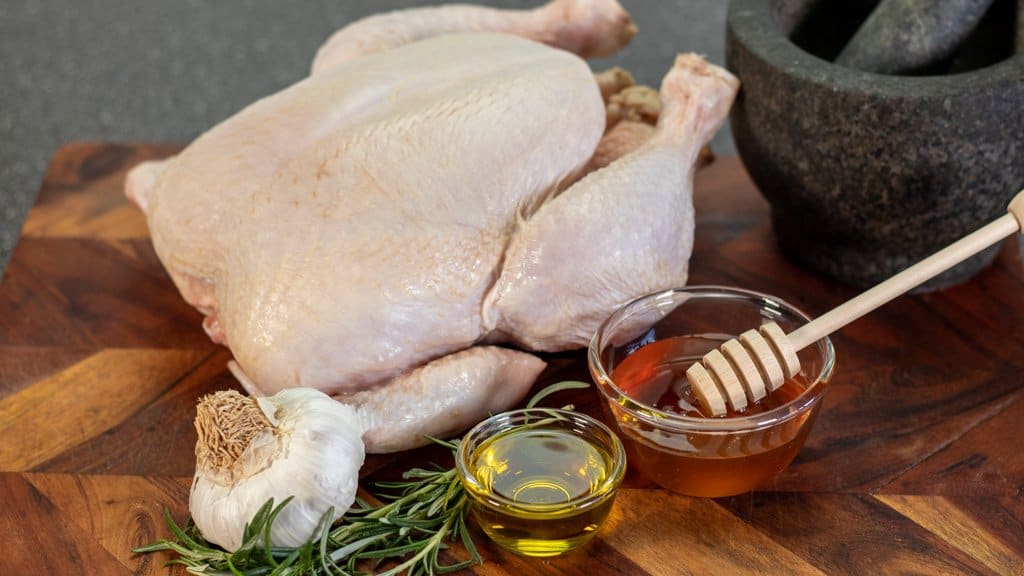
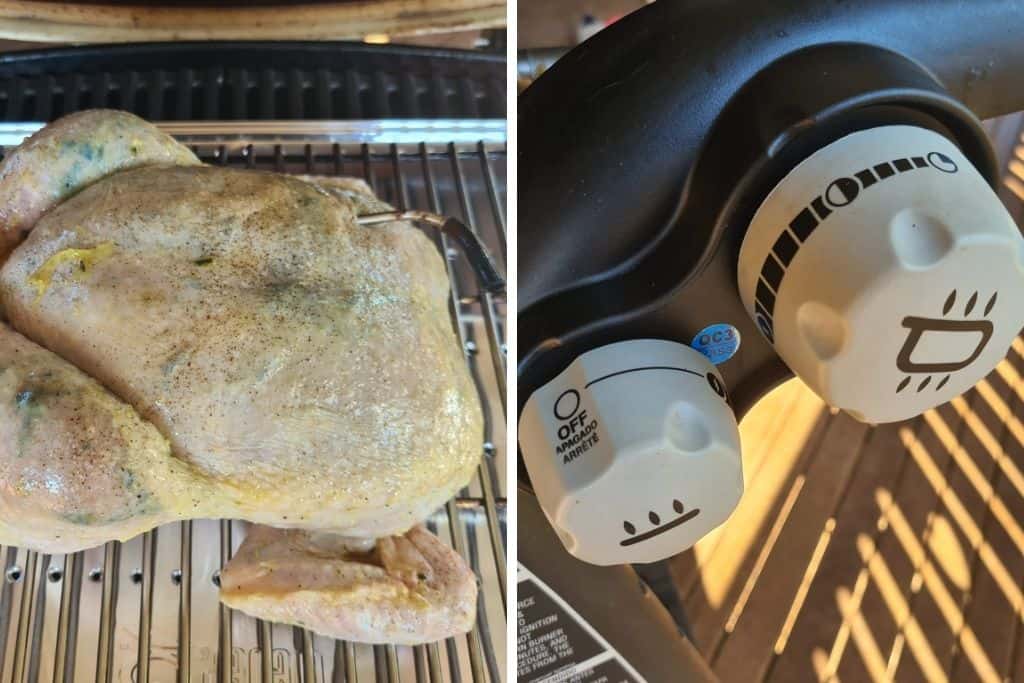
To begin, we need to crush 5 to 6 fresh garlic cloves, and 4 to 5 rosemary stems in a mortar and pestle until you have created a paste. If you don’t have a mortar and pestle, then a rolling pin will suffice.
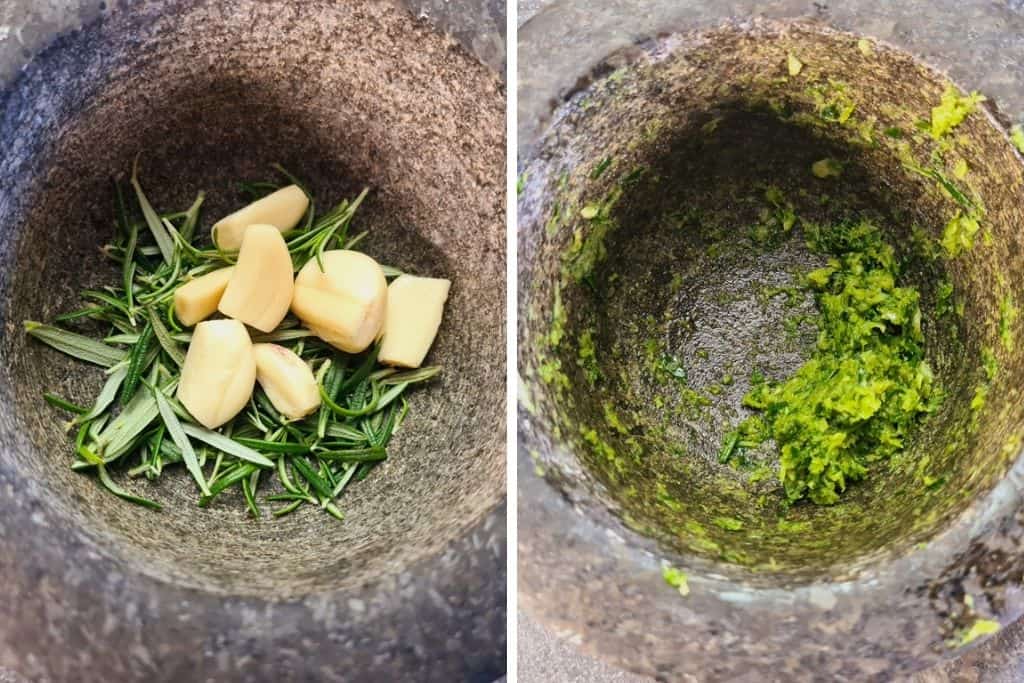
The paste will be what we use to season the meat under the skin.
How to Get the Seasoning Under the Skin?
Starting from the neck, work your finger in between the neck cavity and skin separating the flesh. Once you to begin to get your finger further in you will find it easier to separate from the chicken breast.
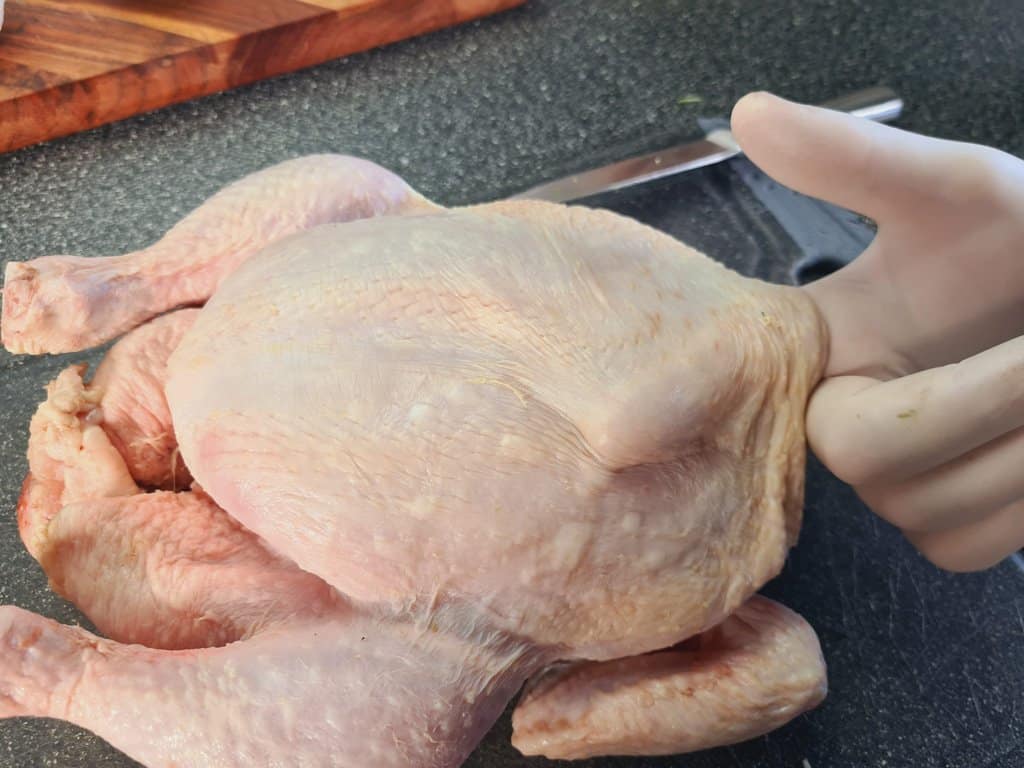
Gently work your fingers down towards the chicken thighs lifting the skin. Only go as far as your fingers can reach, or you may begin to tear the skin.
From the bottom cavity, gently separate the skin the same way as you did previously from the neck, rolling your finger around the leg.
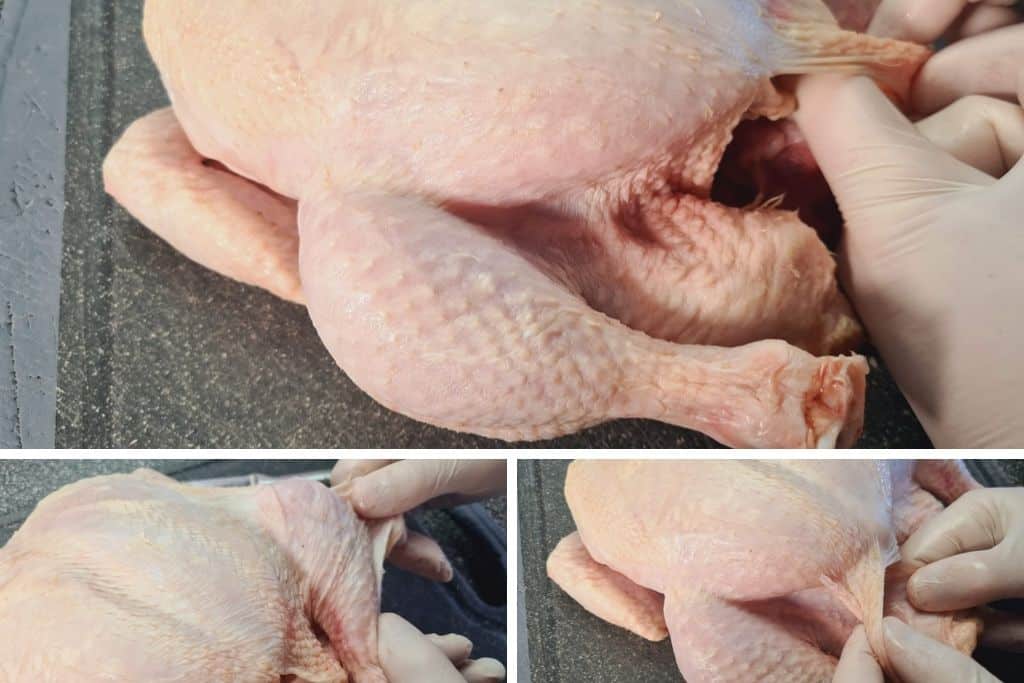
There is no need to worry about the back or wings as it can be a little tricky, there isn’t a lot of meat there, and you will risk tearing the skin.
The next step when the skin has separated from the breast, thighs and legs is to begin adding the seasoning.
Add a small amount of seasoning onto your index finger and spread it onto the chicken breast under the skin in a left to right motion, just like painting a house.
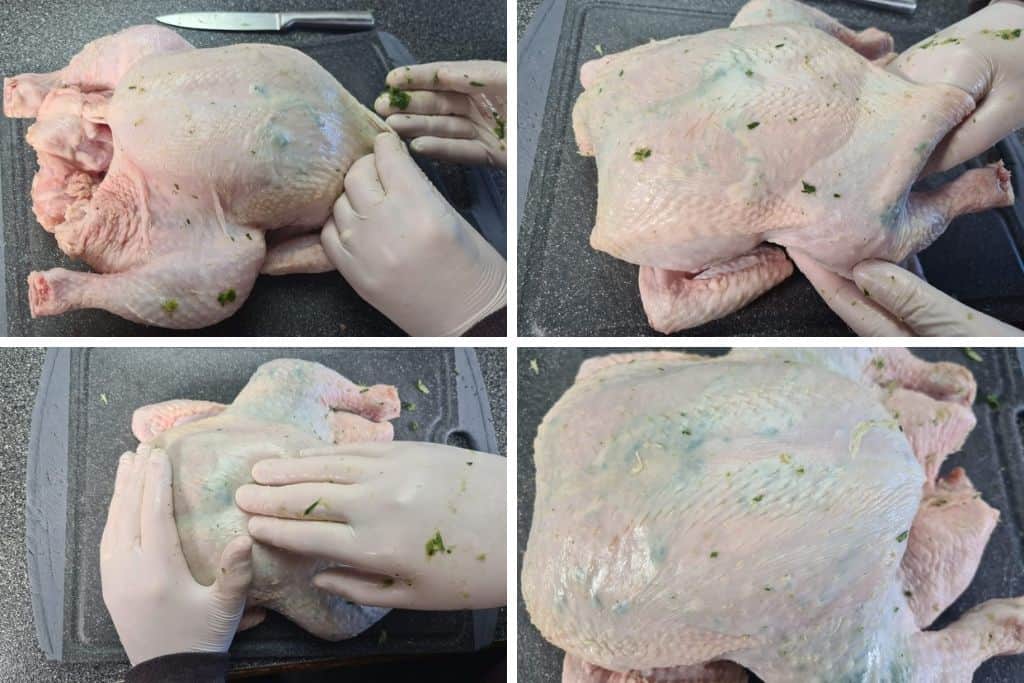
Repeat this process until the meat is coated with seasoning.
If you find that some of the paste has gathered in one place, roll the skin between your fingers and massage the lumps out, they will begin to spread out.
Do the same process from the bottom cavity to reach the chicken thighs.
If you are confident that the breast, thighs and legs have been covered in seasoning, the next step is to clingwrap the chicken and place in the fridge overnight.
Time to Fire Up Your Weber Q
It’s GO TIME! Our chicken has been in the fridge overnight, and it’s getting close to dinner time, now it’s that time to fire up the Weber Q.
Before firing up the Weber always make sure it’s clean. I’m talking about a new drip tray and a clean grill, top to bottom. This is a crucial step never to skip as fats can be dangerous, and starting a fire is going to ruin your weekend.
We now need to warm up our Weber.
If you have a weber baby or the medium series, then turn the gas knob to the high position.
Once our Weber is sparkly and clean, you will need to place a new convection tray onto your grill and place your trivet on top. This is the indirect cooking method where heat will circulate around the meat and prevent our chicken from burning. Just like an oven but way better.
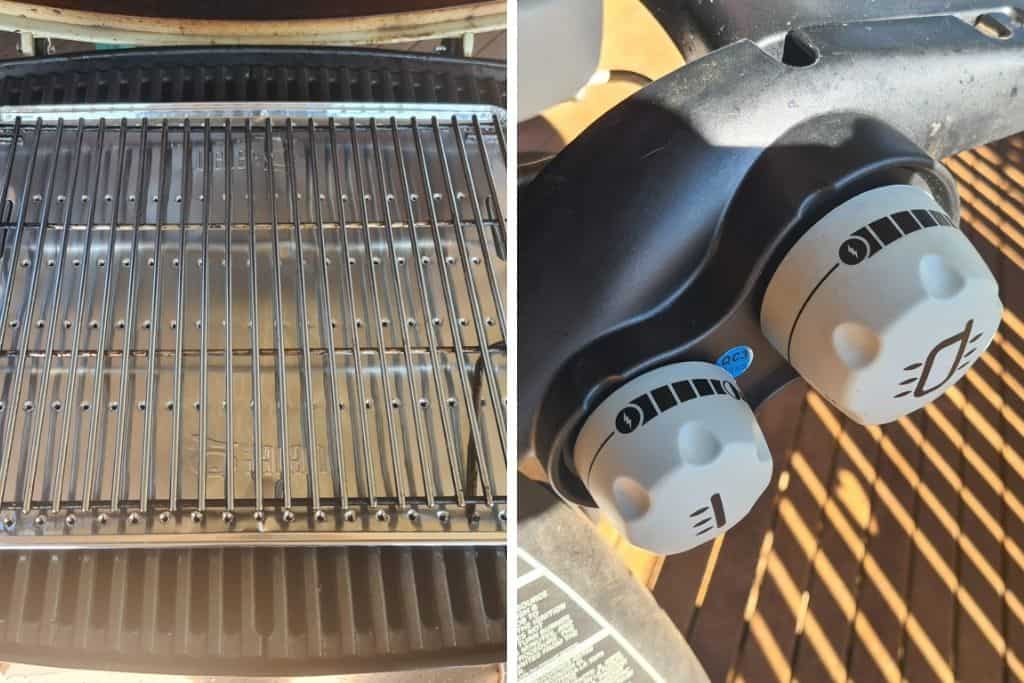
We now need to warm up our Weber.
If you have a weber baby q or the medium series, then turn the gas knob to the high position.
If you have the Weber Q Family, turn both large and small knobs to the high position and heat for 10 minutes and don’t forget to put the lid down.
Let’s use this time to get our roast chicken ready for cooking.
Prepping the Roast Chicken for Your Weber Q
Cut a lemon in half and three to four long stems of rosemary and insert them into the butt of your chicken.
The aromas from the lemon and rosemary infuse with the flesh from the inside as well as outside. Guaranteeing a beautiful, even flavour throughout the chicken.
Adding 2 or 3 garlic gloves is also another great addition to add a little more garlic flavour if you like.
Tie the legs together with cooking string to hold the lemon and rosemary in place.
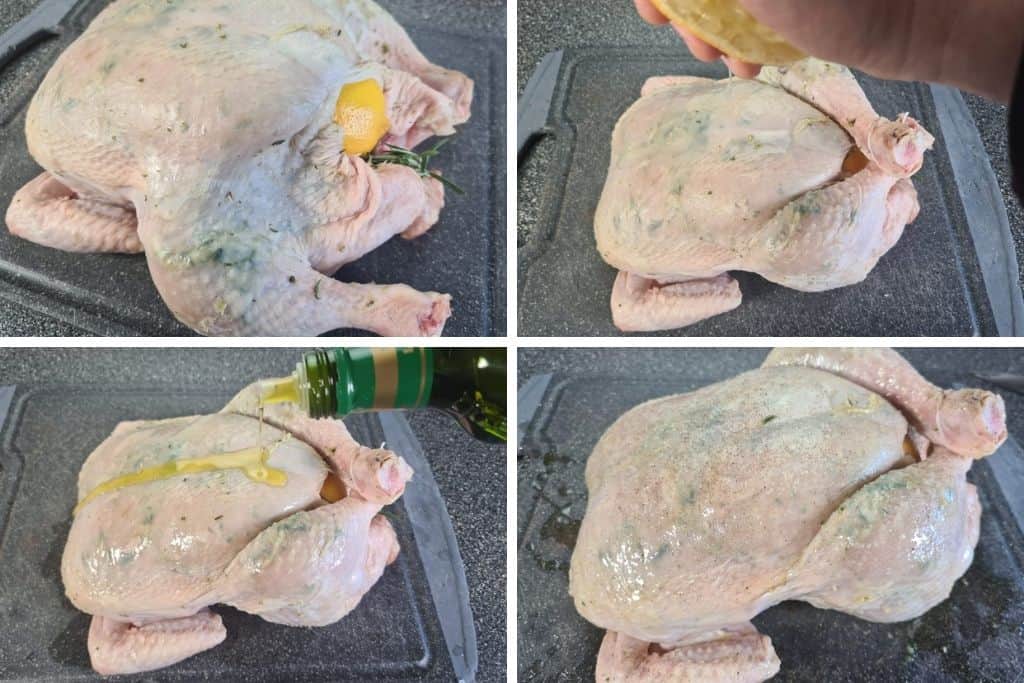
Use the other half of the lemon we cut earlier to squeeze over the chicken making sure to cover it entirely.
Adding lemon with salt helps to bring out the flavour, and we are trying to impress our guests here.
Finally, drizzle extra virgin olive oil and sprinkle salt and pepper to the chicken breast, thighs and legs.
We are ready to cook this bad boy!
How to Cook a Weber Q Roast Chicken on the Family Grill?
I have a Weber Q Family, so I can only educate you on this series. Still, the Baby and medium series are pretty much the same. The difference being the family has a central burner and 2 Gas knobs.
But it makes no difference because we are not going to be using the central burner anyway.
Now the Weber should be nice and hot, and we need to get the chicken in as quickly as we can so we don’t lose a lot of the heat.
Lift the lid and place the chicken onto the centre of the trivet, and listen to the sizzle. Now you know it’s hot.
If you are the lucky owner of Weber’s iGrill meat thermometer or any other meat probe.
Insert the probe into one side of the breast on an angle, making sure not to touch the bone.
If the probe touches bone, this will give us a false temperature reading. You will notice this by the temp increasing rather quickly, but internally the meat is still not even close to cooked.
Close the lid and turn the gas control knob down to the medium (roast) position and for Family Q owners make sure to turn the smaller control knob to the off position.
It is essential to maintain the temperature between 190°C (374°F) and 230°C (446°F) by adjusting the gas control knob throughout the cooking process when required.
TIP: To get an extra crispy skin, leave the small control knob on but in the low position for 10-15 minutes to give the chicken a burst of heat and to help make the skin a little crispier.
Just don’t forget to turn the small control knob off after this time or you could burn the chicken.
For a Baby Q and Weber medium series owners, leave the gas control knob in the full position for an extra 10-15 minutes. Then turn the control knob to the middle roasting position for the remainder of the cooking process.
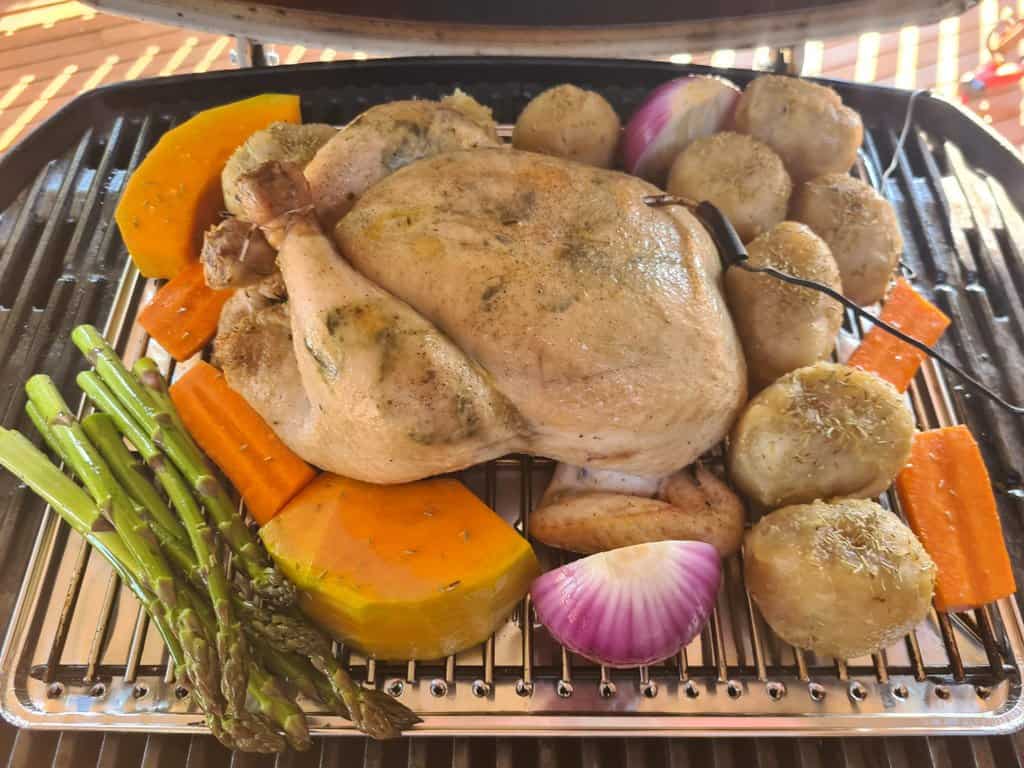
Adding Your Roast Vegetables to the Weber Q
The weight of your chicken will determine the best time to start adding your vegetables. A general rule of thumb is factoring in the time it will take to roast your vegetables.
Most vegetables such as:
- Asparagus
- Carrot
- Onion
- Tomato
- Pumpkin
- Potatoes
Will take approximately one hour to roast. But it is really up to you how much you like your roasted vegetables to be.
If potatoes are adequately parboiled, then 1 hour to 1 hour and 15 minutes is an excellent time to get crispy potatoes with a soft and fluffy centre. You can check out a detailed recipe to getting super crunchy weber q roast potatoes here.
Any vegetables that you would like to add to your Weber Q roast chicken need to be placed on the trivet and not the grill to avoid burning.
While roasting anything, the lid must be down; we don’t want to keep opening it to turn our vegetables.
TIP: When placing vegetables in the Weber, make sure to tuck your vegetables in as close as you can to the chicken, this way your vegetables can absorb its flavour and aroma.
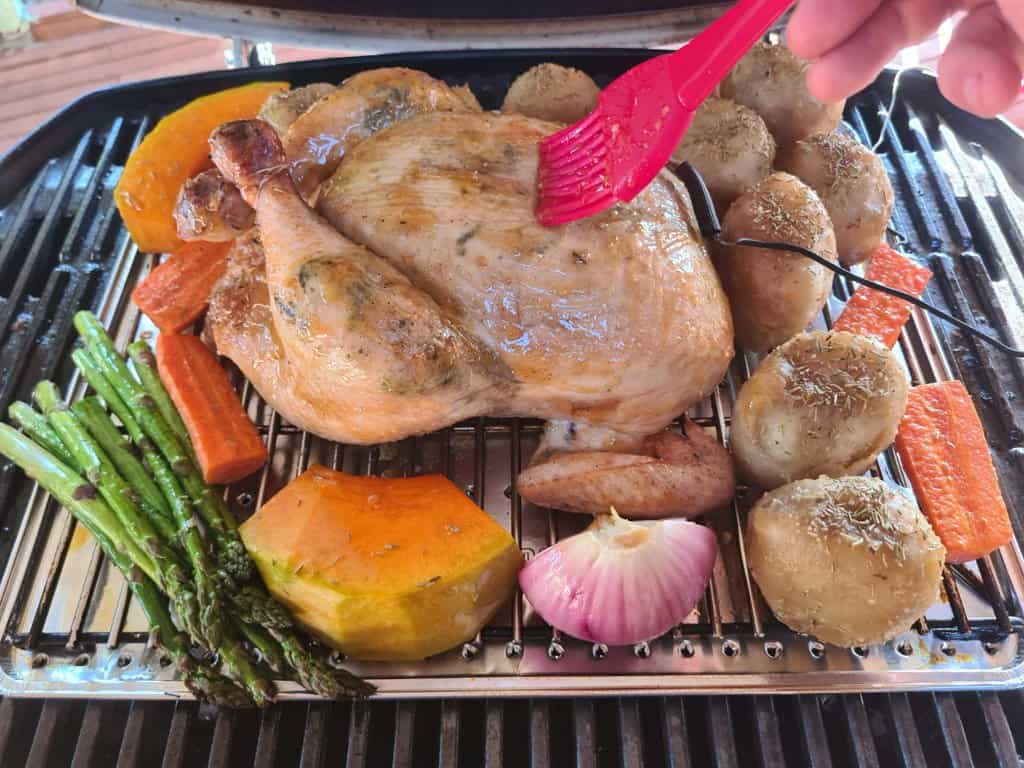
Preparing the Honey-Glaze for our Weber Q Roast Chicken
Our last step is to prep our Honey-Glaze. When we combine garlic, rosemary and honey, your guests will be on a magical journey.
For this, we are going to require the following:
- Butter
- Garlic
- Dijon Mustard
- Honey
- Salt & Pepper
In a small saucepan, melt 3 tbsp of butter, then add 6 tsp of crushed garlic and stir for 60 seconds. If using fresh garlic cloves, try not to brown the garlic.
Add the honey, dijon mustard and a pinch of salt and pepper. Make sure to stir well for a minute or two and allow it to simmer for around 2 minutes.
We are going to want to brush our roast chicken with honey glaze twice during the cooking process.
Grab your basting brush and begin to brush every square inch of the chicken with glaze after the vegetables have been added.
The second round of glaze should be brushed on when the chicken reaches about 61°C (141°F) to allow it to absorb into the skin. Generally when the chicken has about 20 minutes of cooking time left.
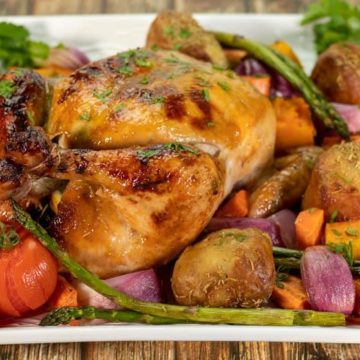
Final Thoughts
Roasting meat in your Weber Q is an entirely different process when compared to cooking in your oven or Weber kettle.
The Weber Q needs to maintain higher temperatures to lock in moisture, giving you a beautifully cooked, juicy and tender roast chicken.
Once you acquire the skills, you will become fully confident in everything you cook. And never go back to cooking in your oven when making a Weber Q roast chicken.
We’re an affiliate
We hope you love the products we recommend! Just so you know, we may collect a share of sales or other compensation from the links on this page. Thank you if you use our links, we really appreciate it!
Tender Honey-Glazed Weber Q Roast Chicken
Equipment
Ingredients
- 1 2.8kg Whole Chicken
- 6 Garlic Cloves
- 4 Rosemary Sticks
- 1 Lemon
- Salt & Pepper
- Olive Oil Extra Virgin
Honey-Glaze
- 3 tbsp Butter Salted
- 6 tsp Crushed Garlic 6 Cloves if Fresh
- 1/3 cup Honey
- 2 tbsp Dijon Mustard
Instructions
Weber Q Roast Chicken Preperation
- Crush 5-6 cloves of fresh garlic and 3-4 stems of rosemary into a mortar & pestle to create a wet paste.
- Using your index finger, begin gently seperating the skin from the breast, until you reach as far as your finger will allow to the bottom and sides of the chicken breast.
- Repeat this process from the butt, gently pushing your finger between the skin and flesh seperating the skin from the leg and thighs on both sides of the chicken.
- Add a generous amount of the garlic and rosemary seasoning to the tip of your finger, and begin spreading it under the skin, thighs and legs. If you find there are clumps, massage these out by pinching the skin and rolling between your fingers.Leave in the fridge to marinate overnight.
- When you are ready to begin cooking, start by cutting 1 lemon in half and put it into the butt, together with 3 sticks of rosemary. Add 3 cloves of fresh peeled garlic if you wish.
- Tie both legs together tightly with cooking string.
- With the other half of the lemon, drizzle over the chicken breast, thighs and legs followed by some extra virgin olive oil, salt and pepper.
Prepping the Weber Q
- Place a new convection tray on to the grill and the trivet on top.
- Family Q: Turn both gas control knobs to the full position and ignite.Baby Q & Medium: Turn the single gas knob to the full position, close the lid to heat up for 10 minutes.
Cooking the Roast Chicken
- Place the chicken onto the centre of the trivet and insert a meat thermometre into the centre of the chicken breast on an angle. Try not to touch the bone then close the lid.
- Weber Q Family: Turn the small control knob off and the large control knob to the middle roasting position.Baby Q and Medium: Turn the gas control knob down to the middle roasting position.
Making The Honey-Glaze
- In a saucepan melt the butter and add the crushed garlic and stir for 30-60 seconds.
- Add the honey and dijon mustard to the saucepan together with a pinch of salt and pepper, and stir continously for 2 minutes, gradually bringing down the heat.
- When the chicken reaches 30°C or 86°F internally it is time to brush on the honey glaze.
- Lift the lid on the Weber Q and generously brush the glaze over the entire chicken, making sure to cover the sides. And close the lid.
- Once the chicken reaches 60°C or 140°F, lift the lid and brush on the glaze for the second time. Close the lid once again.
- When the internal temp of the chicken reaches 71°C or 159°F it is time to take it out of the weber. Remove the meat probe, put the chicken onto a tray and allow to rest for 15-10 minutes. The temp will rise another 3°C making it safe to it.
- Carve, serve and enjoy!