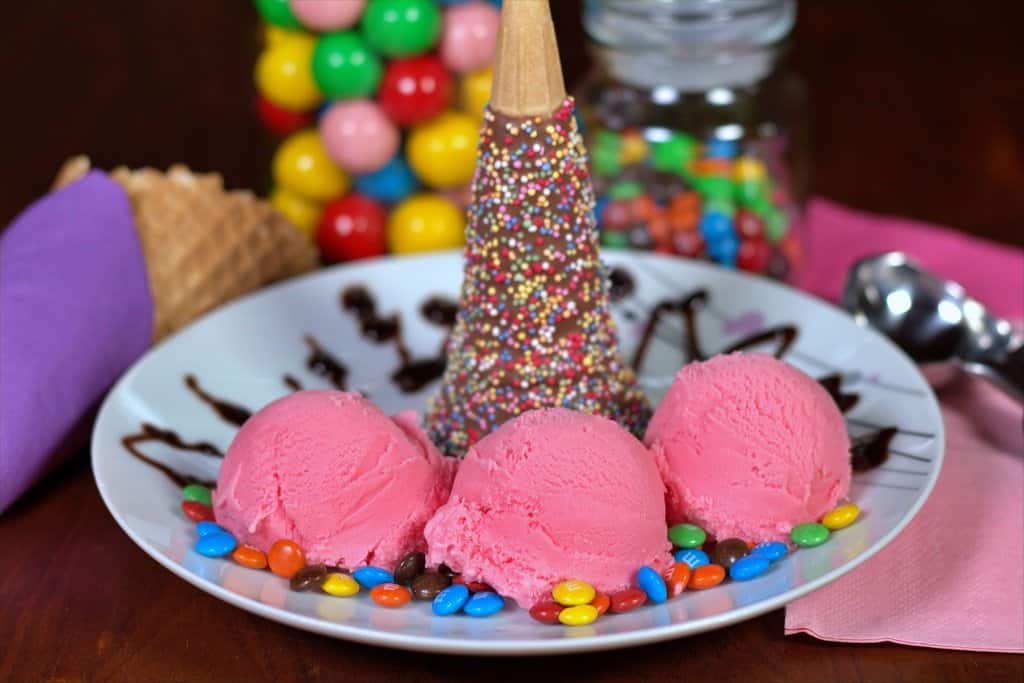
Super Easy Bubblegum Ice Cream Made at Home
One of the best things about being able to make your ice cream at home is being able to add your favourite flavours. And even better the ones that you are unable to buy in the store.
Bubblegum ice cream is one of those that so many love, but have to go to an ice creamery to have some.
Around 16 years old, I had my first try of bubblegum ice cream and have loved it ever since, and paired with licorice ice cream it makes for a delicious combination.
What colour is Bubblegum Ice cream?
The colour can differ depending on where you go and the supplier of the ice cream. Sometimes it can be pink and occasionally blue to a greeny-blue colour.
This recipe uses pink food colouring mainly because it reminds me of the Australian Bubblegum Hubba Bubba colour.
However, you can make it whatever colour you like. You can even get creative and make it in a few batches, each different in colour, then swirl them around to make a rainbow-style ice cream.
Bubblegum Ice cream for kid’s birthday parties!
My kids love this ice cream, and what child doesn’t like bubblegum, which makes it perfect for birthday parties.
A scoop in a decorated ice cream cone or a brightly coloured cup. Or try your hand at making an ice cream birthday cake.
The sky is the limit with this recipe and a little imagination.
Bubblegum flavouring.
Like all my other ice cream recipes, I use the LorAnn Flavourings. Remember it is a 3.7ml bottle and you have to use the entire bottle for the ice cream to get the correct flavour.
Finding these has to be the best thing that has happened in my kitchen as you can create so many flavours of ice cream where you are unable to use fresh fruit.
Will the vanilla essence overpower the flavouring?
It was a concern when I first tried adding the vanilla essence to the ice cream mixture. But no, the vanilla essence does not. The LorAnn flavours are strong enough even though you are adding vanilla to it.
However, if you ever have a concern, the vanilla essence can be left out. It is only in there to keep the ice cream from becoming to hard.
How to Make Bubblegum Ice Cream at Home.

Super Easy Bubblegum Ice Cream Made at Home
Equipment
- KitchenAid Stand Mixer
- Kitchen Aid Ice Cream Bowl
Ingredients
- 600 ml Thickened or Heavy Whipping Cream
- 3.7 ml Bublegum Flavoring
- Pink Food Colouring You can use other colours
- 395 g Sweetened Condenced Milk
- 1 tsp Vanilla Extract this is optional
Instructions
- In a large mixing bowl add the cream and whip till you get soft peaks
- Add the condensed milk and mix until well combined and soft and creamy
- Add the bubblegum flavouring, vanilla essence and a few drops at a time of the pink food colouring or colouring of your choice, until you get your desired shading of colour.
- Mix well until the colour is mixed right through, scraping down the bowl occasionally
If you are using the Kitchen Aid Ice Cream mixing bowl
- Replace the mixing bowl with the frozen Ice cream mixing bowl and attach the icecream mixing attachments and turn onto the number 2 speed.
- Slowly add the bubblegum Ice cream mixture into the ice cream mixing bowl and let it churn for 15 to 20 minutes.
The final step (with and without the ice cream mixing bowl)
- Put the ice cream mixture into an Ice cream container or freeze- safe air-tight container and place in the freezer for a couple of hours before serving.

Tried it out at home, but used a hand mixer and it worked perfectly. Tastes amazing.
That is awesome, thank you for letting us know you used a hand mixer instead of the stand mixer and the churning bowl and still turned out amazing.