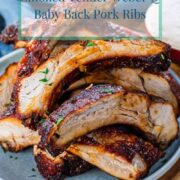
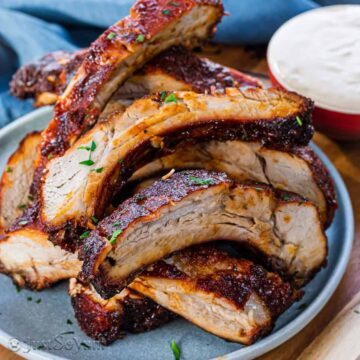
Smoked Tender Weber Q Baby Back Pork Ribs
Savour the delicious taste of Weber Q Baby Back Pork Ribs – juicy, smoky, and perfectly grilled. Delight in the unbeatable blend of flavours in these bbq ribs, infused with rich smokiness and complemented by Lane’s delectable BBQ sauce.

Get ready to embark on a lip-smacking adventure with Weber Q Baby Back Pork Ribs! These tender and tasty ribs are like no other.
Picture this: juicy meat that practically falls off the bone, bursting with incredible flavours that will make your taste buds dance.
Whether you’re a grilling newbie or a seasoned pro, these ribs are super easy for anybody to cook on their BBQ at home.
So, grab your apron, fire up the grill, and get ready to impress your friends and family with the finger-licking goodness of Weber Q Baby Back Pork Ribs.
Prepare for a BBQ feast that will have everyone begging for seconds!
How did baby back ribs get their name?
The term “baby back ribs” refers to a specific cut of pork ribs from the upper part of the pig’s ribcage, closer to the backbone.
These ribs are called “baby back” because they are shorter in size compared to spare ribs or St. Louis-style ribs.
The name “baby” refers to their smaller and more manageable size, not because they come from baby pigs.
Baby back ribs are known for their tenderness, succulent meat, and the delicious flavour they bring to the bbq and grill.
I purchased my US baby back ribs from the lovely team at Ballan local butchers. If you live in the west of Melbourne, then definitely go and check them out. Their meat is high-quality and reasonably priced.
They can also deliver!
How do you cook low and slow on a Weber Q?
Cooking low and slow on a Weber Q gas grill can be challenging due to its compact size and higher heat output.
However, you can still achieve a low and slow cooking method with a few adjustments. Here’s a general approach:
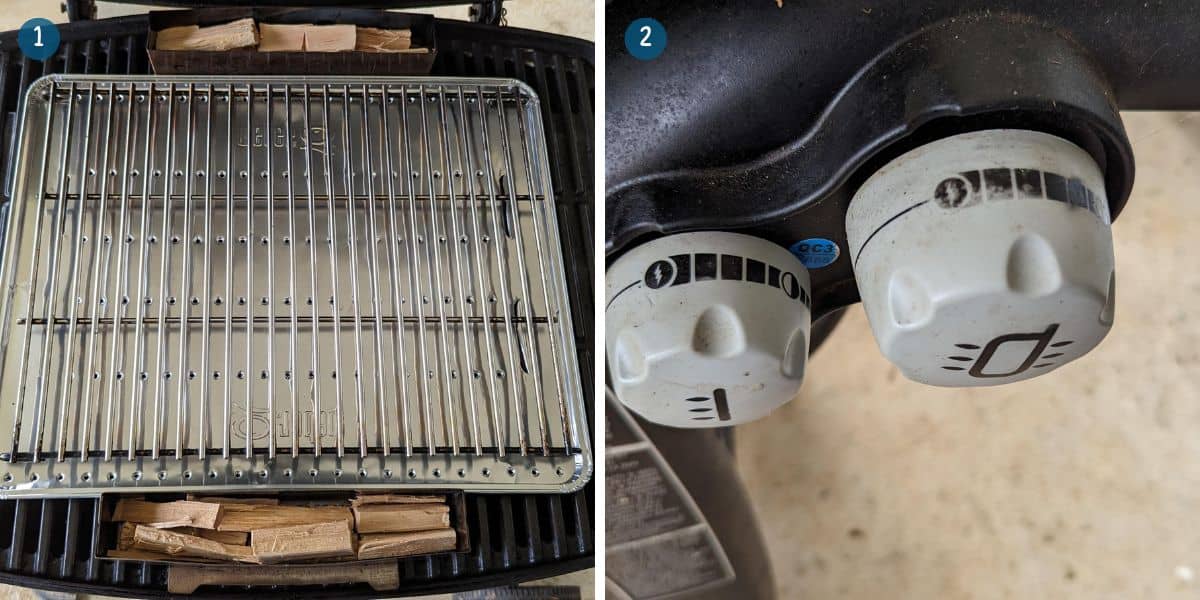
Preheat the grill for indirect cooking: Place a convection tray and trivet onto the grill.
Preheat the grill with all burners on high for about 10-15 minutes to get the grill hot.
Adjust the temperature: Adjust the temperature of the grill by turning the gas control knob to the lowest setting to achieve a temperature range of around 107-135°C (225-275°F).
Family Q: Turn the large gas control knob off and the small gas control knob to the low position.
Aluminium ball hack: Using a ball of aluminium foil to lift the lid slightly on your Weber Q gas grill is a simple technique to help regulate the airflow and maintain a lower temperature. Here’s how you can do it:
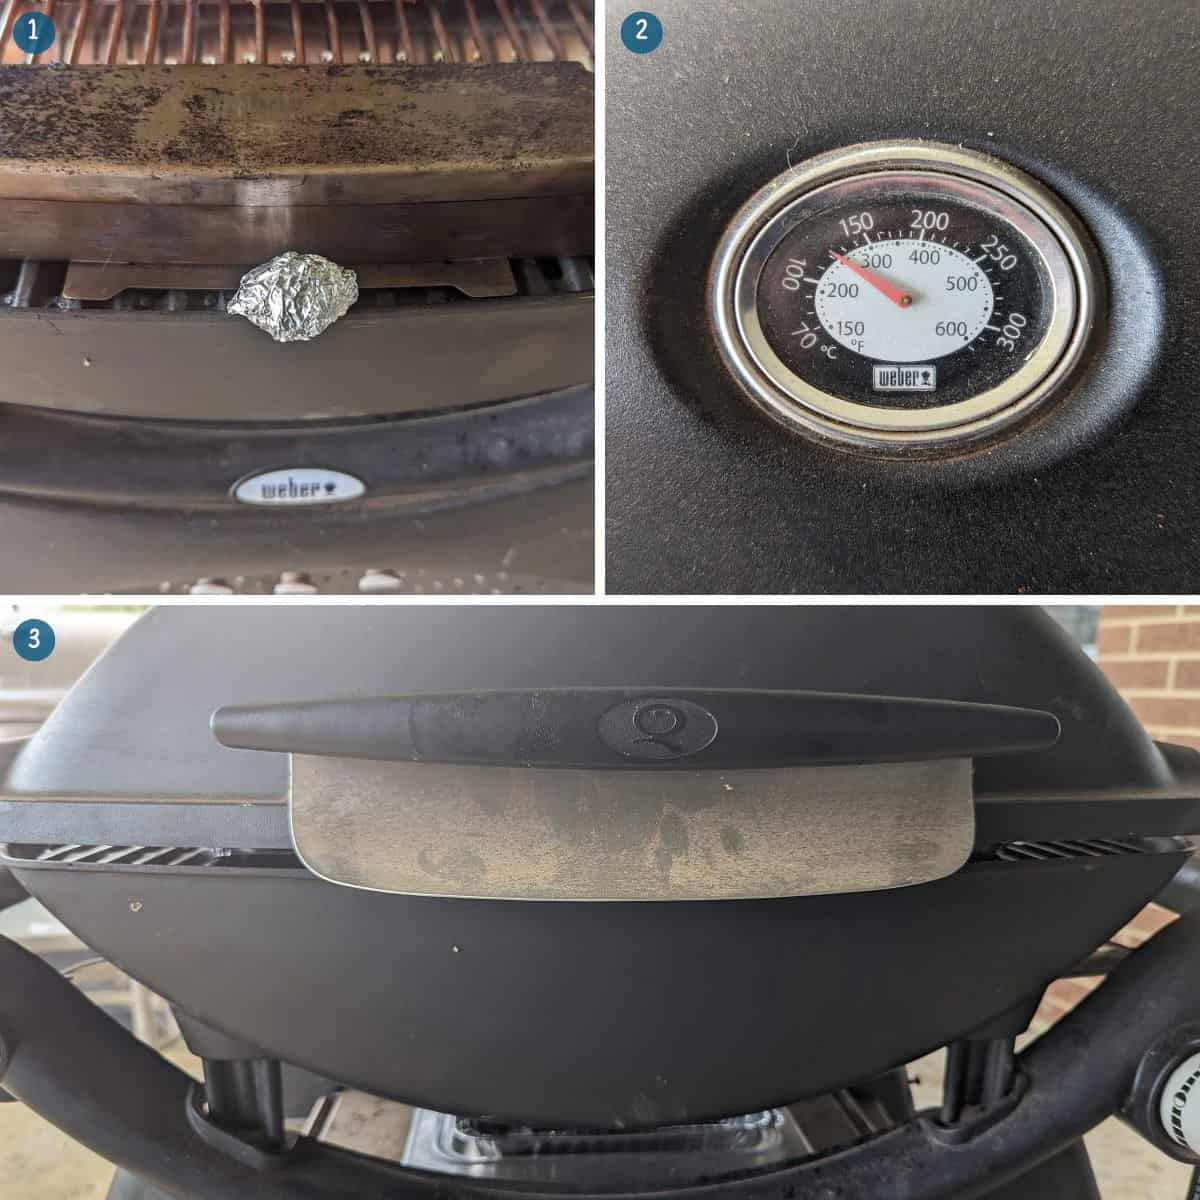
- Tear off a sheet of aluminium foil: Start by tearing off a piece of aluminium foil approximately 6-8 inches (15-20 cm) in length.
- Crumple it into a ball: Take the sheet of aluminium foil and crumple it into a ball. This will create a small, rounded shape that can be placed between the lid and the grill body.
- Place the aluminium foil ball: With the grill closed, carefully place the aluminium foil ball on the edge of the grill body, near the hinge side, between the lid and the grill body. Position it so that it lifts the lid slightly, creating a small gap.
- Adjust the lid opening: Depending on the desired airflow and temperature, you can adjust the size of the gap by increasing or decreasing the size of the aluminium foil ball. A larger ball will lift the lid more, allowing more airflow and potentially increasing the temperature slightly.
- Monitor and adjust as needed: Keep an eye on the temperature inside the grill and adjust the aluminium foil ball as necessary. If the temperature is too low, you can reduce the size of the ball to allow more airflow. If the temperature is too high, you can slightly increase the size of the ball to restrict airflow.
Remember to exercise caution when using the aluminium foil ball to prevent accidents or damage to the grill.
Additionally, it’s essential to follow any specific guidelines or recommendations in your Weber Q gas grill’s manual for optimal usage and safety.
Ingredients you’ll need to make Weber Q Baby Back Pork Ribs
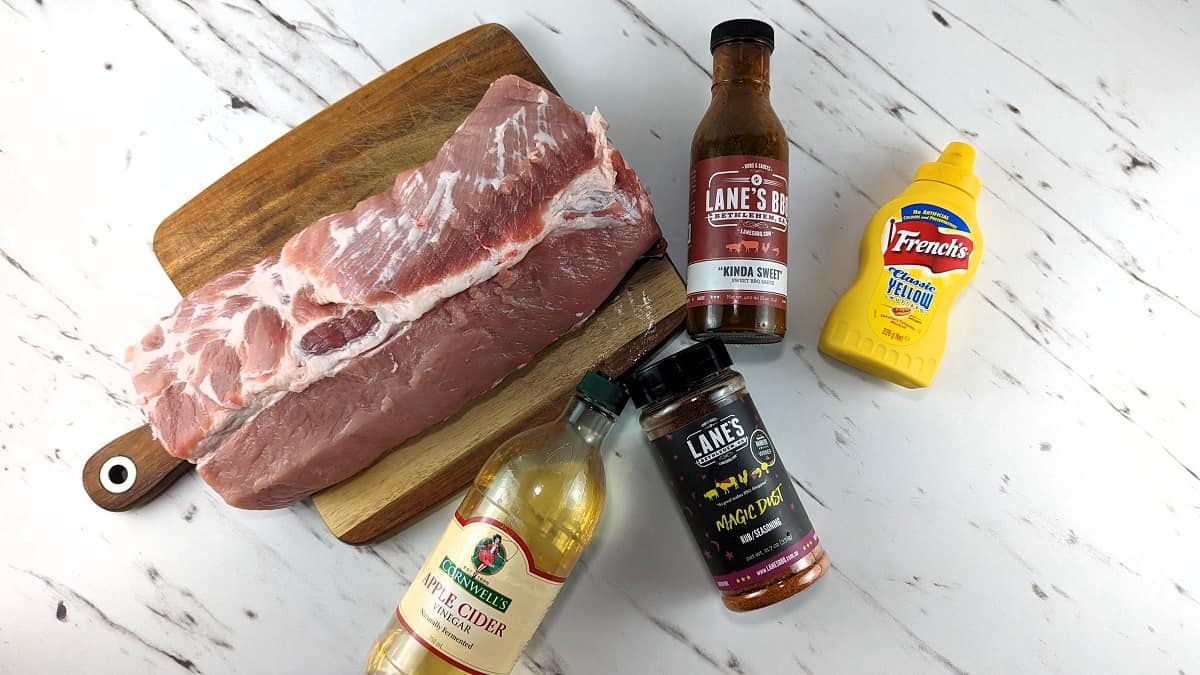
- Lane’s BBQ Magic Dust All-Purpose Rub: This is a flavorful rub that is made with a blend of spices, including paprika, black pepper, garlic powder, onion powder, and cayenne pepper. It is a great way to add flavour to your pork ribs, chicken, or beef.
- Lane’s Kinda Sweet BBQ Sauce: Sweet and smoky sauce made with a blend of tomato puree, molasses, brown sugar, apple cider vinegar, and spices. It is a great way to add flavour and sweetness to pork ribs.
- Yellow Mustard: Yellow mustard is a classic condiment made with a blend of vinegar, water, mustard seeds, and turmeric. It is a great way to add flavour and moisture to pork ribs. It also helps the rub adhere to the ribs.
- Apple Cider Vinegar: Apple cider vinegar is a tart and acidic liquid made from fermented apple cider. It is a great way to add flavour and moisture to pork ribs. It is also used to spritz the ribs during cooking to help keep them moist.
- Hickory Wood Chips: Hickory wood chips are a type of wood that is often used for smoking meat. They impart a smoky flavour to the meat that is sure to please. Of course, this is entirely optional.
How to cook Weber Q Baby Back Pork Ribs?
Here’s how to cook your baby back pork ribs to perfection on your Weber Q grill:
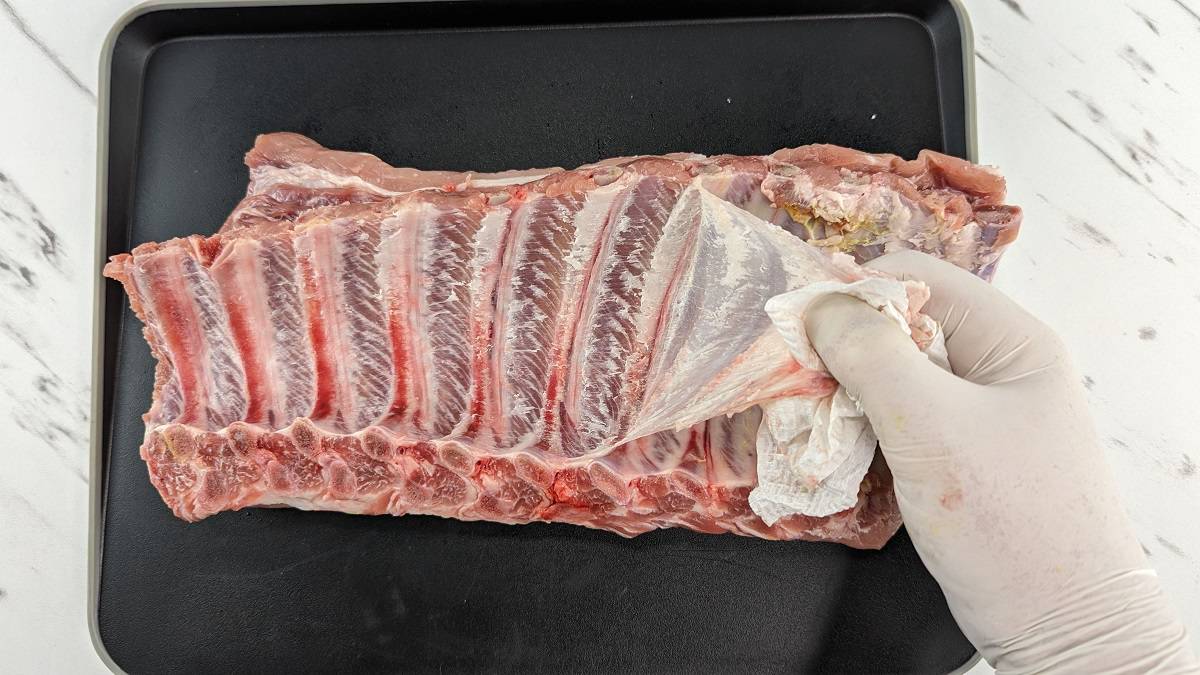
Get rid of the membrane: Take off the tough membrane from the underside of the ribs. Use a paper towel to grab it from one corner and gently peel it away. Easy peasy!
Set up for indirect cooking:
- Place a convection tray and trivet on your Weber Q grill.
- Fill a smoke packet or smoker box with hickory chips, and put it alongside the ribs.
- Preheat on HI (high) for 10-15 minutes.
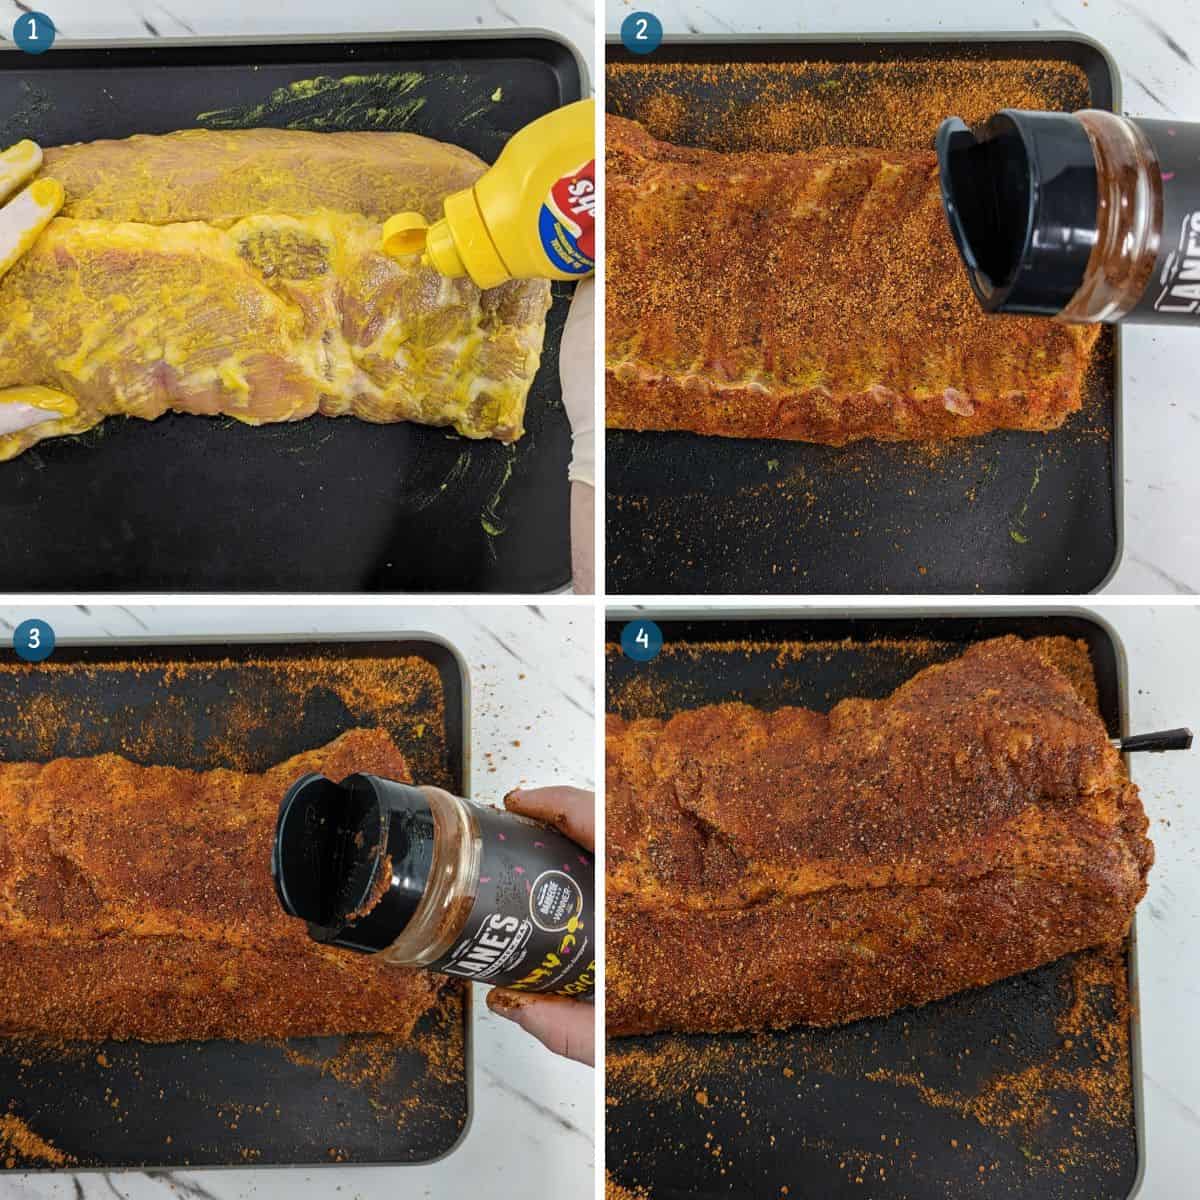
Mustard and rub time:
- Spread 1-2 tablespoons of yellow mustard on each side of the ribs.
- Massage it in.
- Sprinkle Lane’s BBQ Magic Dust evenly over both sides of the ribs.
- Use your fingers to rub it all over.
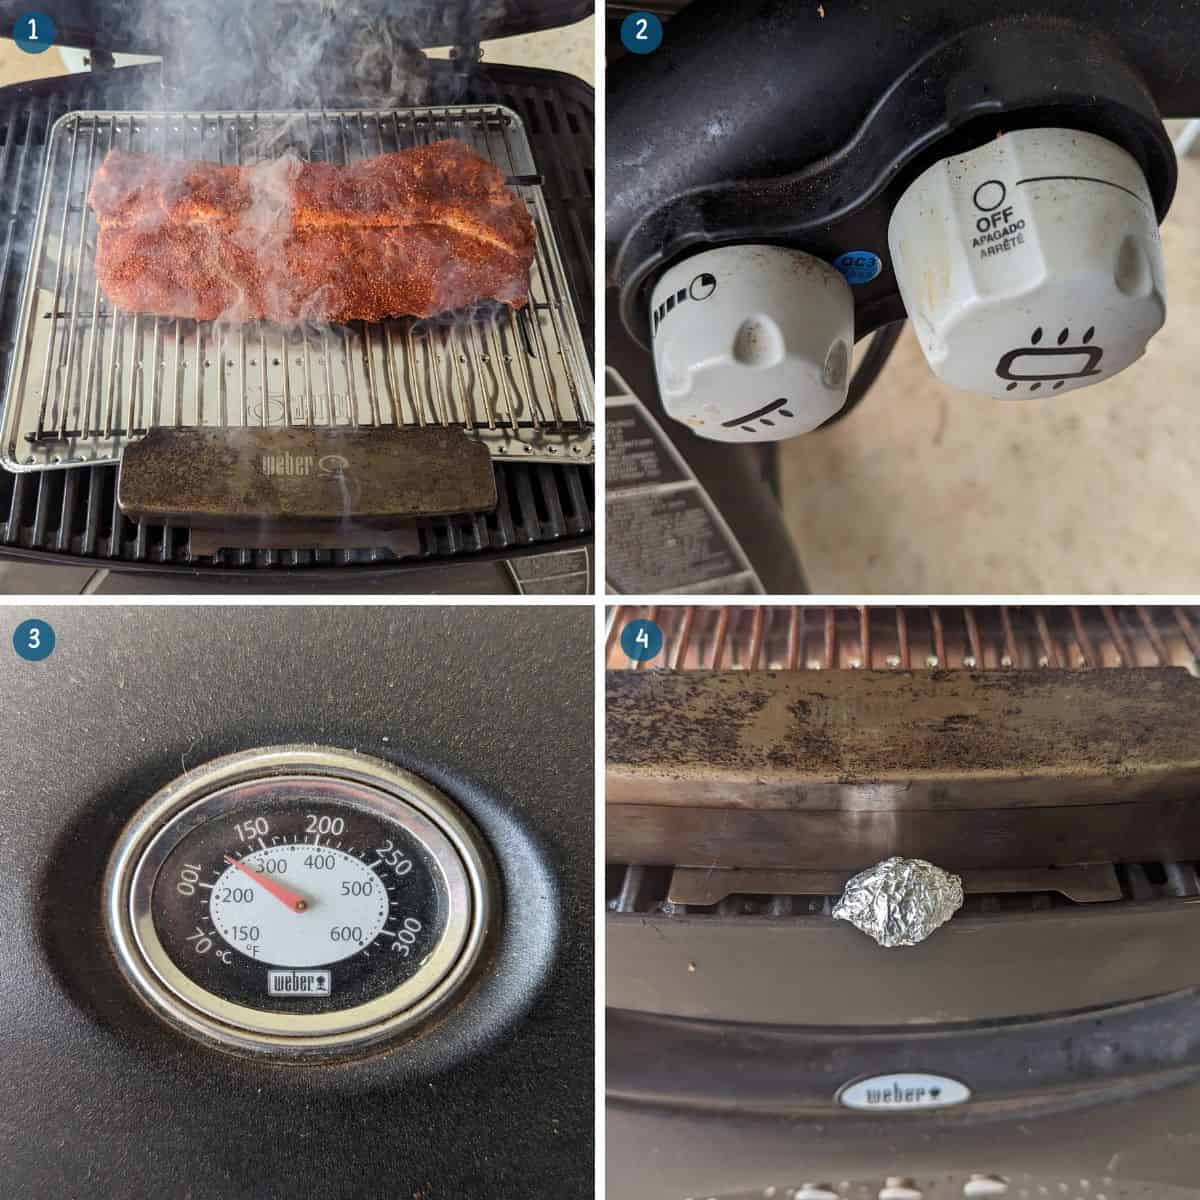
Get that smoke going: Once you see smoke coming from your Weber Q, put the ribs on the trivet. If they don’t fit, you can cut them in half. Set the temperature to the lowest setting.
Keep the temperature steady: Aim for a temperature of 107-135°C (225-275°F). If you need to control it better, you can place a ball of aluminium foil under the lid. That helps, trust me.
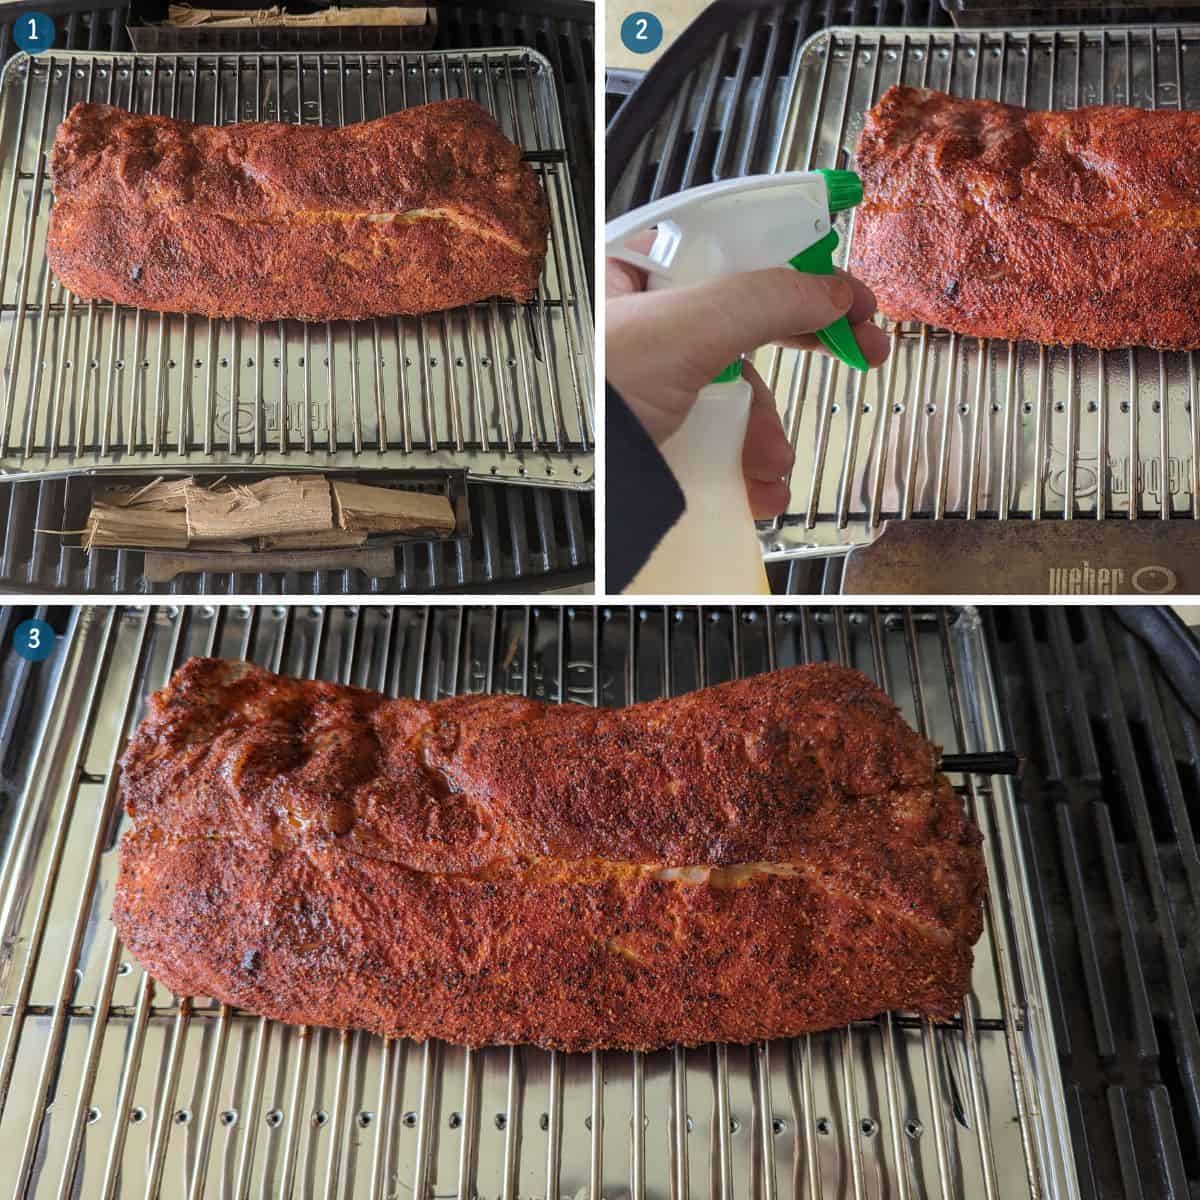
Spritz and wait:
- After an hour, check your ribs.
- If they look dry, give them a light spritz with apple cider vinegar from a spray bottle.
- Fill your smoke pouch or boxes with more hickory to keep the smoke going throughout the cook.
- Close the lid and wait for another hour.
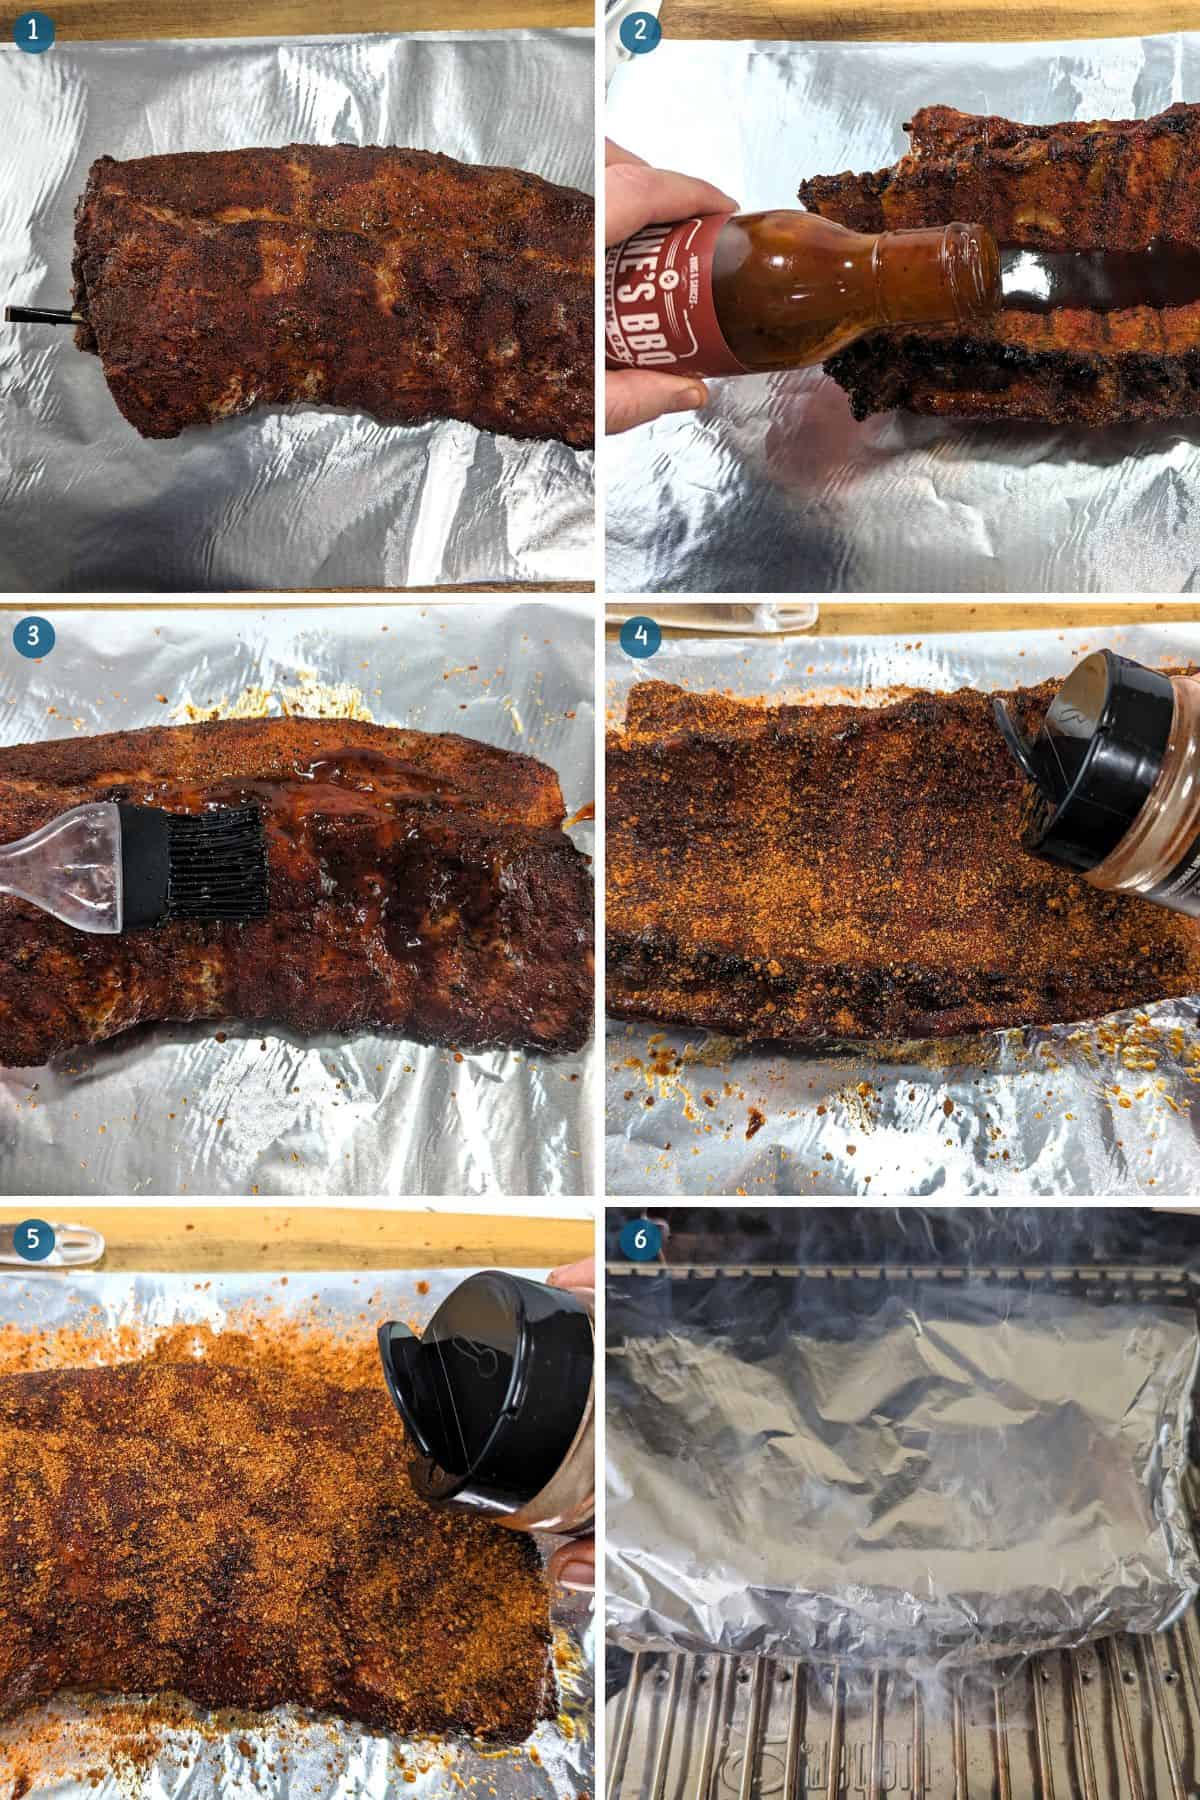
Saucy time: At the two-hour mark, your ribs should be around 74°C (165°F) internally. If not, spritz again if needed, or take them off the grill.
BBQ sauce and more magic:
- Brush Lane’s Kinda Sweet BBQ Sauce on both sides of the ribs.
- Sprinkle more Lane’s Magic Dust over them.
- Wrap the ribs up in aluminium foil and put them back on the grill.
- Let them cook for 1 to 1½ hours.
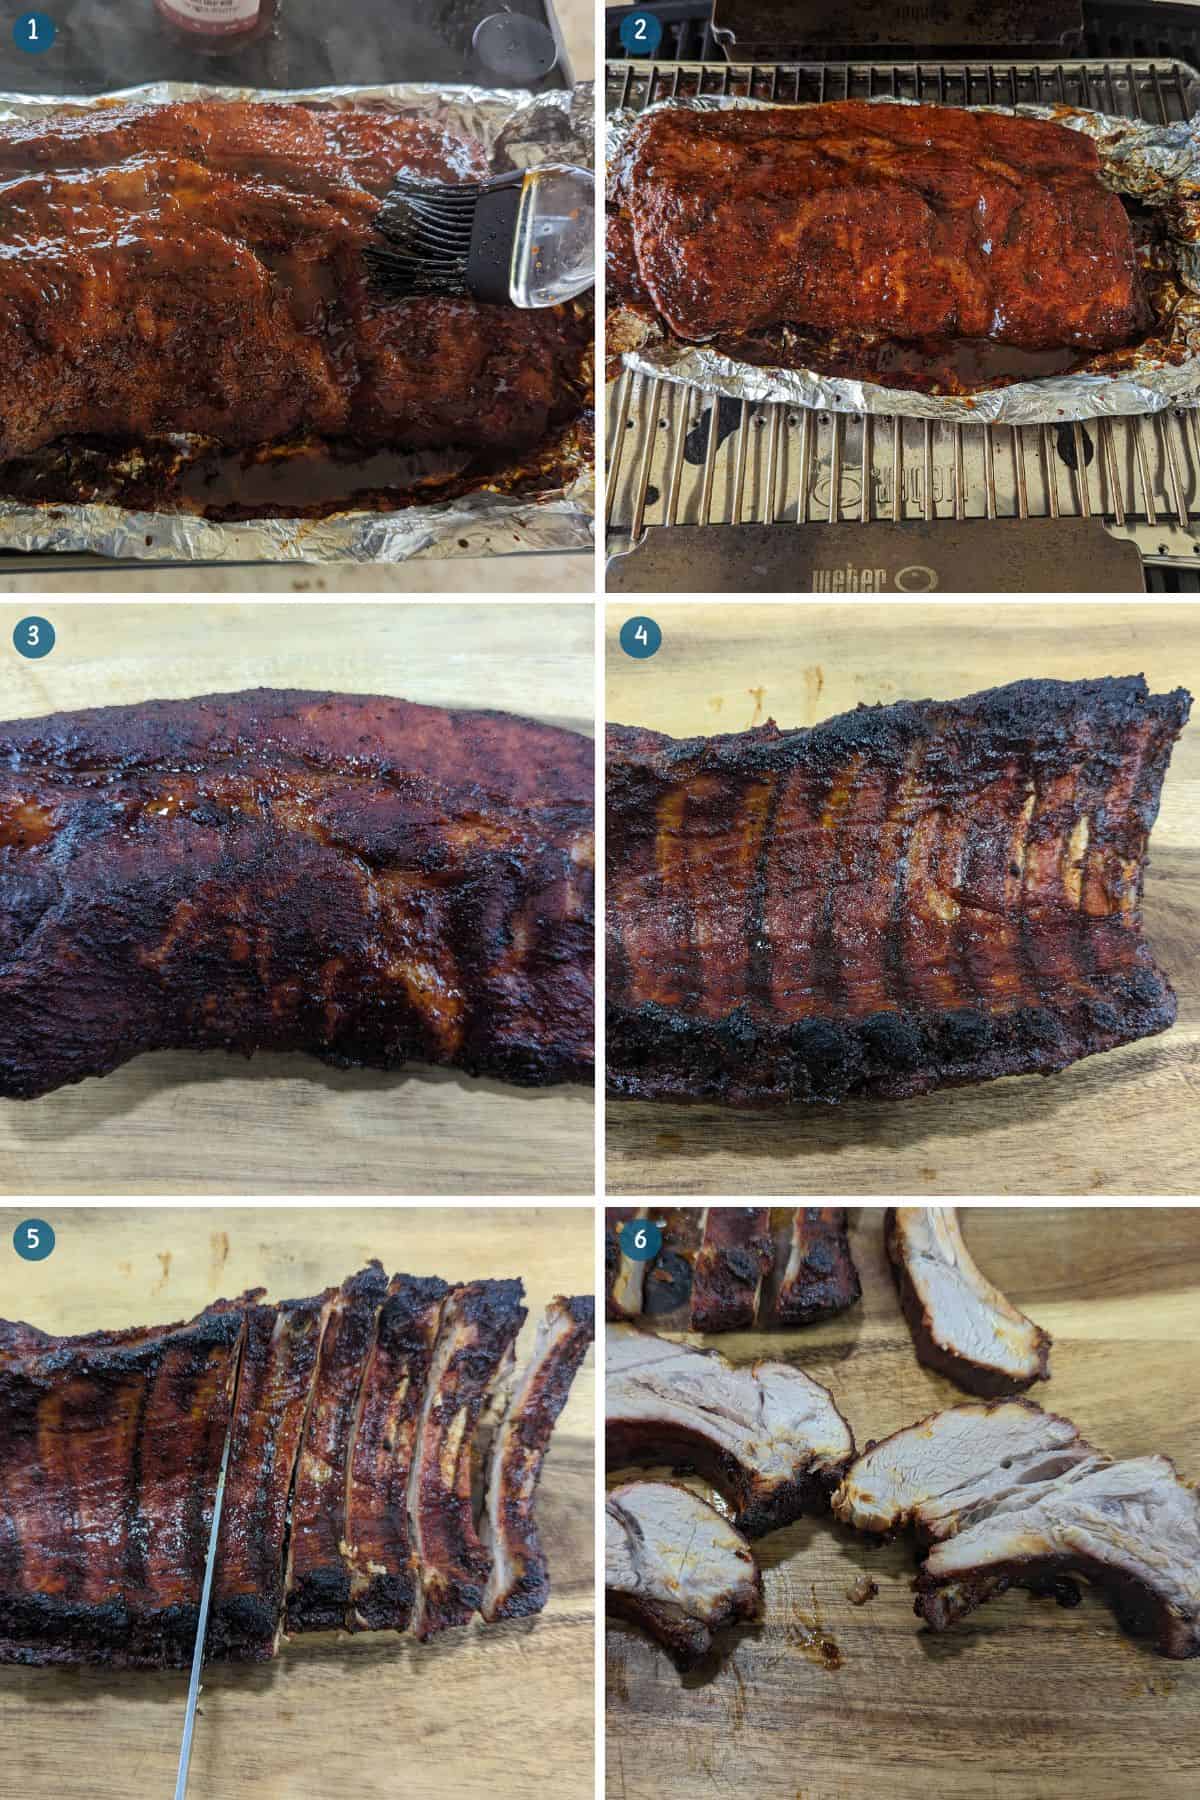
Final touches: When the internal temperature reaches 90°C (195°F), take the ribs out of the foil and place them back on the Weber Q. Give them one last coat of Kinda Sweet BBQ Sauce, close the lid, and wait until they reach 93°C (200°F).
Done and delicious: You’ll see the ribs exposed and the meat falling off the bone. That means they’re ready! Take them off the grill, let them rest for 10 minutes, and serve with the best blue cheese sauce ever. Yum!
Now, grab your apron and get ready to enjoy some finger-licking, melt-in-your-mouth baby back ribs. Enjoy!
Are you looking for a great meat thermometer that’s 100% accurate?
Introducing the Inkbird Meat Thermometer, the ultimate kitchen gadget for perfect cooking every time!
With its advanced features and reliable performance, this thermometer is a game-changer for professional chefs and home cooks.
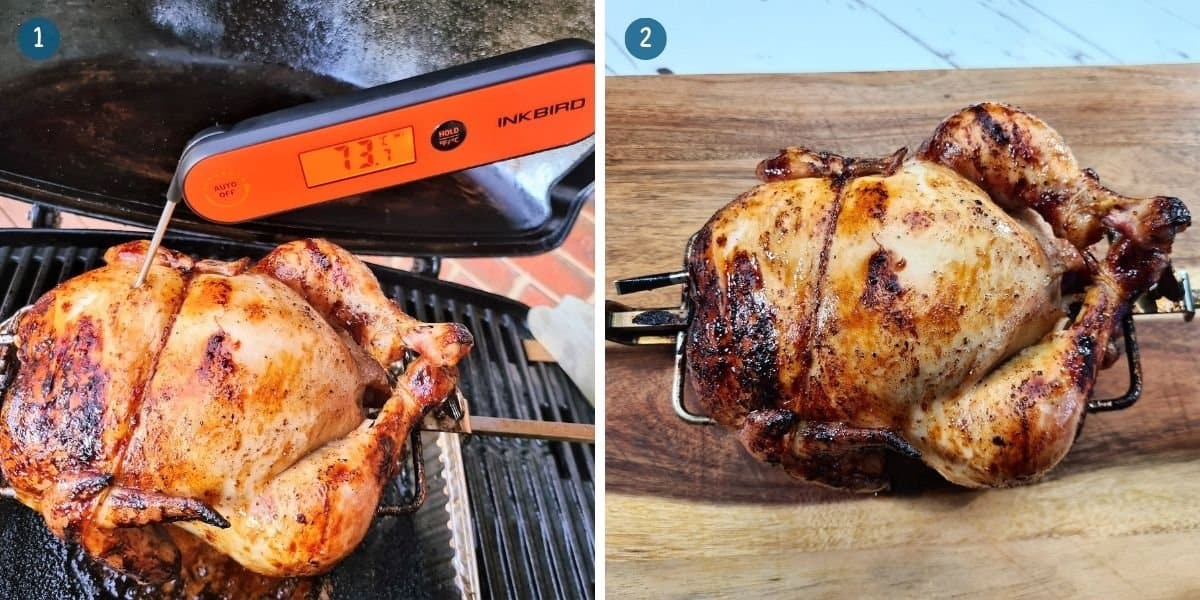
Its rechargeable battery ensures convenience, while the waterproof design adds durability and peace of mind.
The accurate and fast temperature readings allow you to achieve precise doneness for your meats.
Simply insert the probe, monitor the temperature on the clear display, and achieve mouthwatering results.
Don’t settle for guesswork when barbecuing on your Weber Q – elevate your cooking with the Inkbird Meat Thermometer.
Check it out now and take your Weber Q baby back pork ribs to new heights!
What can you serve alongside Weber Q baby back ribs?
Blue cheese dipping sauce: The title says it all! Blue cheese combined with Lane’s sorta white sauce, sour cream, lemon juice and garlic. Hmmm, what more can I say? (Recipe to come)
Chicken and Bacon Caesar Salad: Combined with chicken, crispy bacon and a homemade Caesar dressing, this Chicken and Bacon Caesar Salad is an excellent addition to any meal.
Potato Salad with Egg and Bacon: Whether it is for just a side with a beautiful piece of steak or for a family BBQ, nothing beats this delicious potato salad with egg and bacon.
Crispy Roasted Lemon Pepper Potatoes: Looking for a mouthwatering side dish? Try Super Crispy Roasted Lemon Pepper Potatoes! Crispy, tender, and infused with tangy lemon and bold pepper flavours.
Creamy Mayo-Free Homemade Coleslaw: This simple-to-make homemade coleslaw uses natural plain yoghurt instead of mayonnaise, making it much lighter and fresher. However, it doesn’t sacrifice that classic coleslaw creaminess and flavour.
Classic Coleslaw – My Latina Table: This is a classic side dish made with cabbage, carrots, mayonnaise, and vinegar. It is a great way to add freshness and acidity to your meal.
Luna in the Kitchen – Raspberry Ice Cream Edition!
Luna, our playful Labrador, couldn’t resist the temptation of Kylie’s raspberry ice cream.
With a mischievous twinkle in her eyes, Luna schemed to sneak a lick while Kylie’s back was turned.
But, in a twist of fate, Kylie spun around just in time, catching Luna in the act.

Luna’s tongue missed the ice cream and landed right on Kylie’s nose, leaving a sweet and sticky mess.
Laughter erupted from both of them as Luna’s clever plan turned into a silly, unexpected moment.
It was a humorous lesson that sometimes life serves up the funniest surprises, even in the pursuit of a simple lick.
We’re an affiliate
We hope you love the products we recommend! Just so you know, we may collect a share of sales or other compensation from the links on this page. Thank you if you use our links. We really appreciate it!
Smoked Weber Q Baby Back Pork Ribs
Ingredients
- 1.5 kg US baby back ribs (3.3lb)
- Lanes bbq magic dust all-purpose rub
- Lanes kinda sweet BBQ sauce
- 2 tbsp Yellow Mustard
- Apple cider vinegar (for sprizting)
- Hickory wood chips (for smoking, optional)
Instructions
- Begin prepping your baby back ribs by removing the membrane from the underside. Using a sheet of paper towel, grab the membrane from one corner and carefully pull it back. The membrane should peel off easily.
- Place a convection tray and trivet onto your Weber Q for indirect cooking. Fill a smoke packet or smoker box/s with hickory chips and place alongside the ribs, then preheat on HI for 10-15 minutes.
- Add 1-2 tablespoons of yellow mustard to each side of your ribs and rub it into the meat. Then evenly sprinkle Lane’s bbq magic dust over both sides of your ribs. Gently rub it in using your fingers until fully coated.
- When you begin producing smoke from your Weber Q, place your baby back ribs onto the trivet. If they don’t fit, cut your ribs in half. Then bring the temperature down to the lowest setting.Family Q: Turn the large gas control knob off and the small gas control knob down to the lowest setting.
- Try to maintain a temperature of 107-135°C (225-275°F) at all times; place a ball of aluminium foil under the lid to help control the temperature if required. (See notes)
- After one hour, check on your baby back ribs. Give them a light spritz with a spray bottle filled with apple cider vinegar if they appear to be dry. Then close the lid and wait for a further hour.
- Two hours into the cook, your ribs should be close to 74C (165F) internally. If not, spritz again if required and cook until the internal temperature has been reached. Next, Take the ribs off the weber and lay them flat onto two large sheets of aluminium foil.
- Carefully brush Lane’s kinda sweet BBQ sauce onto both sides of your ribs, then sprinkle Lane’s magic dust over both sides for the second time. Wrap the ribs up tightly, place them back onto the grill, and leave for 1 to ½ hours.
- Once the internal temperature reaches 90C (195F) internally, remove the ribs from the foil and place them back into the Weber Q. Baste the ribs with kinda sweet BBQ sauce for the final time, close the lid and wait for the internal temperature to come up to 93C (200C).
- You should be able to see the exposed ribs underneath and the meat falling off the bone. That means they are done. Remove the ribs from the Weber Q, rest for 10 minutes and serve with the best blue cheese sauce ever!
Notes
- Tear off a sheet of aluminium foil: Start by tearing off a piece of aluminium foil approximately 6-8 inches (15-20 cm) in length.
- Crumple it into a ball: Take the sheet of aluminium foil and crumple it into a ball. This will create a small, rounded shape that can be placed between the lid and the grill body.
- Place the aluminium foil ball: With the grill closed, carefully place the aluminium foil ball on the edge of the grill body, near the hinge side, between the lid and the grill body. Position it so that it lifts the lid slightly, creating a small gap.
- Adjust the lid opening: Depending on the desired airflow and temperature, you can adjust the size of the gap by increasing or decreasing the size of the aluminium foil ball. A larger ball will lift the lid more, allowing more airflow and potentially increasing the temperature slightly.
- Monitor and adjust as needed: Keep an eye on the temperature inside the grill and adjust the aluminium foil ball as necessary. If the temperature is too low, you can reduce the size of the ball to allow more airflow. If the temperature is too high, you can slightly increase the size of the ball to restrict airflow.