Weber Q Roast Pork Belly Rolls with Crispy Crackling and Honey Gravy

Super juicy and slices like butter, my Weber Q roast pork belly rolls have it all. From the crispy crackling to the delicious honey gravy, your tastebuds aren’t going to know whats hit them.
Roasting pork belly on the Weber Q isn’t as difficult as it may seem.
Although I must admit, It did take me a few times to get this one right.
I couldn’t understand why the pork was cooking so fast before I could get the skin to crackle.
Of course, I knew that the Weber Q was designed to produce heat, a lot of heat. But I had many unsuccessful attempts.
That was until I realised I was cooking pork belly like I would cut a boneless roast pork leg.
With a roast pork leg, you roast the pork leg at higher temperatures in the Weber Q for 30 to 40 minutes, then bring the temp down for the remainder of the cook. No brainer, right?
So I thought I might try it in reverse.
I wrapped the pork belly in aluminium foil up to the skin base and cooked it in reverse. 30 minutes on low and blast it with heat for the remainder of the cook.
And it worked!
So I figured it out. By doing this, I slowed the cooking process of the meat to allow the skin more time to crackle.
Read on to see how I made the juiciest Weber Q roast pork belly!
What Ingredients do I Need to Make Weber Q Roast Pork Belly?
Surprisingly not a lot, considering the flavours you’ll experience while biting into the roll.
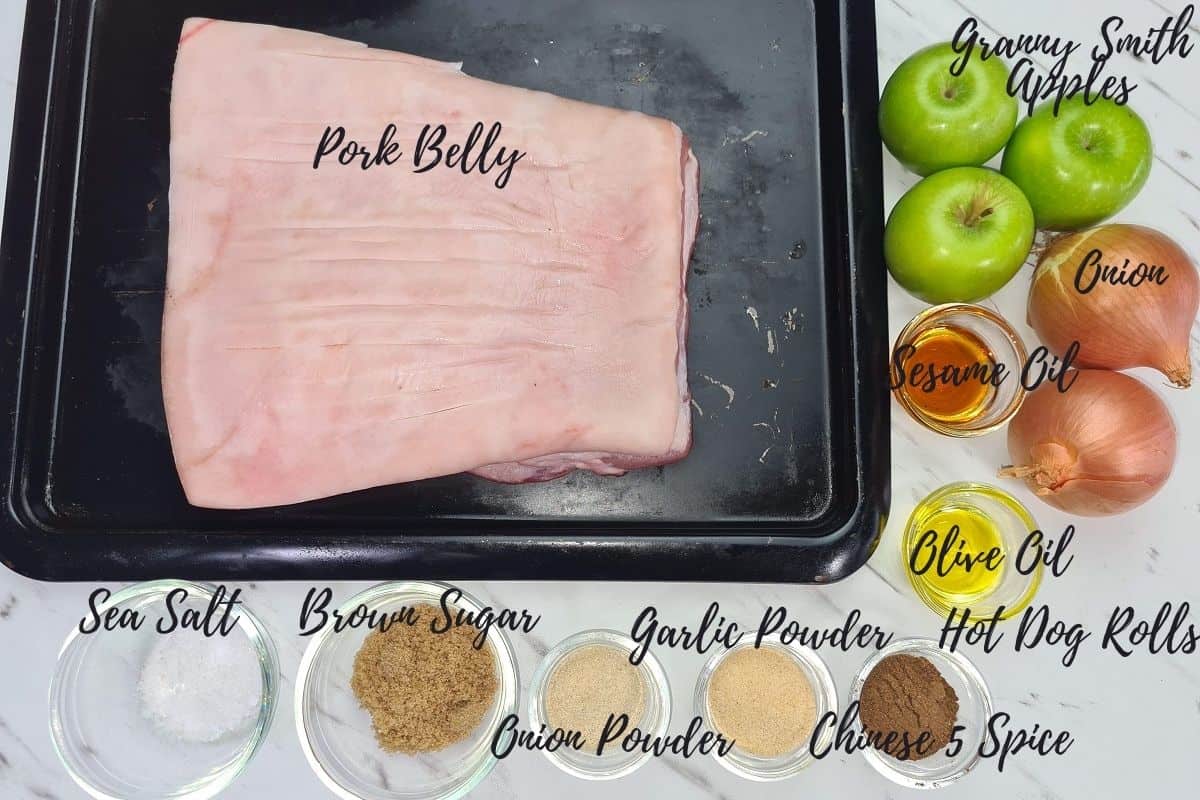
- Pork Belly
- Chinese 5 Spice
- Garlic Powder
- Onion Powder
- Onion
- Apples (Granny Smith)
- Brown Sugar
- Sea Salt
- Pepper
- Olive Oil
- Sesame Oil
- Hot Dog Rolls (Sesame Optional)
To make the honey gravy, you’ll need
- Honey
- Worcester Sauce
- Corn Flour
- A packet of Original Gravy Base
You can get the full recipe for Honey Gravy right here on JustSoYum!
How to Prepare Pork Belly for Roasting? (the night before)
Place the pork belly onto a tray lined with a sheet of baking paper.
Power Tip: When buying your pork belly, try to support your local butcher. Vacuum-sealed bags from your supermarket have already been scored for you.
And not very well, mind you!
Rub the sesame oil over the bottom of the belly, being careful not to get any on the skin.
This will give the meat a different dimension to the flavour when combined with the Chinese 5 spice herb blend.
You can make shallow slices into the meat if you like, but I found it didn’t really change the flavours.
Chinese 5 spice is a pretty potent herb blend, so slicing into the meat to get the herb blend inside is just an extra step I feel is unnecessary.
Make sure to rub Chinese 5 spices over the sides also. If you get the herb blend onto the skin, simply wipe it off.
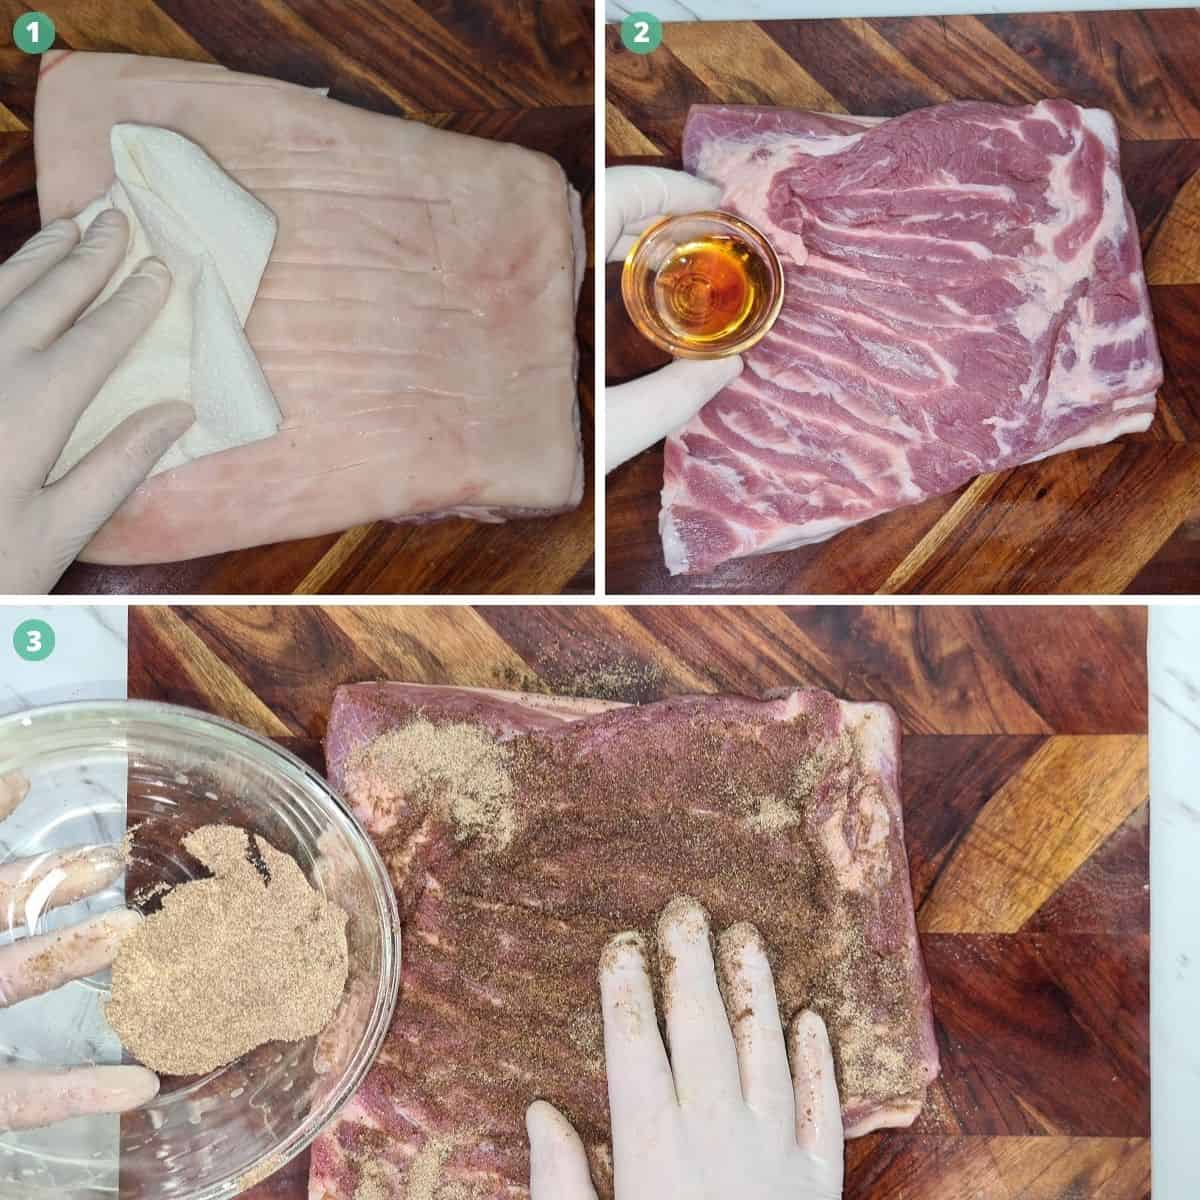
Flip the belly over, and pat it down with a paper towel. You want to get the skin as dry as you possibly can.
This is to help maximise your chances for the skin to crackle.
Completely cover the skin in salt, and if you purchased pork belly that wasn’t scored previously, salt won’t fall between the skin, making the meat too salty.
Once that is done, pop it in the fridge uncovered overnight.
This will draw out all of that extra moisture within the skin.
How to Prepare Pork Belly for Roasting? (the following day)
Take the pork belly out of the fridge at least 2 hours before the cook.
This will give the belly enough time to come up to room temperature allowing a nice even cook on your Weber Q.
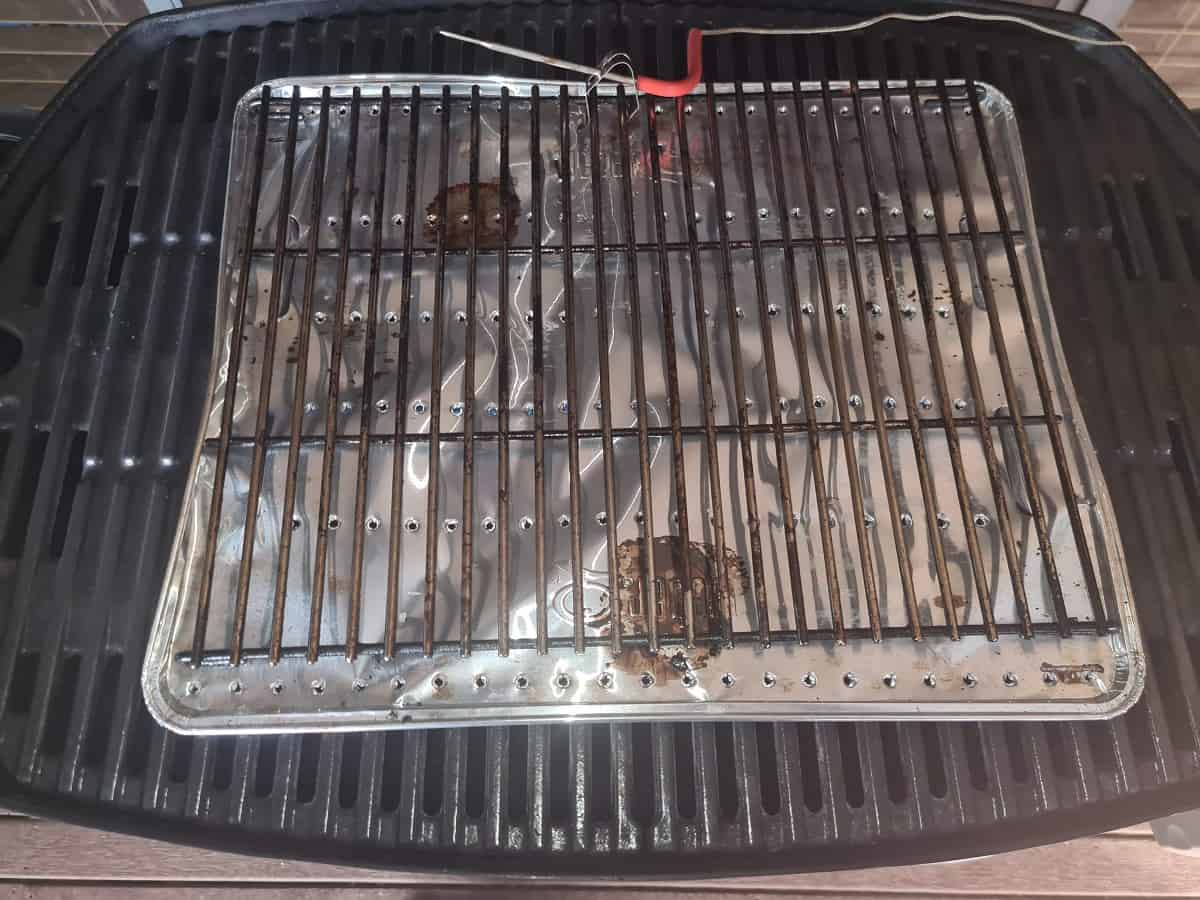
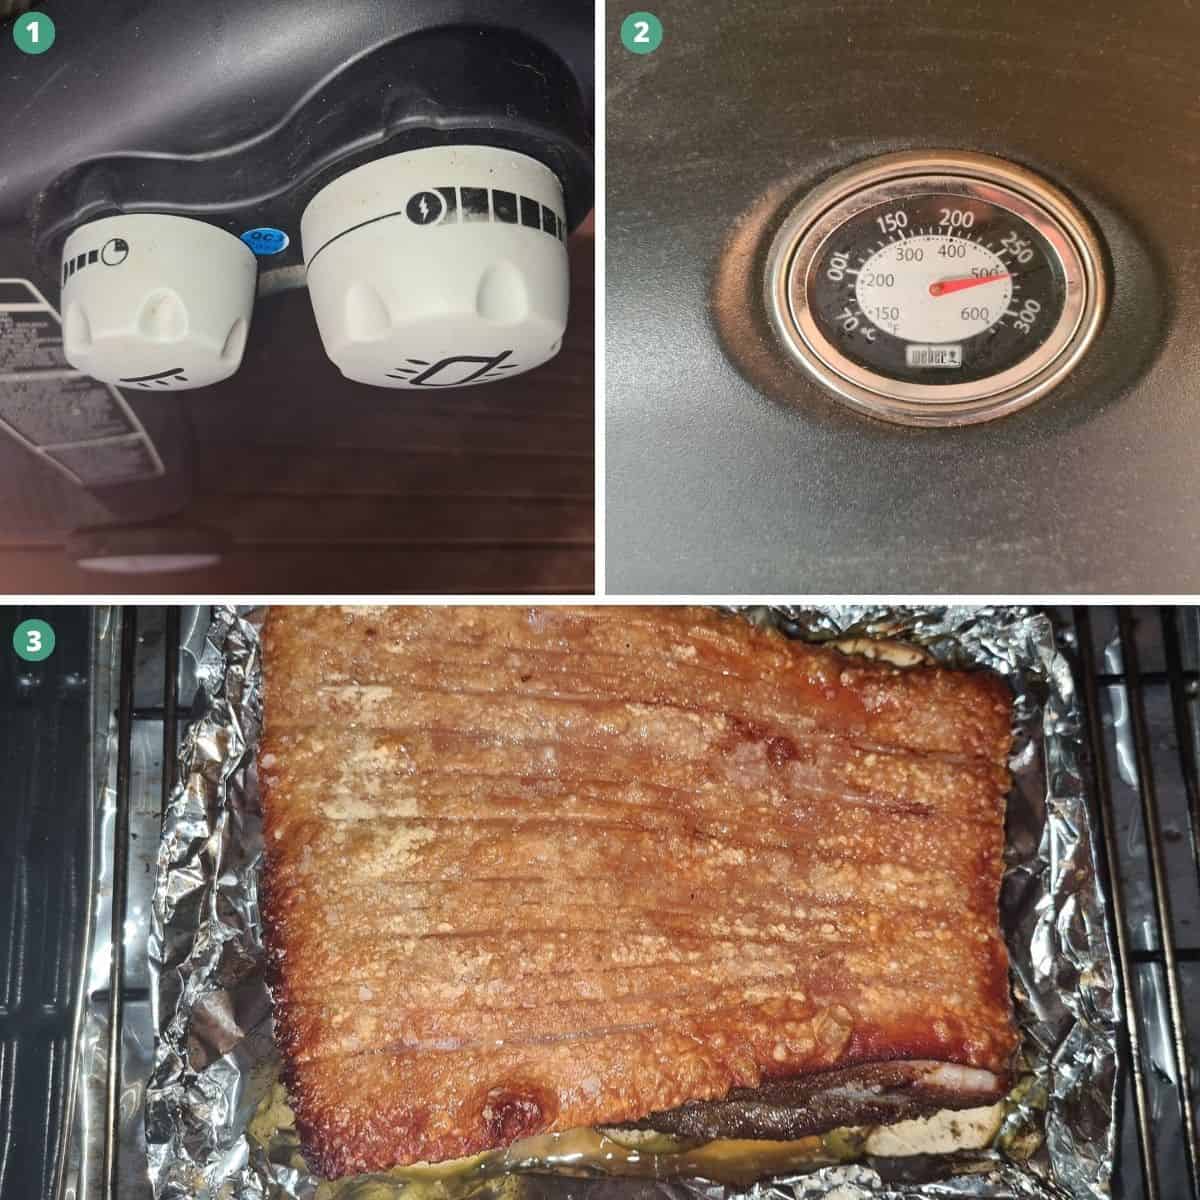
Fire up your Weber Q, place your convection tray, and trivet onto the grill to allow indirect cooking.
For Weber Family Q, turn both gas control knobs to the START/HI position.
And Baby Q and the 2000 series do the same with the single gas control knob.
Close the lid and allow your Weber to heat up for 10 minutes.
Begin scoring the skin on the pork belly with a sharp knife or Stanley blade. Try not to cut too deeply. Cutting to the top of the fat layer is ideal.
Make your cuts roughly 2cm apart.
Rub a small amount of olive oil over the skin, and rub sea salt into the score marks. Finally, sprinkle more sea salt over the skin.
Slice up the apples and onions into halves and place onto 2 sheets of crossed over aluminium foil.
Adding the apples and onion under the pork belly will add moisture, flavour and prevent the burning of the pork belly as it’s lifted instead of roasting in its juices.
Sprinkle the brown sugar over the top of the apples and onions, and place the pork belly on top.
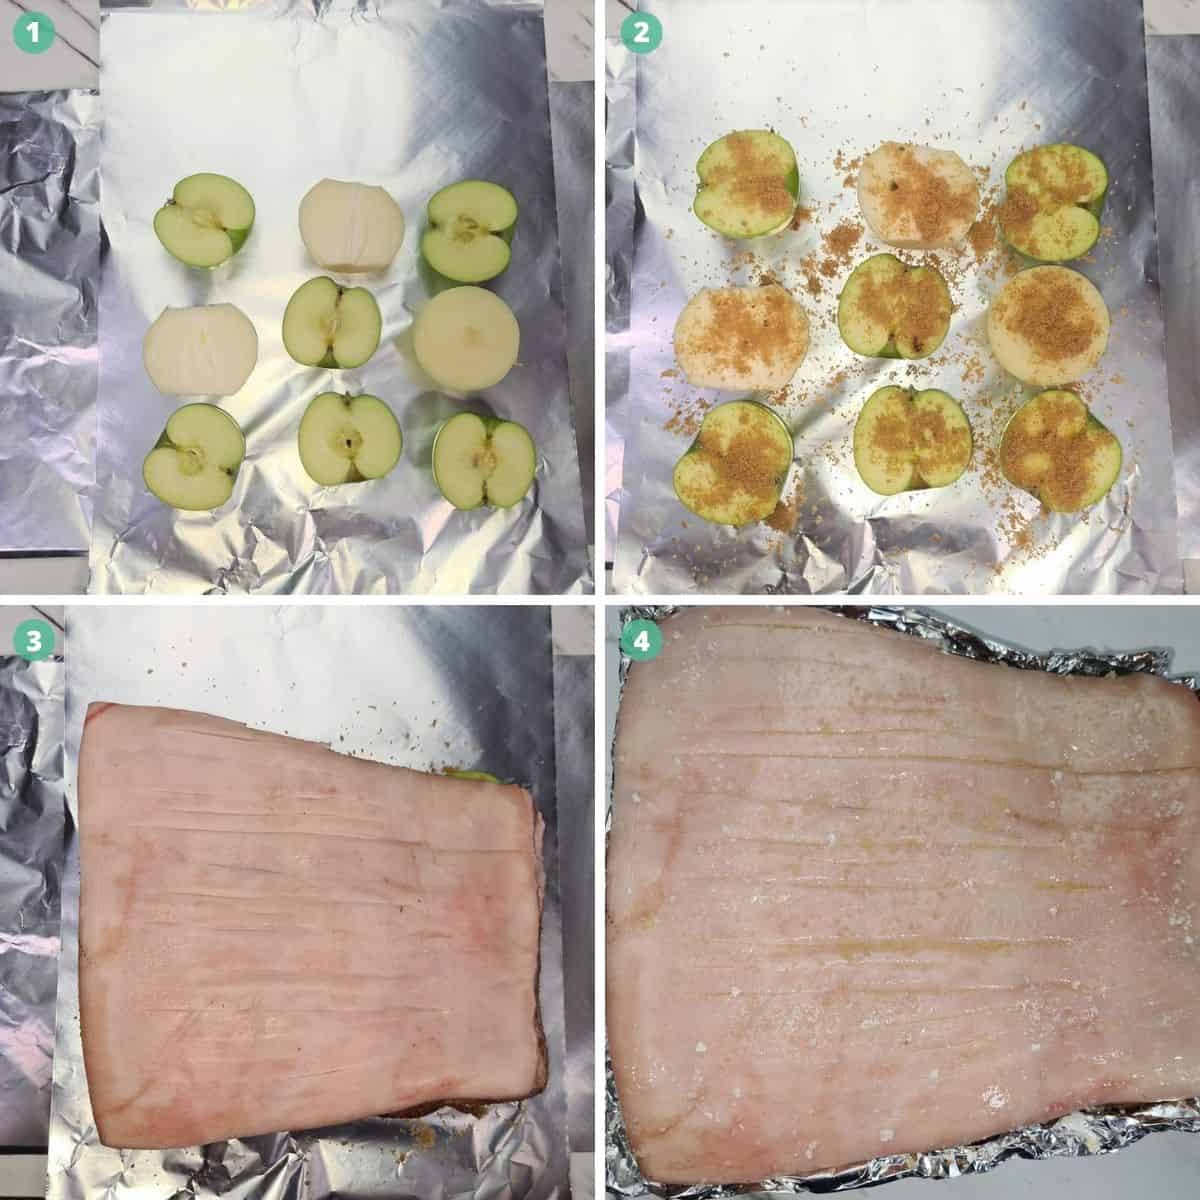
Power Tip: The apples and onions need to be roughly the same size so the pork belly can sit evenly on top. This will stop any oil pooling on the skin.
Begin folding the aluminium foil up to the bottom of the skin and pinch the corners together. You just want to insulate the meat only. Essentially making a boat for the pork belly.
Your pork belly is now ready for roasting, good luck!
How to Roast Pork Belly in Your Weber Q?
Place your pork belly onto the centre of your trivet and insert your meat thermometer into the centre if you have one in your arsenal.
I use the Inkbird IBBQ-4T Wireless meat Thermometer. This means I can enjoy a beer while monitoring the temperature of the pork belly from my phone and receive alerts when my pork belly is ready.
Another alternative is the cheaper Inkbird Waterproof Instant-Read Thermometer. The only drawback is lifting the lid on my Weber to get the temp, allowing cool air to rush in.
Close the lid. And turn the small gas control knob to the off position and the large gas control knob to low.
If you are cooking on a Baby Q or 2000 series, simply turn the gas control knob to low.
Set a timer for 30 minutes.
Doing this will slow down the roasting of the belly, give the skin time to dry out, and greater your chances of crackling during the next phase.

After 30 minutes, the internal temperature of the pork should be somewhere around 30°C (85°F) to 35°C (95°F)
Now we need to hit it with heat to crackle the skin.
On the Weber Family Q, turn the small gas control knob back on to the low setting. And turn the large gas control knob to HI.
Baby Q and Medium series simply turn the gas control knob to high.
Close the lid once again.
Power Tip: There must be no peaking during this phase. When the lid has opened, the temperature of the Weber Q will quickly plummet, interrupting the crackling process.
Once the internal temperature of the pork belly has reached 68°C (155°F), you can go ahead and take it off your Weber Q.
Allow 10 minutes for your pork belly to rest and give it time for the muscles to relax and the juices to run back in, giving you beautiful juicy pork.
Use this time to prepare the honey gravy and slice your rolls.
You can grab our Honey Gravy recipe here.
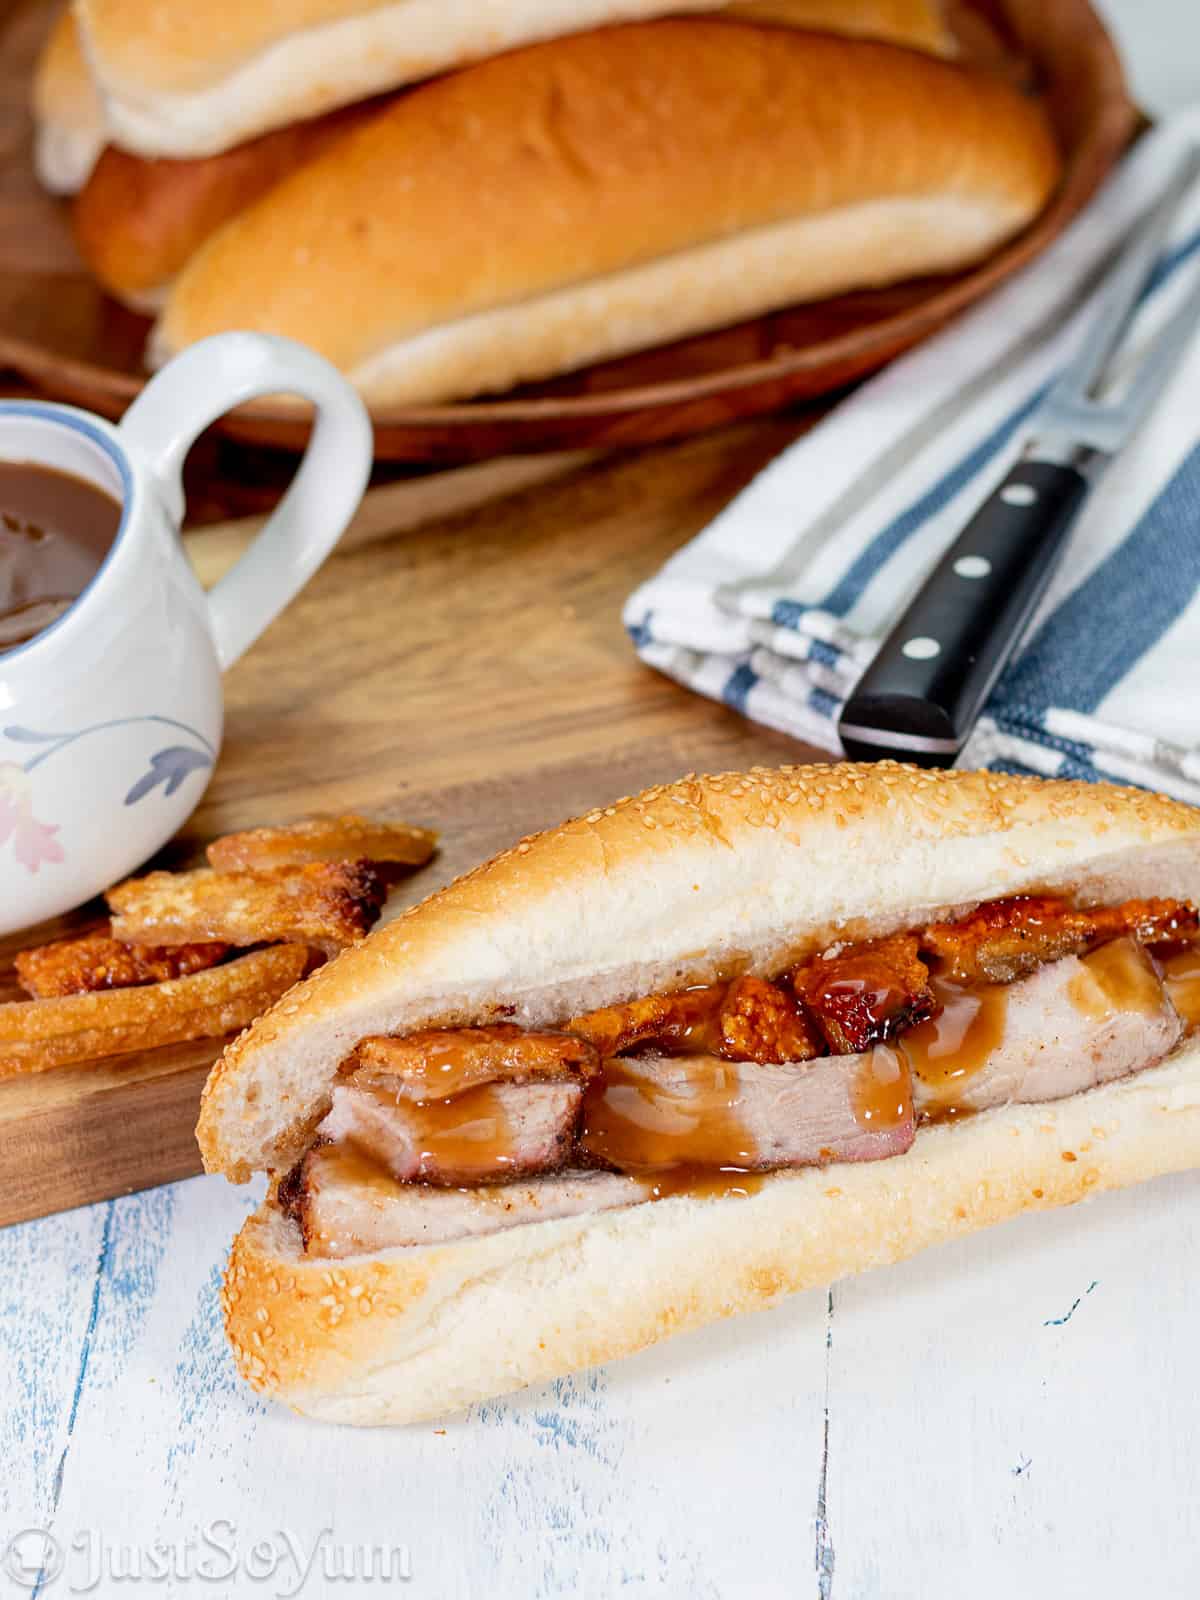
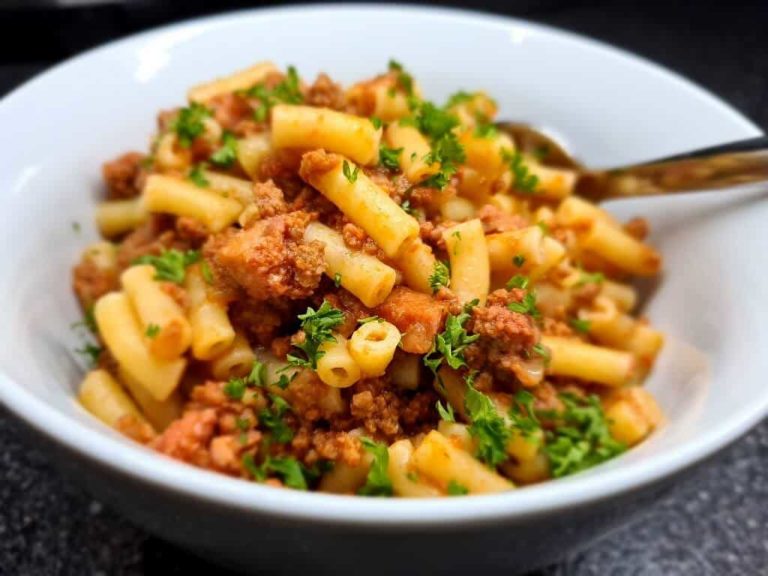
When the pork belly has rested, cut it down the score marks you made earlier and slice it up into rectangles.
Place the pork belly strips onto your roll, drizzle the gravy to your liking and enjoy!
Hot Tip: If you were unsuccessful in getting the skin to crackle, pop the pork belly under the griller on high until you achieve the desired crackling.
Please Try Some of Our Other Weber Recipes Here on JustSoYum!
Our Weber Q recipes are growing on JustSoYum, and we’ve made some beauties that you have to try.
Fully Loaded Meat lover’s Weber Q Pizza Recipe – Packed with almost every meat you can think of and topped with BBQ sauce. Yum! And goes oh so well with a beer.
Simple Weber Q Pizza Dough Recipe – I’ve shown you how to make a pizza in your Weber Q, so you will need to know how to make the pizza dough that goes with it.
Weber Q Banana and Walnut Bread – The Weber Q is so versatile, you can even bake on it. This bread is amazingly soft and tastes terrific.
Juicy Weber Q Roast Lamb with Garlic and Rosemary – Melts in your mouth. The rosemary and garlic are an added touch to boost the flavours of the lamb.
Super Crunchy Weber Q Roast Potatoes: It’s crazy how crunchy these spuds really are. Light and fluffy on the inside and golden brown and delicious on the outside. They are just the perfect crunch.
We’re an affiliate
We hope you love the products we recommend! Just so you know, we may collect a share of sales or other compensation from the links on this page. Thank you if you use our links, we really appreciate it!
Weber Q Roast Pork Belly Rolls

Ingredients
- 1.5 kg Pork Belly
- 2 tbsp Chinese 5 Spice
- 3 Apples Granny Smith (see note 1)
- 2 Brown Onions
- 2 tbsp Brown Sugar
- 1 tbsp Sesame Oil
- 1 tbsp Olive Oil
- 1 ½ tbsp Table Salt For Meat
- 1 tbsp Sea Salt For Crackling
- ¼ tsp Black Pepper
- 6 Large Hot Dog Rolls Sesame (optional)
Instructions
Preparing The Pork Belly (the night before)
- Place the pork belly onto a tray and pat it down with a paper towel. Begin by drizzling sesame oil over the meat and rubbing it in. Try not to get the sesame oil onto the skin. Then rub the Chinese 5 spices and pepper in, making sure you cover all of the meat, including the sides. Keep the skin clear of any rub.
- Flip the pork belly over and sprinkle table salt onto the skin, making sure it completely covered in salt. Pop it into the fridge overnight uncovered to give the skin time to dry out and the meat to marinade.
Preparing The Pork Belly (the following day)
- Take the pork belly out of the fridge at least 2 hours before cooking to allow it to come up to room temperature.
- Place a clean convection tray and trivet onto the centre of the grill.
- Preheat your Weber Family Q by turning the large & small gas control knob to the START/HI position and fire up your Weber Q.Do the same with the single gas control knob if you are cooking on the Baby Q. Close the lid and allow 10-15 minutes to preheat.
- Pat down the skin to remove the salt and any excess moisture. Using a sharp knife or blade, begin scoring the meat in straight lines 2cm apart from top to bottom. Try not to cut past the fat layer.
- Drizzle olive oil over the skin, then sea salt and rub it over the skin making sure to get it into the score marks.
- Cut the apples and peel the onions, then slice them in half. There is no need to remove the core. Just remove any seeds.
- On 2 crossed over sheets of heavy-duty aluminium foil, place the apples and onions onto the aluminium foil (see note 1). Sprinkle the brown sugar over each apple and onion. Then rest the pork belly on top.
- Lift the ends of the aluminium foil to the sides of the pork belly to begin making a boat. Only roll the foil up enough to cover the meat. Pinch each corner together to hold the foil into place until the meat covered on all sides relatively tight.
Cooking Pork Belly On The Weber Q
- Lift the lid on your Weber Q and place the pork belly onto the centre of the trivet. Insert a meat thermometer into the thickest part of the belly.
- Close the lid on the Family Q and turn the small gas control knob off and the large gas control knob to the low position. Do the same with the Baby Q using the single gas control knob.
- Maintain a temperature between 180°C (355°F) and 200°C (390°F) for 30 minutes.
- After 30 minutes, turn the small gas control knob back on and turn it to the low position and the large gas control knob to HI.And the large single gas control knob to the position on the Baby Q.
- For the remainder of the cook try to maintain a temperature between 240C (465°F) and 260C (500°F) until the belly reaches an internal temperature of 68°C (155°F). This will give the skin time to crackle.
- Take the pork belly out of the boat and set aside to rest for 10 minutes.Slice the pork down the score marks. Cut the strips into quarters, and place them onto the hotdog rolls. Drizzle with our delicious honey gravy recipe and serve.
Notes
Alternatively, you can leave a comment below and let us know how you went.


Hi. This sounds lovely and I can’t wait until I try it. What do you do with the apples and onions once cooked?
The apples and onions are simply for added flavour to the meat. Just dispose of them.